

Introduction: Servodriver-Board With Python-GUI and Arduino

When doing prototyping or building model aeroplanes, you often come across the problem, that you have to check servo travel or set servos to the mid position.
In case you don't wont to build up your entire RC-system or test, how far you can push the servo or where the midposition is, then this board is for you! It allows you to move the servo to specified positions or let's travel back and fro.
It works surprisingly well, even with 6 servos that race from one position to another in the loop.
Also, its a nice project to learn about communication between Python-GUI and Arduino using Serial.
Step 1: What You Need...
For this project, you will need the following:
Hardware
- Arduino nano with cable. I used a clone, and the Python code actually expects a CH340-chip of a clone
- A prototyping board. 7x5cm is enough
- Some 2,54mm headers and pins
- 1-6 servos
- Power supply for the servos (I used a batterypack with 4 batteries)
Software
- Python 3: https://www.python.org/downloads/
- A USB-Driver for the CH340-chips: Just google for drivers for CH340 drivers
- Arduino IDE: https://www.arduino.cc/en/Main/Software
Step 2: Soldering the Board
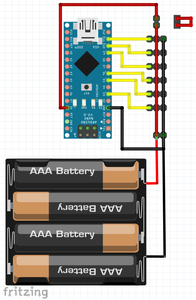
The soldering is actually straight forward according to Fritzing on the picture. Just make sure, that you can hook up the servos easily to the 3-pin-rows.
- The 3-pin-rows are attached to digital pin 3, 5, 6, 9, 10 and 11 of the Arduino nano.
- The red wire is attached to the 5V-pin of the Arduino
- The black wire is connected to the GND-pin of the Arduino
- The pair of pins below the 3-pin-rows are meant to attach a typical RC-receiver power supply, you can add connectors as you like, like screwing terminals, XT-Connectors, JST or... or...
Personally, I like rows of female headers to put the Arduino in, but that's up to you.
Please note, that the shorted female headers are a jumper, that let you supply the servo using the 5V-source of the Arduino for testing purposes. If you strain it too much, the Arduino will reset and loose the right pace. They MUST be removed, before attaching another power supply.
Step 3: Setting Up the Arduino
Install the Arduino IDE and flash the Arduino nano with the attached sketch.
Attachments

Step 4: Setting Up Python
Install Python 3 after Downloading it. Make sure to check the option to create a "PATH"-variable.
You need to install two more packages using pip. For that, press the "Windows"-key, type "cmd" and hit "enter". In the command prompt type the following commands:
- pip install serial
- piip install pyserial
- pip install tkinter
As you can see, I need the modules serial as well as pyserial, which is most likely not the most efficient, since pyserial should replace serial. Nevertheless it works and I am just starting to learn ;).
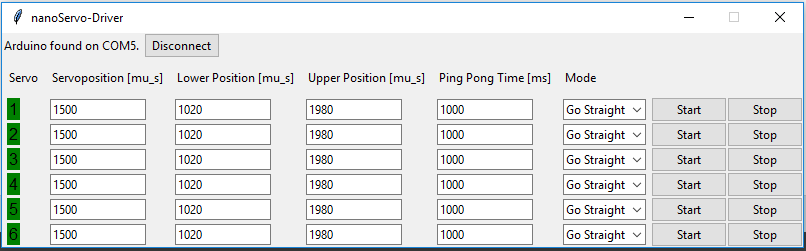
Open the Python-Script in the IDE und run it, or run it straight from the terminal.
In the drop-down menu, you can choose between two modes, "Go Straight" and "Ping Pong":
- Go Straight: Enter a Servo-Position in microseconds in the first column and hit "Start" to make the servo move to the specified position.
- Ping Pong: Enter a lower boundary and an upper boundary in the second and third column. That are the lower and upper position, between which the servo will go back and fro. In the column "Ping Pong Time" you can specify a time in milliseconds, that the servo will wait when it has reached the upper or the lower position. Hit "Start" and the servo will start moving back and fro, hit "Stop" and the servo will stop.
Attachments
Step 5: Where the Magic Happens
Last but not least, I want to point out some of the details ins the code for those, who want to get into a bit of serial communication between Python and Arduino.
Now, what happens in the Python programm?
First of all, the programm checks, what is attached to the COM-ports in this line and saves it to a list:
self.COMPortsList = list(serial.tools.list_ports.comports())
Then it loops through the list until it finds a notorious CH340-chip, saves it and then establishes an serial connection after the for-loop. Note, that the for-loop breaks as soon as the first CH340 is found.
for p in self.COMPortsList:
                if "CH340" in p[1]: # Looking for a Arduino Clone
                    self.COMPort = p[0]
                    break
                else:
                    pass
            self.Ser = serial.Serial(self.COMPort, 57600)
The serial connection is established with the COM-port with a baudrate of 57600.
And what does the Arduino code do? Well, since the Arduino has only one COM-Port, the serial connection is only one line:
Serial.begin(57600);
Now, we can use the both ports to communicate. In this very case, only messages from the Python to the Arduino. The messages are sent here from Python. The serial connection transmits bytes as a default. That's also the fastest way of sending data and as far as I know also still pretty widespread. So the ints for the number of the servo (so the Arduino knows which servo to move) and the position in microseconds are turned into an byte.
Command = struct.pack('>B', self.Place) # The int-variable "self.Place" is turned into an byte
self.Ser.write(Command)			# Writing the byte on the Serial-Port
Command = int(self.ServoPos.get())//10	# Reading the Input from the field and turn in int
Command = struct.pack('>B', Command)	# Turning the int in an byte
self.Ser.write(Command)			# Writing the byte on the Serial-Port
Also, parsing data takes time (for example interpreting four bytes "1", "2", "3" and "0" as the int 1230, not as four different chars) and it is better to do that not on the Arduino.
On the Arduino-side, the information sent are picked up as following:
if(Serial.available()>1){	// If serial data is available, then the loop is entered
    c = Serial.read();		// The first byte (number of servo) is saved to a variable
    Micros = Serial.read();	// The position of the servo is saved here
    Micros = Micros * 10;
  }


