

Introduction: Setting and Using Homing Switches for Industrial CNC Routers


While Limit switches are not required to operate your Industrial CNC Router System, enabling them for homing does give you the ability to have a repeatable home position, which is very handy if you're working with offsets, jigs, or any attachment. It also allows you to easily keep your soft limits working correctly if for any reason you lose coordinates.
Step 1:

There is one switch for each axis. You should be able to see them if you remove the cosmetic covers from the Left Side and over the spindle itself. The Y and Z Switches will trigger when they come close to the metal tab on those axes. Moving your axes to the Front (Y) Left (X) and Top (Z) will touch those tabs to the switches. If they don't touch, you may need to adjust them so they do.
Enabling the switches is done in Mach 3 by selecting "Config" from the top menu, selecting "Ports and Pins" from the Pull Down Menu, and then selecting the "Input Signals" Tab. You'll want to see that the rows marked X Home, Y Home, and Z Home, are enabled with a green check mark. You will then assign each of these rows to "Port 1/Pin 10" as shown in this screenshot. Hit "Apply" and then "OK"
Step 2:

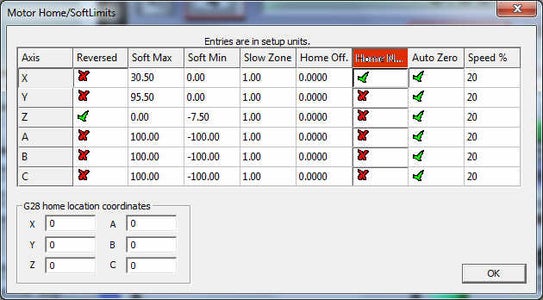
You will then want to return to "Config" in the Top Menu and select "Homing Limits" From the Drop Down Menu" Make sure that "Auto Zero" is checked with a green Check for X, Y and Z rows as in this screenshot:
Step 3:
Hit the "OK" Button when finished. Your Homing Switches are now enabled.
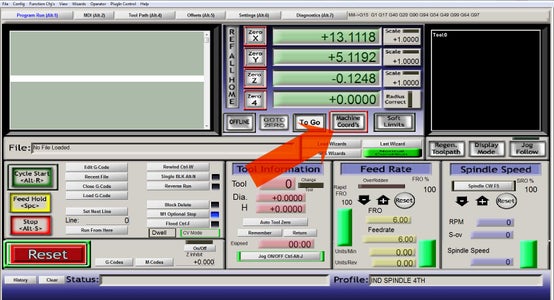
Keep in mind that these switches set your "Machine Home" not your "Job Home" (which is set every time you start a job, by touching the bit to the surface of the material and zeroing each axis individually with its own button.) Under normal circumstances your Machine home doesn't need to be changed. Because of this fact there is only one way to start the automatic homing routine. To start the machine homing, you must first make sure that the "Machine Coordinates" Button on Your Mach "Program Run" screen is showing your Machine Coordinates. You'll find the button directly underneath the X, X, and Z Coordinates DRO's (Digital Read Out.) When it's on Machine Coordinates it will be bordered in Red. See Screenshot below:
Step 4:

You're now ready to start the Automatic Homing Routine. This is started by pressing the "Ref All Home" button, which is the vertical button to the left of the X,Y, and Z Zero Buttons. See Screenshot below:
Step 5:
Your machine will start moving in the "Z" Direction, until it reaches the Homing Switch at the top. It will then start moving on the Y Axis, coming towards the front of the table, until it reaches the Y homing switch. It will then move on the X axis, towards the Left of the machine. When it reaches the X switch, all Machine Coordinates should be set to zero.
Note: Make sure that each axis is moving towards the switch for that axis.
Z= towards the Top
Y = toward the Front
X = towards the Left
If any axis is moving in the wrong direction, stop the routine by hitting the "Reset" button, and go to the Config/Homing Limits screen. Select the row for the axis that's going the wrong way, and check/uncheck the Home Negative column for that axis. See screenshot below:


