

Introduction: Setting Up a Local Webserver on Your Computer

If you work with website development, it is very helpful to be able to edit pages directly on your computer without having to constantly upload them to a server. Unfortunately, many server-side technologies (like generating pages with PHP or accessing databases with SQL) require special software that is complicated to set up on a normal computer.
Fortunately, there are shortcuts. This Instructable will guide you through the processing of installing, configuring, and using a local offline webserver on your computer.
(Note: these instructions are aimed at beginning web developers just getting into server-side programming, so they assume that you have basic computer skills and some experience working with HTML files and the like.)
Materials Required
- A computer running Microsoft Windows
- An internet connection
- About 400 MB of free hard disk space
Time Required: 5-15 minutes, plus however long you want to tinker with it.
Step 1: Download WampServer

Installing all the individual pieces of software you need and configuring them to work together can be daunting. WampServer is a software package that can do almost all of this for you: it installs Apache, PHP, and MySQL, and provides a simple interface to use them.
- Navigate to www.wampserver.com/en.
- Click the word "download" at the top of the page.
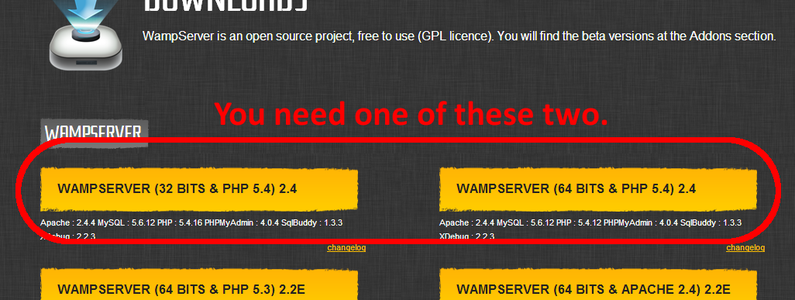
- Click the WampServer version you need. (There are several versions with subtle differences that you should not need to worry about; just look at the first two options on top. If you know you have 64-bit Windows, click the 64-bit version; otherwise, click the 32-bit version.)
- Actually getting the installer to download can be confusing, because (as of March 2014) this portion of the website is glitchy and partly in French. Look for the small link labeled "you can download it directly" at the top of the popup and click it. You should be taken to a SourceForge page that will automatically start downloading the installer.
You should not need to worry about any of the warnings on the popup, except perhaps for the first one (about the Visual C++ runtime.) The Visual C++ runtime is a standard piece of software that is required to run many programs, so your computer probably already has it. If WampServer will not run, however, you may need to come back to this step and install it - just follow one of the links in the first warning (depending on whether you have 32-bit or 64-bit Windows) to download and install it.
Note: Although you need several hundred megabytes of free space to run the software, the actual installer is only about 35 MB.
Step 2: Install WampServer

- Run the installer you just downloaded.
- You can leave all the options on their defaults and just click through it, but stop when you get to the page titled "Select Destination Location." This page is important. After you install WampServer, you will have to put all the files you want the server to "see" in a special folder inside the one you're selecting in this step. Therefore, you want to install WampServer somewhere you can easily access. This is a matter of personal preference, but you may prefer to change the install location to somewhere like a subfolder of your Documents folder.
- Once you're happy with where WampServer will install, click through the rest of the installer.
Step 3: Start the Server

Start WampServer. (If you told the installer to create a desktop icon, click that; otherwise, you can go to the Start menu and search for "wamp.")
Note: Unlike some server packages, WampServer does not start automatically when you log in. You will need to start it manually whenever you restart your computer and need to use your server.
Step 4: Use the Server Folder


For the server to be able to "see" your files, you need to put them in WampServer's "www" folder. You can find it in the folder you installed WampServer to (see the first screenshot.)
There is also a shortcut to access this folder:
- Left-click the WampServer icon in the system tray.
- Click the "www directory" option.
Step 5: Access Your Files

While WampServer is running, the files in the "www" directory behave like a regular website, which you access through the "localhost//" domain. For example, you might do something like this:
- Create a folder called "test" in the "www" folder.
- Create an HTML file called "sample.html" in the "test" folder, with whatever contents you prefer. (In the screenshot above, the file just contains the text "Hello world!")
- Open a web browser and type "localhost//test/sample.html" into the URL bar to see the file, as in the screenshot above.
Now, you can build and test complete websites with PHP and SQL without having to upload anything to a webserver.
To learn more about specific web-development topics like HTML, CSS, and PHP, visit www.w3schools.com.


