

Introduction: Setup GizDuino for Ubuntu Mate Desktop


A week ago, I finally decided to switch my old laptop's OS to Ubuntu Mate (32 bit).
My plan was to use it for my GizDuino project and other electronic hobby. But then I was faced with the problem of hooking up the MCU using Linux - mainly because the patches and instructions were mainly focused on Windows.
I have put in here together the details I've gathered from world wide web to make things easier to get started with your GizDuino projects using Ubuntu Mate OS.
Notes:
1. Ubuntu Mate Desktop 1.10.2 is the OS version.
2. GizDuino 5 with 328P MCU is the Arduino clone.
Step 1: Setting Up Prolific Driver


This will basically setup the device and the usb port to be used in Arduino IDE.
1. Open Terminal and run dmesg. This will check the devices connected in your laptop - see the first image.
2. If the device was connected and was detected you would need the get the USB ID by executing lsusb - see the second image.
3. Setup the usb serial by running sudo modprobe usbserial vendor=0xID and before :> product=0x:> e.g. sudo modprobe usbserial vendor=0x067bproduct=0x2303 - see the third image.
4. Run dmesg again to check if the device was setup properly.
The instructions here were mainly base on this post:
http://forums.reprap.org/read.php?12,4546
Step 2: Setup Arduino Boards Options
When installing Arduino IDE, the arduino folder is typically located in /usr/share/arduino.
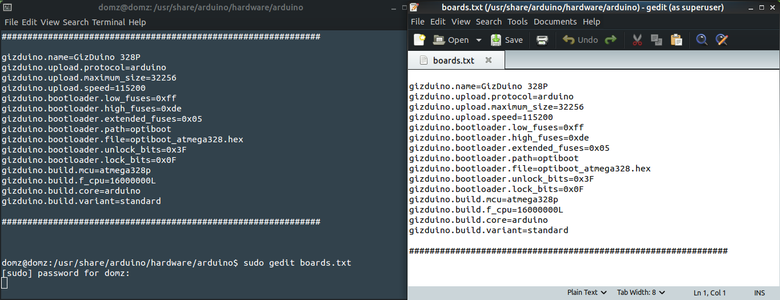
To create/modify the available boards in the Arduino IDE, we will need to update the boards.txt file located in /usr/share/arduino/hardware/arduino and include lines for GizDuino.
1. Create a backup copy of the boards.txt file by running sudo cp /usr/share/arduino/hardware/arduino/boards.txt /usr/share/arduino/hardware/arduino/boards.bkp on Terminal.
2. gedit should be installed to proceed, modify the file by running sudo gedit /usr/share/arduino/hardware/arduino/boards.txt. Alternately, you may use vi, etc to modify the file. Remove or comment the lines where you don't need and add the following:
##############################################################
gizduino.name=GizDuino 328P gizduino.upload.protocol=arduino gizduino.upload.maximum_size=32256 gizduino.upload.speed=115200 gizduino.bootloader.low_fuses=0xff gizduino.bootloader.high_fuses=0xde gizduino.bootloader.extended_fuses=0x05 gizduino.bootloader.path=optiboot gizduino.bootloader.file=optiboot_atmega328.hex gizduino.bootloader.unlock_bits=0x3F gizduino.bootloader.lock_bits=0x0F gizduino.build.mcu=atmega328p gizduino.build.f_cpu=16000000L gizduino.build.core=arduino gizduino.build.variant=standard
3. Save the changes.
The details listed here were patterned from:
Step 3: Congrats! You Made It.


You should now be able to use the USB and the boards you have updated with your Ubuntu Mate OS.
Upload a sample sketch to verify the completion of the setup.
Enjoy.


