

Introduction: Shrinkify Your Arduino Projects | Arduino UNO As ATmega328P Programmer (https://youtu.be/YO61YCaC9DY)


Video Link: https://youtu.be/YO61YCaC9DY
Programming ATmega328P using Arduino as ISP ( In-System Programmer) allows you to use Arduino features on a breadboard or PCB. It mostly helps when you are making your college project. It reduces the cost of project and size as well. So simply do the testing on Arduino and finalize the project on ATmega328P. Programming ATmega328P using Arduino as ISP it takes only a few steps. Before proceeding to program part you should know what is Bootloader.
The bootloader in Arduino/ATmega328P: The bootloader is a sketch that is programmed into the programmable flash memory of the Arduino/ATmega328P (and occupies 4380 bytes out of the available 32KBytes). It is what differentiates an Arduino ATmega328P and a normal factory Atmega328P. The Arduino bootloader runs when the board is powered ON (or when we press the reset button). This bootloader initially waits for a new sketch on the serial port from the Arduino IDE, if it gets something, the new sketch is burned into the flash memory or else it runs the sketch which was previously burned. Most Arduino microcontrollers have the function of auto Reset which allows the Arduino IDE to reset and upload code. The bootloader has to only understand what the Arduino IDE is sending and write it to the flash memory of the microcontroller. To burn code on an Atmega328P without the Arduino bootloader, you would need an ISP programmer such as AVR ISP.
So here we will basically burn the bootloader to newly bought ATmega328P and then use Arduino as ISP to burn the desired sketch in ATmega328P.
Steps to use Arduino UNO As ATmega328P Programmer:
Step1:Upload ArduinoISP code in Arduino UNO.
Step2: Make basic breadboard setup for ATmega328P.
Step3: Burn Bootloader.
Step4: Upload your code to ATmega328P.
Step 1: Upload ArduinoISP Code in Arduino UNO


ArduinoISP is a sketch that works as a bootloader sketch after burning it into the flash memory of ATmega328P. First of all, verify the setting as follows:
Board: "Arduino/Genuino Uno"
PORT: "COM2" // Yours might be different
Programmer: "AVRISP mkII"
Then go to File > Examples > ArduinoISP > ArduinoISP
And upload it to Arduino Uno.
Step 2: Make Basic Breadboard Setup for ATmega328P
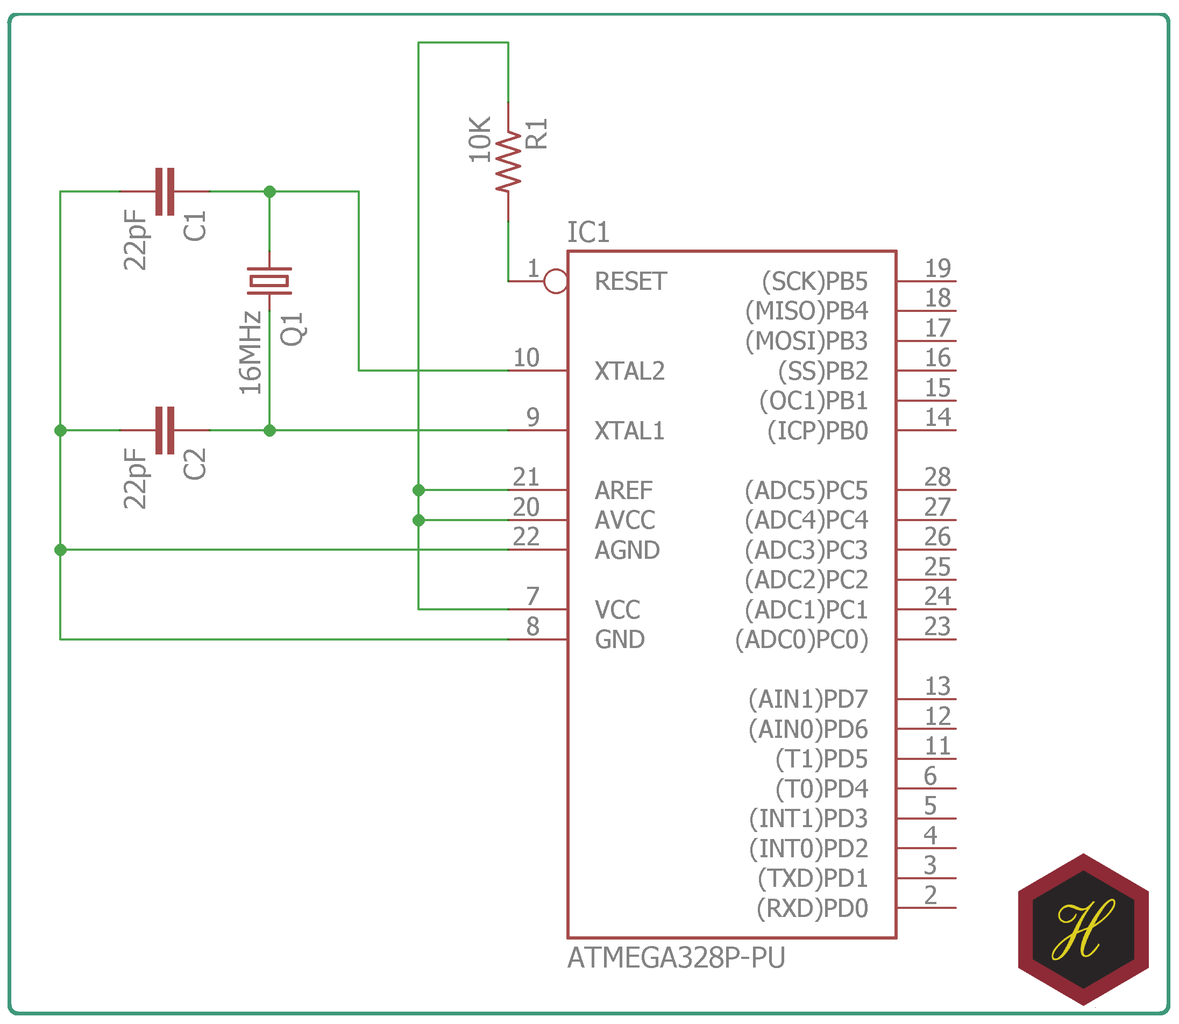
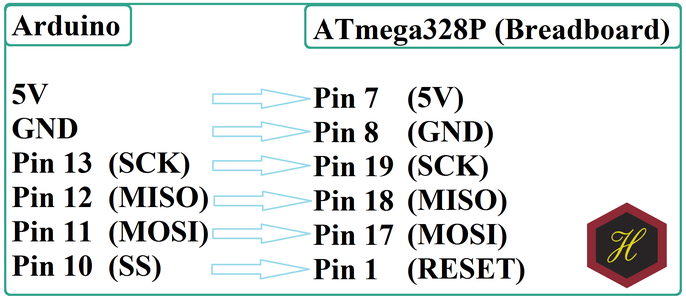
Above is the basic configuration of ATmega328P to be functional. After setting up the breadboard, it’s time to connect this breadboard unit with Arduino. Now follow the connection given above in figure to connect Arduino and breadboard circuit.
Step 3: Burn Bootloader

Hopefully you have understood the use of burning bootloader. We need to burn bootloader only ones and afterward program ATmega328P as many times as you want without burning bootloader again. Now it’s time to burn the bootloader. Modify tools settings as shown in the picture and then Burn Bootloader.
Step 4: Upload Your Code to ATmega328P.


Open the code you want to upload.
Keep tools setting same as that of burning bootloader process.
Now upload code to ATmega328P by using "Shift + Upload".
So this is how you can Program ATmega328P using Arduino Uno.
If you have any doubt, feel free to ask in the comment section.
Downloads:
Buy:
ATmega328P from Amazon India: http://amzn.to/2rKvzTV
Arduino Uno Original from Amazon India: http://amzn.to/2rKvzTV
Low-cost Arduino Uno from Amazon India: http://amzn.to/2rKvzTV

Participated in the
First Time Author Contest


