

Introduction: Simple Crosscut Sled


In this video I make a cross cut sled using Kregs Precision Trak and Stop Kit.
This is a very simple afternoon build without the bells and whistles. The Kreg precision Trak adds a versitile stop block system that allows for fast repeatable cuts. The sled itself is made from a half a sheet of 3/4" plywood, so it is very affordable.
Materials
- 3/4' Plywood
- Glue
- 1 1/4" Screws
- Kreg Precision Trak Kit
- Mitre Rails
Tools
Check out the video for a full walk through.
Step 1: Cut List

Break down your sheet goods into manageable lengths using your choice of a table saw (or circular saw. It is recommended to use a guide system with a circular saw. create your cut list to the designated dimensions.
Step 2: Back Fence

Pre drill and countersink one of the 20" x 4" piece of ply and glue and screw it to the other to create the back support for the sled
Step 3: Attaching Mitre Tracks

lay your mitre tracks in your mitre slots on your table saw. Then align your fence to 20" so the blade is centered in the sled ( you can adjust this for your own preference if you would like, I chose the center because i wanted 20" to the left of the saw blade)
Step 4: Attaching Mitre Tracks Pt.2

Align the front of the sled base with the front of the mitre slot tracks. Screw the first one in using the proper length screws, and making sure to keep the base flush against your fence. After you fasten the first screw, slide the sled out and fasted the second, then flip the whole sled over for the final screw. This isn't particularly important it is perfect because you can adjust the fence later. Make sure the sled slides smoothly and adjust your tracks accordingly.
Step 5: Attaching Front Fence

Attaching the fence at this stage is simple. Counter sink a hole at each end of the base and fasten the 2 1/4" thick board to the back of the sled on each end. Do not over tighten, this pivot will be how you adjust your sled in the next step.
Step 6: Raising the Blade

Raise the blade slowly through the center of the sled making sure to keep your hands clear. Once the blade breaks the surface go ahead and slide the sled forward and back to give a reference of where the blade will be. DO NOT CUT THE WHOLE WAY THROUGH THE BASE OF THE SLED ON EITHER SIDE!!!!
Step 7: Attaching Back Fence

Attach the back support. Make it as square as possible, this piece isn't used for reference and is not 100% crucial to be perfectly square. So give it your best judgement, countersink and fasten using screws.
Step 8: Squaring the Sled

Using the 5 cut method, square a piece of scrap wood on the saw as it stands. Make any adjustments needed to square the sled. Once adjusted , countersink and fasten down the fence. There is a link in the extras folder for the 5 cut squaring method in great detail
Step 9: Attaching Stop Track

Pre drill your precision track and attach it to the fence. You will need to cut 8" off of one of the track pieces to fit this 40" sled, this can be done on your mitre saw. The metal is soft and easily cuts.
Step 10: Front Support

Add the support piece to the rear of the sled using countersunk screws. Avoid screws near where the blade intersects the fence.
Step 11: Blade Guard

Countersink and attach the 6" x 2 1/2" piece of 2x4 where the blade exits the back of the sled.
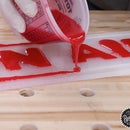
Step 12: Waxing the Sled


