

Introduction: Simple Portable Bluetooth Speaker


Hi everyone! Thanks for tuning in this project of mine, I hope you'll like this one and learn something new!
After thinking of how I got into building speakers the first thought that comes to my mind is Barry Llewellyn's projects that really caught my eye and inspired me to build my own. Therefore I thought I would try to make my version of a small yet relatively simple portable Bluetooth speaker, which Barry has made on his Instructable. My take on this project includes designing my own panels, removable back, adding a few indicator LEDs, a nicer switch and a magnetic charger which not only does look awesome but also performs great.
Step 1: Build Plans and Parts

I did have to go over a few changes during the build since I didn't have it planned that well at first. You can see that in the video the back panel had an AUX port and a different layout than on the finished speaker. After trying to put the extra components for the AUX port, I noticed that I would simply be too difficult for the average DIY'er to cramp so much wiring in such a tiny enclosure, therefore I have removed the idea of the additional AUX jack input and only left the Bluetooth connectivity. Also, after completing this speaker for the first time I have noticed that the LED battery capacity indicator is not as useful as I have thought it would be - the LEDs are dim and the switch does not always make a proper connection, requiring a firm push on the button sometimes. Therefore I have simplified the design removing the unnecessary components.
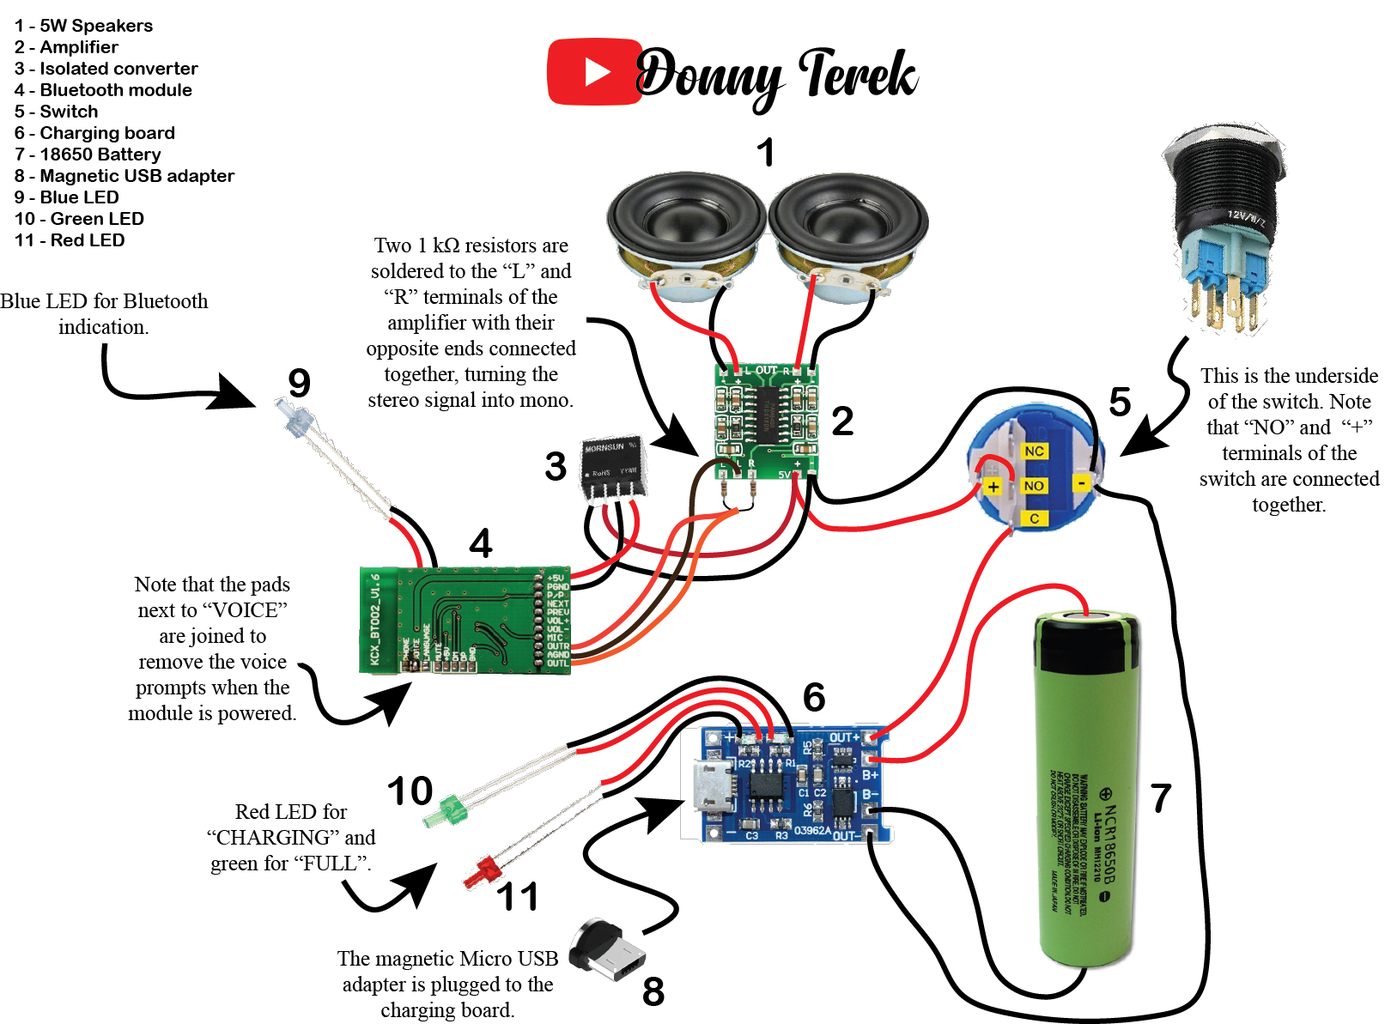
As always, I have included the laser cut plans and the wiring diagram below. Feel free to download or print it and make sure you zoom in for a better view. Just to make sure the dimensions on your device are shown correctly, the hole diameter near "FULL" is supposed to be 1.7mm.
Here are all the parts you will need for the build:
Parts:
🎁 $5 OFF your first App order on AliExpress - https://a.aliexpress.com/_mPN8FLo
- 5W speakers - https://bit.ly/3vWDLjK / https://geni.us/GFI5
- Amplifier - https://bit.ly/3XojrDT / https://geni.us/XDgi
- Bluetooth audio receiver - https://bit.ly/3VZ6LSK / https://geni.us/KBHU
- Passive radiators (40x78mm) - https://bit.ly/3ZBn6Aa / https://geni.us/WZxqbZv
- Charging board - https://bit.ly/3CBIgnV / https://geni.us/ziXE6
- 18650 Battery - https://bit.ly/3J3KCNl
- B0505S-2W isolated 5V converter - https://bit.ly/3nefFLb
- 19mm 5V latching LED switch - https://bit.ly/3XlgG69
- 1k Ohm resistors - https://bit.ly/3CAjUKY / https://geni.us/JhknxRm
- 2mm LEDs - https://bit.ly/3k7gU2B
- Magnetic USB adapter (matching the charging board socket) - https://bit.ly/3izxIi2 / https://geni.us/6jy2iIh
- 5V 3A charger - https://bit.ly/3Znrkv5 / https://geni.us/MI3Jdq
- Adhesive rubber feet - https://bit.ly/3X1nPsG / https://geni.us/VkuJ
- M2.6X12 screws - https://bit.ly/3CvFPmO
- Foam gasket tape - https://bit.ly/3hXlrnu
Tools:
- TS101 soldering iron - https://bit.ly/3hQm4PP / https://geni.us/owyDm5G
- Multimeter - https://bit.ly/3VOFjYv / https://geni.us/UmrhyYk
- Hot glue gun - https://bit.ly/3QdYfhg / https://geni.us/1dwxqIM
- Wire stripper - https://bit.ly/34kBgLn / https://geni.us/6epIs
- Cordless drill - https://bit.ly/2UiMSbL / https://geni.us/A5AZi
- Jig saw - https://bit.ly/3GpY8w6 / https://geni.us/D8GC
- Drill bit set - https://bit.ly/3S3i6zC / https://geni.us/ktAK1M
- Step drill bits - https://bit.ly/3eM5GtB / https://geni.us/xYRx7J
- Forstner bits - https://bit.ly/35snpjW / https://geni.us/F6it
- Hole saw set - https://bit.ly/3YZU8tg / https://geni.us/hONP
- Wood router - https://bit.ly/3I7Aplm / https://geni.us/6okRl
- Roundover bits - https://bit.ly/3ijBZWU / https://geni.us/cc82
- Center punch - https://bit.ly/3xslc8u / https://geni.us/o5WBEwB
- Helping hand - https://bit.ly/3B9mIgt / https://geni.us/Yyqyte


Step 2: Starting With the Enclosure


The only building material for the speaker needed is plywood in two different thicknesses. I used 4mm (5/32in) for the front and back panels and 3 layers of 12mm (1/2in) plywood for the enclosure itself. I recommend using better quality plywood on this project since the grain of the plywood is what makes this speaker unique - I absolutely love the way the plywood grain shows once finished with lacquer, therefore the better quality plywood you will use - the better finished product you will get.
The enclosure is really simple - it consists of 3 layers of plywood glued together. I placed the front (you can also use the back one) panel on my plywood and traced it around the outer edge three times, giving me three templates. Then I took my jigsaw and cut out the pieces along the line, making sure not to cut into the line. Staying a hair from the line is what you need.
I highly recommend using a saw blade made specifically for plywood which helps avoid any tearout resulting in a better finished in the end.
Step 3: Sanding the Pieces


Once the pieces are cut out close to the line, it is then time to sand the pieces as close to the line as possible, though it is not necessary to be very exact. The only purpose of sanding close to the line is to allow us to draw an inner line around the edge of the plywood pieces. To do that I hold the pencil with a steady hand and use my finger as a guide to draw an outline around the edge. The distance from the edge is not critical - I would say 6-10mm is good enough for a sturdy enclosure.
Step 4: Cutting Out the Frames


Once we have the outline drawn on the pieces we can carefully drill out the corners on the pieces to allow for the jigsaw blade. Here I am using a forstner bit on a drill press and drilling halfway through on each side to avoid tearout. The same can be done with a simple drill. I then took the jigsaw once again to cut out the inner pieces leaving me with three frames for the enclosure.
Step 5: Glue Up!


Once we have the enclosure frames ready, we can start gluing them up. Before that I sanded the edges of the plywood pieces to remove any fibers and rough edges so that the pieces stick well. I applied a healthy amount of glue on both sides of the pieces and pressed them in place. After a few minutes I have removed the excess glue from the outside of the enclosure and then glued the front panel in place, making sure it sits inside of the outer edge of the enclosure. I then carefully clamped the pieces between two boards making sure they don't slide out of alignment.
Step 6: Once the Glue Has Dried


Once the glue has fully dried, we can remove the clamps and reveal the piece which now looks somewhat like a speaker. I then use two clamps to hold the back panel in place, making sure it is aligned properly and I pre-drill the screw holes. I couldn't drill all the holes in one shot because the clamps were in the way, but once the panel is held in place with a few screws, I got those holes drilled then. The back panel is now temporarily screwed in place for the next step.
Step 7: More Sanding


Once we have the back panel temporarily screwed in place, we can sand the enclosure flush with the front and back panels. Take your time on this step and use a few grits for the best results. Once the enclosure is sanded and is now smooth with no rough edges, we can drill the hole for the switch. I am using a 20mm forstner bit for this step. Make sure to drill the hole further away from the woofer hole so that the switch does not interfere with the woofer once it is in place.
Step 8: Applying Clear Coat


Now that we have a smooth enclosure, we can remove the back panel and get the enclosure ready for a few coats of clear lacquer. Make sure you use some kind of a solvent remove any oils from the surface of the enclosure before spraying.
I used some matte clear lacquer from a spray can and I am stunned from the results. the enclosure looks amazing, and to be honest, I did not expect such a nice result using spray lacquer. I highly recommend using the matte lacquer.
Step 9: Mounting the Components


Now comes the fun part of installing the components. To begin with I used some two component adhesive to mount the passive radiator in place. The same goes for the speaker drivers. I also put a few blobs of hot glue to hold the components in place while the adhesive cures.
Step 10: More Soldering


Time for soldering the electronics! Make sure you refer to my wiring diagram which I have uploaded in a step above.
Removing the LEDs from the boards requires a steady hand and a sharp soldering iron tip. Make sure to use plenty of solder and a quick action to remove the LEDs in less time as possible. I then soldered the wire for the 2mm LEDs. I did these procedures for the charging and Bluetooth boards.
I then soldered two 1k Ohm resistors for the right and left channels of the amplifier to turn the stereo signal into mono since we will be powering to speakers in the same enclosure, therefore the signal has to be the same for both woofers.
Step 11: Installing the Components


Here you can see the redesigned back panel that I wrote about before. As you can see I have the AUX port removed and the charging port adjusted to allow for the Lithium-ion battery inside the enclosure.
My favorite part about this design is that the LEDs and the charging port are friction fit in place. I made the holes just to barely fit the components in place therefore using glue is not necessary but I would still recommend applying a small amount around the LEDs and the magnetic USB connector to avoid any leaks and hold them in place really well.
Once the LEDs and the connector are installed in place, I used some hot glue to glue the rest of the components in place. Make sure that no wires touch the passive radiator from the inside or you will experience some horrible rattling when music is being played.
Step 12: Last Steps!


Once the components are installed in place, I stick a thin adhesive foam strip along the edge of the speaker to make an airtight seal once the back panel is screwed down. I should have applied the strip before mounting the components in place but it was not a big deal.
We can now screw the back panel in place. How long have I waited for this! Make sure to tighten the screws well so that the foam strip is pressed well. Once that is done we can stick a few adhesive rubber pads on the underside to use as feet for the speaker.
And we are done!
Step 13: Finished!


We can now admire this tiny speaker that we have made. I absolutely love the magnetic charger, it makes such a satisfying click once it is attracted by the magnets in the connector! And the charging lead also has an LED which glows once plugged in. The charging takes around 2 hours and the playtime is around 6 hours depending on the volume.
Step 14: Final Thoughts

To be honest, I am more than happy of how it turned out. It sounds amazing for its size, super loud and even has plenty of bass which I did not expect from such tiny drivers. The Bluetooth establishes the connection instantly and the sound quality does not suffer at all. The speaker outputs only around 6 Watts of clean power but that is plenty enough for this little guy. Make sure you check my video for the sound test but take my word that it does not do its justice probably due to my crappy microphone.
Anyway, I hope you liked this build and perhaps learned something new! I highly encourage you to try building one yourself. It is a lot of fun and the result is actually something that you can be proud of.
Thanks for following me on this build and I will see you on the next one!

Participated in the
Remix Contest


