

Introduction: Soft Soled Shoes for Babies and Toddlers


Soft shoes help your kidlet build proper foot muscles and feel the ground while running about. They also provide necessary protection from hot pavement or cold air. But baby feet grow fast and come in many shapes and sizes, so making your own soft shoes is a great way to get a custom fit at almost no cost. Even with an incredibly active kid, the vinyl or leather bottoms wear through at about the same time the feet explode out the front. Perfect.
These are based on the soft shoes (fleece booties, really) I made for Corvidae when she was first starting to walk. As she became more mobile, she soon needed shoes with a proper sole - covering several miles a day on concrete and other hard surfaces wears through fleece booties in no time flat. There are a couple of tweaks to the basic design necessary to accommodate the addition of a sole, and the changing shape of a child's foot. Read on for details.
Step 1: Modify Bootie Pattern


Sole:
First, be sure to read over my original fleece bootie Instructable. Trace your child's foot, then draw a shoe-shape around it, leaving about 1/2" buffer around each bit of foot. Unlike the booties, an oval won't do at this stage - your kid is GOING PLACES, and the shoe has to fit a bit better. This shoe-shape determines the shape of the bottom and sole of the shoe.
Upper:
Next, draw the upper part of the shoe. Again, it's different than the booties - it needs to be significantly wider to accommodate the growing height of your kid's arch. Also, the sole makes the shoe more rigid, so you've got to build in more space than if you were putting booties on the same pair of feet. Check out the second picture below - I find it easiest to match the right side of the shoe, and add about 2/3" on the left-hand side. Err on the side of too much space here; you can always make them smaller. Continue the upper about 1/2" past the end of the sole pattern.
Heel:
The heel should be a rectangle long enough to go from mid-point on one side of the sole, and tall enough to run from that equivalent location to the back of the upper. See bootie Instructable for a deeper explanation.
I date each of these patterns, so I can see exactly how quickly the kiddo's foot grows. Sometimes it's scary fast.
Step 2: Cut & Sew Bootie

I won't go into detail, as this part proceeds exactly as described in the original baby bootie Instructable. At the end, you'll have a nice fleece bootie.
Just be aware that the upper is wider than the sole, so you'll need to bunch it up a bit as you sew the toe. Sometimes I pin the edges of the toes together to be sure it all works out right in the end.
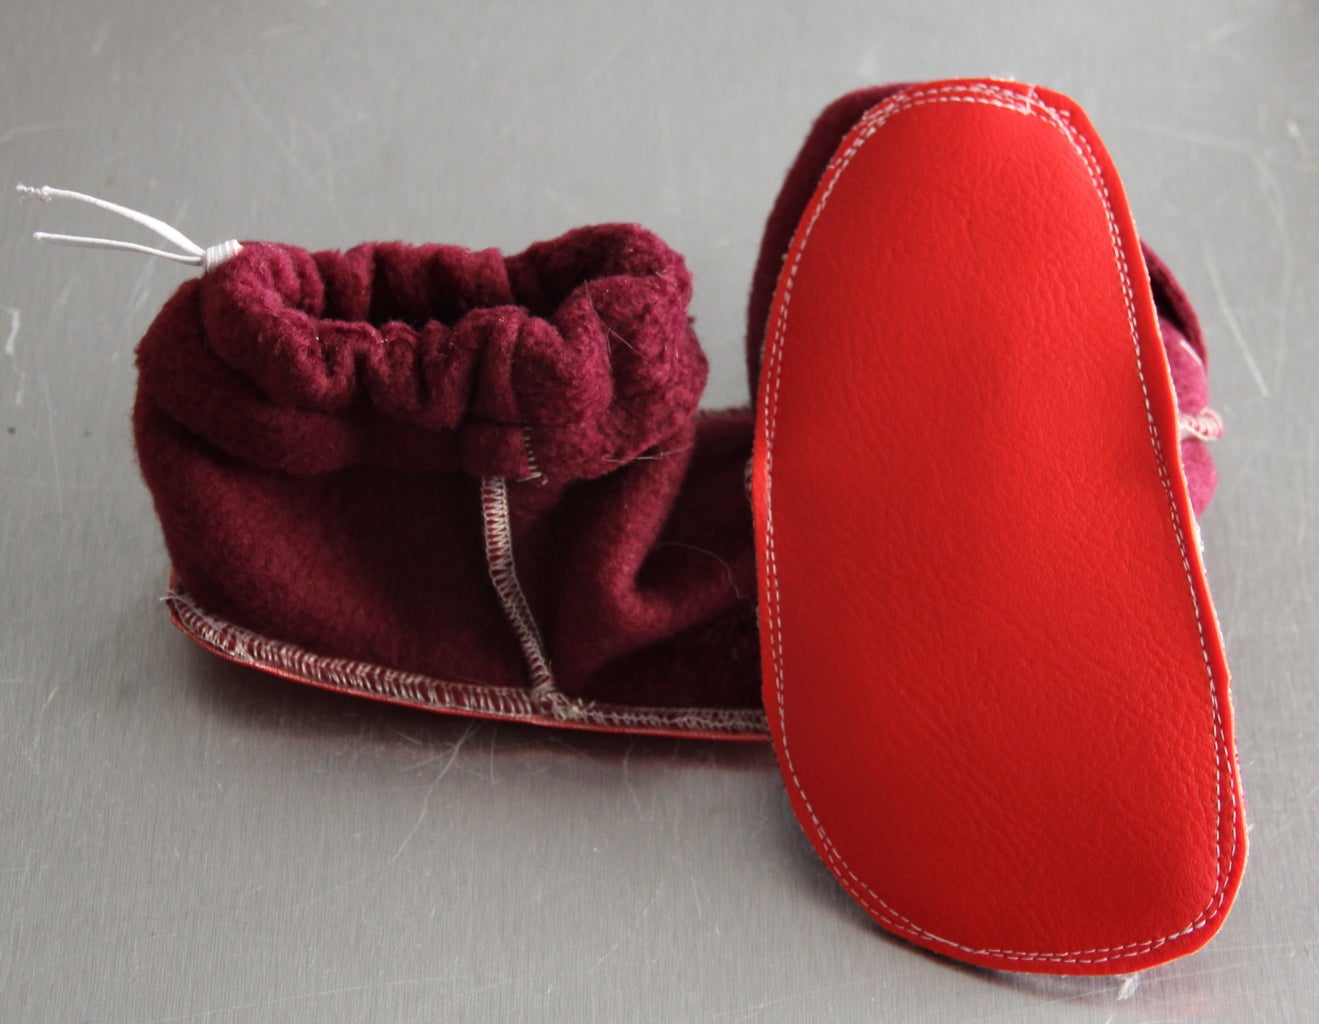
Step 3: Cut & Pin Sole


Cut out a chunk of vinyl (or leather1) a bit larger than the sole of your shoe.
Set the bootie on top of the wrong side of the vinyl, smooth it flat against the surface, and gently pin in place at the heel and ball of foot. This assures you won't get a big wrinkle in the bootie, and permanently sew it into place against the sole.
1 - I thought I'd prefer leather, but the vinyl turns out to perform far better under the wear of SF sidewalks. Your mileage may vary.
Step 4: Sew Sole


Sew around the edge of the bootie, affixing it to the vinyl. I found it best to do one pass along the inside of the serged edge, and one pass through the middle of the serged edge. Experiment, this isn't rocket science.
Step 5: Trim Sole

Trim the vinyl sole so it's about the same size as the edge of the fleece bootie. Again, not rocket science - there's room for fudging here.
I first tried leaving a wide margin and folding it up and over the bootie's edge, but that didn't work. The thicker edge caught as Corvidae walked, and she scraped her feet, wearing through any fasteners (upholstery thread, etc) I had used to stitch the edge down. They quickly flopped open, and I had to do an emergency trim. It's faster and easier (not to mention more effective) to just trim to the edge of the bootie.
Step 6: Wear With Pride

Now shoe your child, send them outdoors, and wait for the comments.
"Those look so cute!" "They must be comfortable!" "Where do I buy shoes in THAT color?!?"
Bonus points if you create crazy color combinations of fleece/vinyl. I'm using scraps from work, so my palette is limited, but so far we've had banana shoes (bright yellow uppers with red soles) and safety shoes (blaze orange uppers with red soles). I'm having a lot of fun, and so is Corvidae. She loves her soft shoes, and is sad when it's raining and I stick her in hard-soled crocs or boots.
Now if you'll excuse me, I have to make another pair. It seems the kid's feet have exploded again.

Participated in the
4th Epilog Challenge


