

Introduction: Solving Truth Tables

A truth table is a way to visualize all the outcomes of a problem. This instruction set is made for people getting started in discrete mathematics. We will be practicing today with an example problem that is specific to these instructions. You will need some scratch paper and a pencil to visualize the table. This problem should take around 5 minutes to complete for people with prior knowledge about the topic and around 10 minutes for beginners.
For this instruction set, we will be focusing on the problem ~p Λ q. We are using this to introduce some symbols needed to interpret truth tables.
Step 1: Understanding Truth Tables

A truth table is a way to visualize all the possibilities of a problem. Knowing truth tables is a basic necessity for discrete mathematics. Here, we will find all the outcomes for the simple equation of ~p Λ q.
Step 2: Knowing the Symbols

The first step to the truth table is understanding the signs. The “~” in this particular problem stands for negation. The “p” and “q” are both variables. The “Λ” is equivalent to “and”. This equation is read as “not p and q”, meaning, the equation is true if p is not true and q is true.
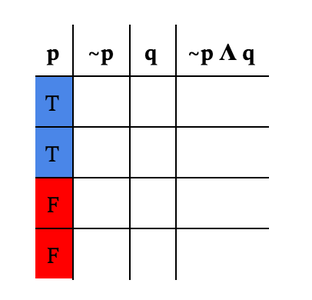
Step 3: Formatting the Table

Now to form the actual table. It is important to break the problem up by each variable. For this problem, we will be breaking it up as following: p, ~p, q, and ~p Λ q. The image is a good example of what your table should look like.
Step 4: Assigning True and False
Since there are only two variables, there will only be four possibilities per variable. For p, we split it up with half the spaces taken by T (for true) and the other half by F (for false).
Step 5: Negation

For ~p, you write the opposite sign that p has since ~p is the opposite of p.
Step 6: Variable "q"

For q, you alternate between T and F in order to get each possible combination. Since the equation only focuses on ~p, we can ignore the p column when determining the truth of the equation. The “Λ” symbol means that both ~p and q have to be true for the equation to be true.
Step 7: Solving for False in the Last Column

For the first row, since ~p is F and q is T, ~p Λ q is F in the scenario that ~p is F and q is T. The only scenario the equation is T is where ~p is T and q is T.
Step 8: Finding the True in the Last Column

This means the only row that is T is the third one.
Step 9: Finishing the Table

Double check that your table is correct. You do this by checking your signs are right and making sure the last column is done correctly. The last column is the result of all the possible permutations from the variables.
Step 10: Done
Now that you know how to do a basic truth table, keep practicing! The more you practice, the better you will get at doing them.


