

Introduction: Stacked Ball-in-the-Maze Puzzles


I would like to propose with this article the construction of a special, cheap toy, very easy to make and, in my opinion, very attractive and for children over three years of age (because of the choking hazard!). In essence, the toy is composed of several overlapping labyrinths, separated from each other by a more or less transparent plexiglas(acrylic) plates, each plate having in one corner a hole through which a ball can be inserted. If these holes are placed alternately in opposite corners, the ball can cross the mazes in order from top to bottom. The goal is to insert the ball into the top hole and eventually fall through the bottom hole, thus "solving" the overlapping mazes. The (exploded) assembly would look a bit like the one below.

Yes, I know, the idea of three-dimensional labyrinths is not new. I've seen a lot of projects here on instructables or thingiverse like this:
- Solid Maple "Unseen Maze" Gift
- amaze - multi-layer labyrinth
- Mazecube 1 / 3D-Maze 5 layers / Ø5 marble
- 3D Hidden Maze
- 3D Maze
and so on...
But they all have one thing in common: the mazes are hidden, and to solve the puzzles you have to rely on hearing, vibration, memory, luck, I don't even know what! God, but the beauty of this puzzles lies in the visual twist of the road ahead. You have to see the maze, not hide it! What I do by overlapping the mazes is to confuse the eye a bit and solving the game is not very easy but you cannot not see the maze, sorry! So don’t think that having visible mazes will make it easier to solve the puzzle. On the contrary, it can be very difficult.
Also, the construction I propose is very flexible, many variants of the game can be made: the plexiglas boards can have different degrees of transparency, the mazes can have different colors (they can even be translucent), etc., I will present different variants in the content of the article.
In addition, I will show you in the last step how I highlighted, visually, this construction :)
So keep a close eye on the next steps!
Step 1: Materials, Components...


Materials, components I used:
- 3D printed mazes from different color, PLA or PET-G filaments;
- 110mmx110mm with 7mm hole plexiglas(acrylic) sheets;
- 3D printed assembly pieces;
- 5 and 6 mm diameter steel bearing balls. (take care: choking hazard!)
Optional:
- 3D printed simple support;
- 3D printed support for LEDs (2 pieces);
- 36 LEDs from a 60 led/m WS2812 ledstrip;
- 110mmx110mm plexiglas(acrylic) sheet;
- translucent white and frosted white window foils;
- a Digispark clone module;
- a mini push button;
- a microUSB cable;
- a phone charger with USB output.
All 3D printed pieces files are on Tinkercad and the STL (or SVG) files are attached, look at the next steps.
Step 2: Generating the Mazes
It is difficult and time consuming to design, to manually draw a maze. That's why I used a software solution to generate them. I’m gaining time in this way, I can set different values for the maze generation and the result is an STL file that can be printed directly on the 3D printer. For this I use a script that can be run in OpenSCAD.
OpenSCAD is a software for creating 3D CAD models, it is free and is available for Windows, Linux and Mac. OpenSCAD is not an interactive design software but a compiler that reads the contents of a script file that describes the object and then OpenSCAD renders the 3D model as described in the script file. This gives the user complete control over the 3D modeling and allows changing any step in the process. Also, it is possible to carry out projects that are defined by configurable parameters.
The script I used is a slightly modified version of JustinSDK's maze generator which you can find on Thingiverse. He also has a large collection of very interesting maze generators, that you can find on github. Worth a look.
So, I downloaded the OpenSCAD installation kit, I installed it, I opened the maze_generator_mod.scad script (it is attached below just change extension to *.scad).
Clicking on the render button  I can generate different mazes

that I can save by pressing the STL button  .
.
A few remarks on the script.
The only change I made to the original script was to add an exterior wall that has two purposes: to strengthen and close the printed structure of the maze and to hide the entrance and exit of the maze. If you give up the outer wall (outside_wall = “NO” or outside_wall_thickness = 0) then the generated maze is the one in Justin's original script.
With the initial values in the attached script, the size of the maze is 110mm x 110mm and the thickness is 7mm.
Attachments

Step 3: Printing


The STL files saved after their generation in the OpenSCAD script can be uploaded to your favorite program and printed on your 3D printer. You can also use a 3D printing service of course.
I printed with Repetier-Host on my super cheap Anet A2 printer. I tried PLA and PET-G of different colors, even with transparent filament and it was best when I also used a brim so that the adhesion of the labyrinth (which has many right angles) at the base of the print to be very good. It was also necessary to take into account the contracting of the material and to adapt the dimensions accordingly, i.e. to increase them a little.
I have obtained the best results with PET-G filament. It is true that it is a little more expensive than the PLA filament and needs a heated bed for printing, but because it has a better physical resistance, it is preferable for printing labyrinths. Also, because it is more elastic than PLA, it is very suitable for the side pieces that tighten the assembly of labyrinths and plexiglas plates. I have been using a carbon printing plate as a printing base for a long time, with this plate I don't need Kapton or other tapes or glue or adhesive, the first layer adheres very well. However, it needs a bed heated to a temperature of over 50 degrees, but once the printing is finished, the printed object can easily come off the surface of the plate when the plate cools down. It's a little expensive but it's worth it.
You can see in the photos above images from the printing process.
Step 4: Construction


As I said in the introduction, this project proposed by me allows a wide variety of construction types, for example:
- two or more overlapping labyrinths, the more difficult the solution, but about five labyrinths I think would be enough;
- mazes of the same color (harder to solve), mazes of different colors (slightly more accessible), labyrinths made of transparent or translucent material (they look cool 😊);
- plexiglas boards (SVG file attached below) can be completely transparent or less transparent (smoked);
- the construction can be glued, so it can be non-removable or removable, with the help of some side pieces also printed on a 3D printer. I attached the STL files but they are also on Tinkercad,
You can edit them as you wish. It is good to print these side pieces after printing the labyrinths so that you know the final thickness of the labyrinths;
- several non-removable (glued) structures can be made with different labyrinths or with the removable version, the labyrinths can be replaced, they can be rotated, turned and of course changed with new ones;
- last but not least, different sizes, shapes of mazes can be generated, I attached some mazes that I have printed for this project;
And all these variants can be combined as you wish … So virtually infinite variants :)
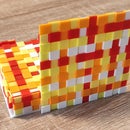
In the photos above you can see some finished constructions all with removable structure:
- one with two mazes made of transparent filament, two smoked plexiglas plates one in front second in back and transparent plexiglas between mazes;
- a construction with three labyrinths made of transparent filament and transparent plexiglas plates between them only the last being a smoked plexiglas plate;
- a construction with four labyrinths of different colors and transparent plexiglas plates between the plates.
The balls I used for the puzzles are some bearing balls of 5mm and 6mm diameter.
Attachments


Step 5: Visual Exposure


As I said at the beginning, mazes are not only very engaging puzzles but they are also good looking toys. That's why I thought of exposing them in two formats:
- a support for the structure that can be printed in 3D;
- also a support with addressable digital LEDs (WS2812) that can illuminate the stacked labyrinths below during solving or simply put the puzzle on the surface of the stand and you can enjoy an interesting game of light and color;
The STL files for this supports are on Tinkercad:
For lighting I used 36 LEDs from a led strip of 60 led/m, and as a micro-controller I used a Digispark clone. For the light diffuser I used a 110mmx110mm plexiglass plate which I covered with 2 'coats' of translucent white and 2 'coats' of frosted white window foil.
The uploaded program is an adaptation of the DemoReel100 example from FastLED's library github page. With a push button I can switch between several lighting effects until the lighting mode. I attached the very simple schematic, you can see it above. Of course you can imagine other effects but for a demonstration I think it's very ok. I attached the code below. For programming the Digispark clone there are many instruction on the net for example you can read the 'How to Use ATtiny85 with Arduino' instructable.
You can see these exposures in the video below.
You can also see how 'easy' is to solve the puzzles.😊
I hope you will like my project and you will try to reproduce it. I am at your disposal if you have any questions.
I wish you good health!
Attachments

First Prize in the
3D Printed Contest


