

Introduction: Stealth "Exploding" Building


Well, it doesn't really explode as much as violently disassemble due to the use of a mousetrap mechanism. The stealth part comes from the fact that it is a bank cleverly disguised as a miniature building. It can be labelled in such a way as to entice people to put their loose coins into it. When they do, they'll get the surprise of a lifetime and provide lots of laughs for those in the know. I used to build these with my students to teach them about physics and there is no end to the creative ways they decorated them.
Step 1: What You'll Need

Some hardboard or plywood about 1/4"(6mm) thick for the walls, some thin strips of wood, like 3/8"(10mm) square dowel for the edge border, wood glue, epoxy glue, mousetraps- I got 4 for a dollar, and some scrap pine.
Step 2: Layout and Prep

I can't stress enough the need for accurate measurement and layout. If you are precise it will work. If not it won't. Measure the length and width of the mousetrap. You will need to layout a base and lid. They are the same size. The formula for length is length of mousetrap+ double the thickness of your dowel+ double the thickness of your plywood+2mm(1/8"). For width it is width of mousetrap+ double the thickness of your dowel+ double the thickness of your plywood + 2mm(1/8"). The side walls are the same length as the mousetrap and 10cm(4") high. The end walls are the same width as the mousetrap and 10cm(4") high. Use a square to make certain everything is perfectly straight. Then carefully cut your pieces.
Step 3: Assembly

Cut the square dowel to make a frame around the base and lid. Glue in place with wood glue. Centre the mousetrap in one frame and fasten in place with wood glue. Use pliers to pull the mechanism away from a second mousetrap and fasten the wood base in the exact centre of the second frame. This helps to keep the walls from collapsing when it is assembled. Epoxy something solid to the bait holder of the mousetrap. This provides a bigger surface for the coin to hit and set off the trap. Ironically, a quarter is the exact size to fit inside the kill bar so that is what I used. Cut 3 pieces of square dowel or scrap pine and glue them on the two side walls and one end wall so they sit just above the kill bar when the trap is set. These knock the walls and roof off when the trap is sprung so let the glue dry thoroughly. Remember you have a left and right wall so they will be on opposite sides.
Step 4: Cut the Coin Slot

Measure carefully and cut the slot so it is directly above the bait holder when the lid is on. A Dremel tool works well for this.
Step 5: Set It

Set the trap and carefully put the walls in place. They should fit loosely in the grooves due to that extra 2mm(1/8") you added to the length and width. Remember, the blocks should be above the kill bar. Put the lid in place. If you measured carefully it should go together perfectly. If not you have some adjusting or rebuilding to do.
Step 6: Test

Put in a coin. It should "Blow up real good, Eh!" I should mention that wearing safety glasses and thoroughly testing before letting children operate it would be a good idea.
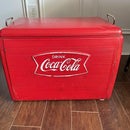
Step 7: Disguise It

Decorate it to resemble something that people would actually want to put their money in. The more effort you put into this step the better the effect. Then put it in a conspicuous place and enjoy the fun.


