

Introduction: Steampunked Magic Eye Winker Powered by Batteries and USB-connected


and a happy new year to the instructables- and also steampunk- company.
Here is my latest project: TheSteampunked Magic Eye Winker.
Since my earliest childhood I am deeply impressed of the magic light at my grandparents radio.
Whenever they where listeneing -mostly in the evening- to the radio news I was fascinated by this magic glooming light of the magic eye tube.
So I decided to find a way of watching it again.
I discussed a lot with my friends and finally got in contact with a famous guy called Mr. Nixie. He made the propsal to invent such a special universal electronic to let wink any of thes old magic eye tubes. My option was that it has to be possible to drive this circuit either by 4 pieces of AA-batteries or by using an USB connector. Also it has to be not too expensive and available for all guys in the world.
And here is the result:
Enjoy yourself by this small video impression and if you like, follow this instructable
Have fun Yours Aeon Junophor
And now let us start!!!!
Step 1: First Draft


The Steampunked Magic Eye Winker should follow in its design my other steampunk objects and so I invented this from the already known brass parts. I combined it with some new parts from an very old petrollamp and some wodden stuff.
Step 2: Wood Works


To build the wodden holder I took two parts of 16 mm plywood and fixed them with 4 screws. After forming it to an oval I cut a big hole with an hole saw in the top plate. Then I combined some 12 mm plywood with my beloved 3mm fiber plate and fixed it with PUR-glue. Out of tis plate I cut the slices.
Step 3: Metal Works, Part One


Now we have to do a lot of metal works.
First we have totake some pieces of brass wire 2 mm in diameter and solder it thre times to a gear. Then we take the petrol lamp gallery part and rill three holes to put the brass wire in.
Step 4: Metal Works Part Two


Now you have to cut some pieces of copper tubes. I used 18 mm and 25 mm tubes
Step 5: Metal Works, Part Three


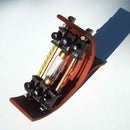
In the next step you go on to build the Holder for the magic eye tube. I call it the "lantern"
Step 6: Modifying the Lantern

The highlight of this installation is the integrated copper web to cover two thirds of the lantern. This gives the lantern an impression of keeping a secret .
Step 7: Combining Metal and Wodden Parts


Now we have to combine the wodden pieces with the metal ones. First we put the slices and the brass holder together. Then the gear and brass screw socket has to be combined with a wodden plate. To let the parts perfectly fitting together we have to grind them. I used a drilling machine and a file. Be careful when working with rotating parts!!!
Step 8: The Electronic by Mr. Nixie


Herr are the electronisc parts which has been developed especially for this project. But you can uses ist as well for your own creations All detailed descriüptions about the circuit and how to build them together you will find here.
Magic Eye Winker
Beyond you can see the circuit and some of this magic eye tubes in progress.
Step 9: Integrating the Electronic 1


Now the electronic parts can be build in.
I build one steampunked winker only powered by the USB connector and another one.. but this you will see in teh next step ;-)))
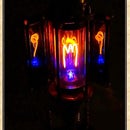
Step 10: Integrating the Electronic 2


The second steampunked magic eye winker runs with the fantastic looking 6E1P tube. It can be powered by 4batteries of the AA Type and you can switch over to the USB power supply. By turning the POTI in the E 27 brass socket you can influence the glooming too.
Thank you all for following and have much fun in creating your own magic eye winker project
Yours Aeon Junophor


