

Introduction: Studio Art

Ceramic is my passion and I love it.
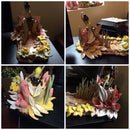
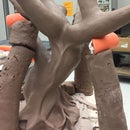
This piece when I started it I only had a drawing I had no idea what else I wanted or how to get even get started. After a long staring at the drawing I started building. I started with a flap slab, I used the extruder to make the amount of coils I needed so the shape would be the same, and not have one side bigger and taller than the other. Each of the shape was done differently some was done with bigger coil, and some with smaller coils just to keep the piece balance. After the piece was done I cleaned it, I smoothed it out. I had to clean the edge so it didn't stay to sharp. The glaze that I pick out I wanted to match the piece that I created. I wanted to show shape of the piece and I wanted the glaze go with the piece.
Steps:
1) Draw idea
2) Memorize your idea (have the picture in your mind it makes it easier to build as you go on).
3) Have all tools ready and out.
4) For the shape use a ruler and a piece of paper to cut out the shape you want
5) Roll out a flat slab
6) Cut the shape you want the bottom to be
7) Cut out the shape you want to build up from
8) Use an extruder (if one is available) or you can roll out clay to make coils
9) Make each form bigger than the other
10) Keep all the coil same shape so your forms have the shape.Ceramic is my passion and I love
it.
This piece when I started it I only had a drawing I had no idea what else I wanted or how to get even get started. After a long staring at the drawing I started building. I started with a flap slab, I used the extruder to make the amount of coils I needed so the shape would be the same, and not have one side bigger and taller than the other. Each of the shape was done differently some was done with bigger coil, and some with smaller coils just to keep the piece balance. After the piece was done I cleaned it, I smoothed it out. I had to clean the edge so it didn't stay to sharp. The glaze that I pick out I wanted to match the piece that I created. I wanted to show shape of the piece and I wanted the glaze go with the piece.
Steps:
1) Draw idea
2) Memorize your idea (have the picture in your mind it makes it easier to build as you go on).
3) Have all tools ready and out.
4) For the shape use a ruler and a piece of paper to cut out the shape you want
5) Roll out a flat slab
6) Cut the shape you want the bottom to be
7) Cut out the shape you want to build up from
8) Use an extruder (if one is available) or you can roll out clay to make coils
9) Make each form bigger than the other
10) Keep all the coil same shape so your forms have the shape.
Step 1: Start With a Base

keep building up from the base.
Step 2: Built Up With the Picture You Drew on Your Mind!

keep going!
Step 3: Keep Building Up Keeping in Mind the Shape and Which Direction You Want to Go!

smooth it out.
Step 4:

let it dry if too wet to clean the edges.
Step 5: The Top Shape Has to Be Bigger Than the Form.

make sure the shape all the same size. clean the edges.
Step 6: Final Step: Clean the Piece, Smooth It Out, Fix the Edge at the Bottom of the Form. Do All the Finishing Touch and Fire.


after you take out of the kiln let cool. wet it before glazing.
Step 7: Here Comes the Fun Part! Glazing, When Glazing Make Sure the Color You Picking Out Goes With the Piece, Make Sure That the Color Matches the Story Behind the Piece.

glaze with the color you prefer and remember to have fun!


