

Introduction: Sun Dress


This instructable is showing the process to make a dress where the sun's activity at the rim is visible.
This project covers design, sewing, electronics, soldering, programming and making a shoot.
The challenge is to display data on garments. Choosing the sun makes a connection between our earthly existence and some consciousness of things happening in the universe.
The sewing pattern is a basic pattern for a basic dress size 36, still without a collar. In a following stage this pattern is modified with white linings.
For this dress 2-way stretch fabric is used (horizontal direction). Getting in and out becomes easy, without zippers or buttons.
The color of the fabric is black with little spots of bright color dispersed on the fabric.
Step 1: Stuff Needed


Materials
Fabric, 3-5 meters
Lining
Electronics
2 Atmega328 plus RF transceiver (Jeenodes)
1 Attiny2313
USB cable for connecting to the computer
some switches: one for connecting the power to the dress. I have also one switch which gives me the "party mode", this is an alternation of around 5 patterns. Needed for the shoot, to have some different patterns readily available.
Batteries:
either 3 AAA or one lipo battery
64 led's
lot's of wires
programming tools
avrisp mkii (modified, so it powers the chip while programming)
for the atmega's: arduino software
tools:
sewing tools
soldering tools
Step 2: Making the LED Circle


The dress has two chips: an Atmega328 for receiving and a Attiny2313 for addressing the led's.
With the well known led matrix script it is easy to use 64 LED's on 16 pins. The essence is using persistence of vision effects, which means that only a maximum 8 LED's are on at the same time but the switching is faster than your eye can follow. This means that it seems that all 64 led's are connected at the same time.
This led matrix script is placed on a Attiny2313. So the Atmega328/rf12 is receiving and transferring the code to a attiny2313, which is connected to the 64 LED's.
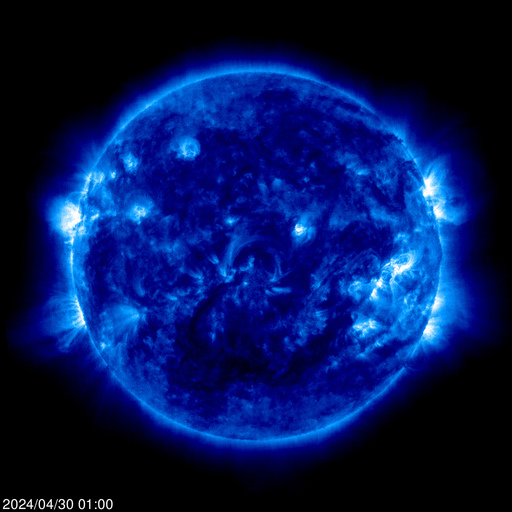
The rim of the solar disk is scanned, using a picture of NASA which is updated every minute.
http://soho.nascom.nasa.gov/data/realtime/eit_171/...
Using Processing the solar rim is coded into 64 spots, which can be
bright or dark. The information is sent to the dress using two
transceivers (Jeenodes).
https://github.com/contrechoc/sun_rim_script
Because the sun is rotating relatively slowly,
connecting to the dress once a day is sufficient to have the activity of
the suns rim displyed during the whole day.
A lipo battery is used as an energy source, it is held in a pocket under the skirt. The rest of the electronics is all on the outside of the dress so the fabric is protecting both the body (no wires inside) and the the electronics (no damage when getting into the dress).
Step 3: First Testing: Adding Design Elements


The electronics is working. The dress, just finished for 5 minutes is shown for the first time at the e-textile group meeting in V2, Rotterdam.
The dress was still rather dull. Lots of details are considered. Adding the white lines accentuates the shapes which are added to the basic pattern of the dress.
The dress is mounted on a mannequin to see if the white lines are helping the overall look of the dress.
Step 4: First Shoot


In a first improvised shoot, we looked at the effects and the ways to show the dress.
Model and fashion advice: Jasna Rokegem.
The loop in the dress next to the circle has to be reinforced to give it the intended angle to the body. The loop represents the phantastic shapes the of the gas in the complex magnetic field on the surface of the sun.
Step 5: Final Shoot


With a nice team we did a final shoot in the studio of the art school WdKA.nl
Jasna Rokegem, model, styling, fashion advice.
Tash Berting, photo's.
Contrechoc, dress concept, dress design and electronics.
We used the projected solar disk of the sun as a background. Because of the difference in light this solar disk was requiring opening the lens for 10-15 seconds. This gave us additional effects, like disappearing of the model inside this ilumination.


