

Introduction: Super Paint Splatter Maker XL


One of the fun things I'd seen around was a turn-table type thing where you could put down a sheet of paper or T shirt, throw some paint on it, and start spinning the table. Centrifugal force then throws the paint outwards from the centre, and once you stop the spinning you've got a pretty cool abstract paint explosion on your medium :)
The kids loved the concept, and I'm looking forward to trying it out with more materials such as molten crayons.
The instructable is fairly short and straight forward, since making this is very simple. I made this with some leftover materials I had in my shop, and didn't pay for anything. If you'd have to buy the materials from scratch, though, I'd estimate having to spend around $20-30 (excluding the tools).
The overall concept of this device is that you have a large platform with a wheel underneath it, and this is attached to a stationary board with a bolt that lets the wheel+platform spin freely. A couple of feet away you have a second wheel attached to the board in the same manner, and there a length of rope connecting both wheels (which have a "V" groove running along their circumference to hold the rope). The bolt holding the solitary wheel extends upwards about an inch or so, and a drill is attached to that extension. When the drill is turned on, the wheel spin, pulls the rope, makes the other wheel spin, and anything left on top of the platform splatters outwards. Simple !
Step 1: Tools and Materials


Tools
The one tool you absolutely need (unless you choose to spin this manually) is a drill, and a battery powered one is preferred as the cable might get in the way. Besides that, I used a jig saw to cut the platform and wheels, a regular handheld wood saw and bench vise to cut the notches in the wheel, and a hacksaw to cut the bolts.
Materials
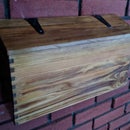
The whole thing rests on 2x10 piece of construction lumber that is approximately 4 feet long, but this could easily be replaced by a couple of 2x4 beams that have been attached side by side to make a wider platform. The turn table started out as a 2x2 foot piece of press board, and the wheels were made out of two 6x6 squares of 1" thick material. You'll also need some threaded rod and lock nuts, but I had bolts that were just long enough (about 4" long) and by cutting of the heads I was able to add the nuts to both ends. Finally, a length of thin rope to run around the two wheels is needed.
Step 2: Preparing the Table and Wheels


The rotating platform
Assuming you're dealing with a perfect square piece of material, find the centre by measuring both diagonals and tracing a short line at the centre of those diagonals. Where they meet is the actual centre. Drive a nail into the centre, extend a string from it, tie a pencil to the other end of the string and trace a large circle that is as close to the edges of the platform as possible. Use the jigsaw to cut that circle off. Try as much as possible to cut close to that line, because when the table rotates at high speed any uneven edges will contribute to an increasing wobble and shake.
The wheels
Cutting the wheels follows a similar process as for the table. Trace a circle on the 6x6 material (I used a large yogourt container) and cut if off using a jigsaw. Place the circles in the vise, and using the saw cut a "V" groove all around the perimeter. The groove should be about 0.25" deep so that the rope running inside it cannot slip off.
When the wheels are ready, attach one to the underside of the platform (right in the middle). I used four screws and didn't bother with glue. You just need to make sure they're completely inseparable.
Step 3: Preparing the Bolts and Attaching Everything


Once the turntable and wheels are ready it's time prepare the bolts and attach everything. The idea here is to ensure that both the solitary wheel and wheel/platform combo are attached securely to the support beam but can still rotate freely.
For the platform, insert a bolt from the top of platform and into the wheel and add a couple of washers (to ensure the wheel does not drag on the support beam as it spins). Drill a hole on one end of the support beam and slip the bolt through it, add a couple more washers underneath and finish with a lock nut. The nut should be put on tightly enough so that there isn't any up/down movement of the platform but also lose enough that it can all spin freely enough (if you give it a turn and it keeps on moving under its own momentum then you're good).
The solitary wheel follows a similar path but with the distinction that the bolt must first be firmly attached to the wheel since the drill will be spinning the bolt and we need the wheel to follow suit. Start by sawing the bolt's head off, insert through a hole in the centre of the wheel, and add a washer and lock nuts to both ends. Firmly tighten both nuts while ensuring there's about an inch of bolt sticking out on one end (this is where the drill will be attached). To help the drill hold on to the bolt, you can also file down the sides of the bolt (where the drill will latch on) so that there are now flat sides instead of rounded ones.
Add another washer or two to the long end of the bolt, insert it it through a hole drilled on the other end of the support beam, and finish off by adding a final washer and lock nut. Like with the rotating platform/wheel combo, tighten the final bolt to the point where everything is solid by still rotating freely.
When both wheels have been securely attached to the support beam, run a length of cord around the two, tie it firmly (the loop should be tight enough that you can pluck it), and if the knot is sticking out too much you can wrap it with a bit of tape in order to smooth the whole thing and help ensure that it won't "jump the track".
Step 4: Having Fun

When everything is fully attached to the support board and the rope is tied up between the two wheels, it's time to have fun. Slip a drill onto the bolt extending from the wheel, tighten the chuck and you're good to go. If you want to also keep the mess down to a minimum, consider using some plastic sheeting or a roll of brown paper to create a barrier around the spinning platform (just don't let the barrier touch the rope).
Using the Super Paint Splatter Maker XL is very simple. Tape a sheet of paper to the platform, throw some paint on (make sure the paint is a bit runny), and turn on the drill . Depending on the type of rope you used, the wheel might slip quite a bit if you go full speed from the get-go, so you're probably better off starting it off slowly and accelerating gradually. To get a completed painting we let it spin for about 20 seconds.
Have fun :)


