

Introduction: Tabletop Easel Box

"Easel boxes" already exist, to be sure. They're called pochade boxes and look like this. My problem with those designs is that they create an automatic distance between painter and painting, which some may not be comfortable with.
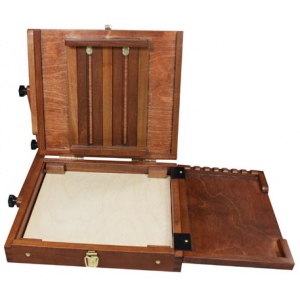
Enter this design! It can look intimidating until you realize it's just a plain wooden box with two special features attached.
I hope this alternative design serves you well. Feel free to modify it for your personal use.
Materials needed:
- 9 mm plywood (you can use better quality wood if you want, though you will have to adjust measurements accordingly)
- 4 small hinges
- 16 small screws
- 1 small bolt
- a wing nut that fits the bolt
- 2 washers
- 4 safety pins
- several nails
- adhesive pads
Step 1: Establish Sizes

MAIN BOX:
The main box is 9" x 12" x 1" overall and consists of 6 wooden pieces: the top board, bottom board, and 4 sides.
The top board is 9" x 12", or 228.6 x 304.8 mm. See image for the dimensions of the bottom board and 4 sides.
STAND:
The stand consists of 2 identical wooden pieces. It originates from the inside of the box, so it should be able to fit inside it. The length of box's inside is 210.6 mm, so the stand should be just a little shorter than that.
We can say that the dimensions of the two pieces are 205 x 25.4 mm each.
EASEL:
The easel consists of 2 T-shaped groups of wood.
The first group is stationary. It has 4 pieces:
- Two 7" x 1" (or 177.8 x 25.4 mm) pcs, and
- Two 4" x 1" (or 101.6 x 25.4 mm) pcs.
The second group will be the part of the easel that slides and adjusts to accommodate different canvas sizes. It has 3 pieces:
- One 7" x 1.5" (or 177.8 x 38.1 mm), and
- Two 4" x 1" (or 101.6 x 25.4 mm) pcs.
Step 2: Cutting Out Pieces
Cut out all the wooden pieces using the dimensions in the previous step. Either use a handsaw or trace paths in a woodcutting program like VCarve then input them into a CNC machine.
Sort them by function: Main Box, Stand, or Easel.
Step 3: Main Box


Nail the four side pieces of the main box to the bottom board. Sand, along with the top board.
Step 4: Stand


Make lines at 1 inch intervals along each piece, with the first line about 5 mm from the edge (1st pic). Cut 10mm (1 cm) notches starting from these lines (2nd pic), but don't cut more than halfway through the wood. You want to keep it intact. Make the notches slanted. Sand.
Step 5: Easel


Remember the easel groups from step 1? I will be referring to them here.
Group 1 Instructions (Stationary part):
Nail/glue the shortest pieces together, one directly on top of the other. Mark the horizontal center. Mark 3/4 inch on either side of the center. These are where the edges of the longer pieces will rest (Pic 1). Nail/glue the longer pieces onto the shorter one, as shown in the first photo.
Nail/glue this to the center of the top board.
Group 2 Instructions (Sliding part):
Nail/glue the shortest pieces together, one directly on top of the other. Drill a 4 mm hole along the center of the 1.5" wide piece, but leave the edges intact. (Pic 2)
Nail/glue the center of the short piece to the top of the long piece in a T shape.
Step 6: Varnish

*This step should be done outdoors.
Using a brush, paint 3 - 4 layers of varnish all over every piece of wood. Allow them to dry between layers.
Step 7: Assembly


MAIN BOX:
Connect the bottom to the top board with 2 hinges.
To figure out the placement of the hole for the bolt, place the sliding half of the easel between the stationary half glued to the top board. Mark the top end of the 4 mm gap. Remove the sliding half and drill a hole into the top board using the mark you just made. (Pic 1)
Add latches to the box.
STAND:
The stand will be connected to the inside of the top board (the part facing the inside of the box). On this inner side, mark 2 spots 1 cm from the side farther from the box hinges. Make them about 1.5 cm away from left and right sides each. (Pic 2) Your hinges should not go beyond these marks. Nail the hinges to the top board. (Pic 3)
Nail the other halves to the two bottom stands (ridge side up). Ensure that they fit in the box. (Pic 4).
Add adhesive rubber pads to the ends of each stand.
To make the stand more stable, connect the two stands with a strip of wood/acrylic.
EASEL:
Nail the safety pins near the outer edges of each T. Place the sliding half between the stationary half. Place a washer on the top, then the bolt, pushing it through the hole you drilled. (Pic 5) Add the other washer to the back, and finally the wing nut. To adjust, simply loosen the wing nut.
Optional: Screw a handle into the top side of the box to make it easier to carry around.
Step 8: Finished!


Enjoy your tabletop easel box!


