

Introduction: Tap-Pad Robot


My daughter and I continue to combine different technologies. This Instructable demonstrates a combination of high-tech invention products. We used two of them before, and for this one we add a third. One is Circuit Scribe, which provides conductive ink in a pen, so you can draw "wires" that conduct electricity, and circuit components . For this project, we only used the conductive ink. The second tool is Makey Makey, an tool that you can use to turn arbitrary physical action (like touching a fruit) into a signal that makes the computer think that you just pressed a certain key on the keyboard. The last one - really two - is the new mBot robot made by Makeblock, which you can program with the Scratch programming environment.
The goal is to show you the steps to combine three different products to build and drive a remotely controlled robot just by tapping a piece of paper!
This project assumes that you have experience with each of the following:
- Circuitry: There is no soldering, but you do need to be able to connect alligator clips to multiple things and plug cables in to ports.
- Coding: You can program the robot using the Scratch environment developed at MIT. The code is simple, but you need a basic understanding of how to go through the mblock software and use Scratch.
- Computer: You need your computer for almost anything, so it would be helpful to have it with you while assembling and operating.
Step 1: Assembling the MBot


If you have experience building circuits, the instructions that are included with the kit are easy to follow, and you can skim quickly through this section. If you don't, these pictures may help you. There are also videos elsewhere on the web.
We were impressed with the quality of the mBot product. Even its box is high quality, with a small magnet that holds the lid closed.
The robot even has a smiley face!
Step 2: MBot: Parts


Before beginning to assemble any kit, always check that all of the parts are there. These are the mBot parts. The instructions include a Parts List. All of the parts were in our kit, but it also included extra parts: an LED matrix, decals, and a remote.
The "brains" of the mBot are all in one circuit board. It has an Arduino-compatible CPU, but you don't need to know that to build and use an mBot. This diagram shows you all of the things included on this main circuit board. Makeblock included an impressive array of features on this board, including connectors for the two motors and four sensors, and also a light sensor and multiple LEDs, a buzzer, and an infrared transmitter and receiver. It also includes a USB connector to connect to your computer, where you will write software.
Step 3: MBot: Instruction Manual

As you can see in the picture above, these instructions were written for people all over the world: no words! That means you must pay attention to the shapes of parts. We won't duplicate those instructions, but we'll provide tips that explain things that might not be clear.
Step 4: MBot: Installing Motors


The instructions only show one motor being added. Attach both, with the bolts and nuts provided.
Make sure the nuts are on tight. A pair of pliers (not included) may help.
When both motors have been bolted in, it should look like the last picture above.
Step 5: MBot: Adding Wheels

Two small screws hold the wheels on. This might be the hardest step. Make sure the wheel is perpendicular to the robot frame before beginning to tighten the screw. We found it easier to stand the frame on one side and attach the wheel to the other side. Athaching the second wheel is harder, because you must stand the frame - including the one attached wheel - on its side. This is easier with two people.
Step 6: MBot: Nose Wheel

The next page shows how to add the nose wheel, the ultrasonic sensor and the standoffs for the circuit board. It also tells you to push the motor cables up through the center hole in the frame.
The picture above is the nose wheel attached to its circuit board - note the edge sensors at the left end, which will be the front:
Step 7: MBot: Ultrasonic Sensor

The ultrasonic sensor just gets attached to the front of the robot. Note the edge sensors in front of the nose wheel.
Step 8: MBot: Battery Pack

The battery pack is the only part that's not bolted down. That makes some sense, because it must be removed to change the batteries. The instructions show an easy way to do this: place it upside down on the table, press opposite sides of velcro on the frame and the battery pack, and then flip the battery pack over, pivoting it on the edge closest to the robot.
Step 9: MBot: Radio

There is one last part to add: the radio transmitter and receiver board. Each kit includes either a Bluetooth board or a WiFi board. We chose Bluetooth for ours. You just press it into the connectors toward the back.
Step 10: MBot: Cables

With everything attached, it's time to plug in the cables.
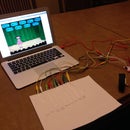
Step 11: Making Tap Pads

To make the "tap pads", you need a piece of paper - cardstock works best - and a CircuitScribe Conductive Ink Pen. You draw arrows with the conductive pen, and then draw lines from the arrows to one side of the paper; I chose the top. If you want to add another robotic action, do the same with a rectangle, labeled underneath "Space". It should look somewhat like the example drawn below - with four arrows and a space bar. Later, you can add more to the code and create more features if you want them.
Step 12: Assemble the Circuit


To assemble the circuit, you need the paper that you just created, a Makey Makey tool, and a computer. First connect the colorful wires to the paper so that they're touching the conductive ink...
... then connect them to the corresponding holes in the board.
Connect the long orange cable to the circuit board and to the USB port on the computer.
Then connect a wire to one of the ground holes on the Makey Makey. (If you want to, you can use Antistatic Wrist Strap, so it holds you, instead of you holding it.)
If you need more assistance with the Makey Makey, see our first Instructable Using CircuitScribe, Makey Makey, and Scratch to Create Art.
Step 13: Write the Code
The mblock code is very simple. The ten sections that you see below receive signals from the Makey Makey, which translates your taps on the conductive ink pads on the paper to key presses, and then the computer activates the corresponding code. A Bluetooth signal is sent to the robot, telling it what to do.
Nothing is perfect, and the least obvious - and maybe "least consistent" - part of using an mBot is choosing the right serial port to communicate from the computer to the robot. Fortunately, there are a few YouTube videos that discuss this.
(Screenshot of code is on its way!)
Step 14: Tap-Drive Your Robot!
Finally! The Fun Part! Tap the silver pads that you drew, and drive your robot!
Video: http://youtu.be/RF4fRlNbRgI
Step 15: Acknowledgments

Once again, a big shotout to the Tech Valley Center of Gravity for assistance, and hearty congratulations on the Grand Opening of their new Makerspace!


