

Introduction: Ted Baer's Bicycle Wheel Windmill


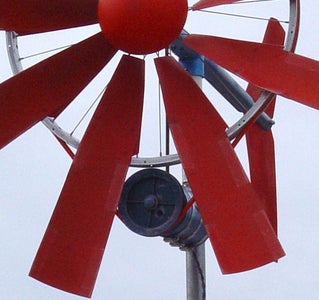
Ted Baer has created a series of small windmills designed for third world use over a period of three decades. This first in the series has evolved in simplicity and power. The aluminum vanes are constructed from a building flashing roll utilizing the pre-existing bend of the roll in construction. Two 16 " sections are riveted together to make one vane. The vanes clip on the spokes of the bicycle wheel using a "bent nail" and a bend in the vane. Detailed pictures will be provided shortly. The generator is a surplus permanent magnet motor and the uv resistant endless belting is purchased to length from online sources.
Output is a respectable 2 amps at 12 mph (18-20 volts) providing a cost effective alternative to a solar photovoltaic panels (if wind is available). The total cost of the windmill was less than $80 purchasing most items new (off-the-shelf). The two most expensive items were the permanent magnet motor (around $30) and the uv resistant round belting typically used in food processing plants to drive conveyors ($3 to $5 per foot).
The windmill does have a tail (see new photo). The frame is made from PVC pipe. It is important to use only a 24 to 27 inch rear solid axle bicycle wheel. The wheel is mounted to a PVC end cap via a hole drilled in the middle of the end cap.
The generator is a 24 volt DC permanent magnet motor. This one was surplus and used in old main frame disk drive units. DC permanent magnet motors are available through Internet surplus resources, but getting scarce. Here is a link that gives you more detail on sources and the types to look for: http://www.otherpower.com/otherpower_experiments_tapedrivemotors.html
The generator is mounted using a simple L bracket. Should be sturdy (not the typical shelf bracket) and both the motor and the bracket are secured with radiator hose clamps.
The windmill pole is electrical conduit that 1.5 inch PVC slides over. A short segment of PVC pipe is screwed into the metal conduit to create a bearing that the windmill pivots on (PVC to PVC).
The tail has to be counterweighted to balance the unit. Ted used a bunch of pennies and got it balanced perfectly. What else are they good for? :-)
I'm adding a couple of new pictures. Sorry we don't have more detailed steps with pictures. This was done some time ago.
Step 1: Testing


The test rig is a Windstar van with top rack and platform. The tripod is a roof TV antenna mount. Windspeed, volts and amps are taken and recorded with a digital camera. Video clips will be provided shortly.
Step 2: Vane Attachment

The vanes attach by folding the aluminum flashing over one spoke and hooking a bent nail around a second spoke, The bent nail is inserted through a drilled hole in the vane.
Step 3: Blade Attachment Detail
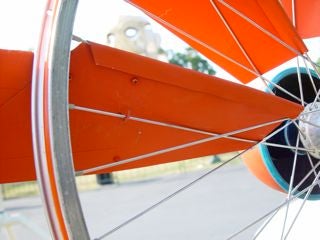
This shows how the blade is attached. The bend is made by hand, simply bending the aluminum flashing over a metal rod about 1/8th inch in diameter. The metal flashing we used (years ago) was thicker than currently available. You will have to laminate (rivet or use two-sided tape) two thicknesses together to obtain a blade that is stiff enough. But you can also make blades out of wood (1/8 inch plywood or door skins) or plastic.
Step 4: Generator Belt Detail
This just gives a bit more detailed view of the generator, pulley and endless belting.
Step 5:

There were many variations of the windmill. Here is the most successful in terms of output. It uses two wheels and two generators. Let your imagination run wild. Our mantra is/was: "how much can you do with how little".
Step 6:
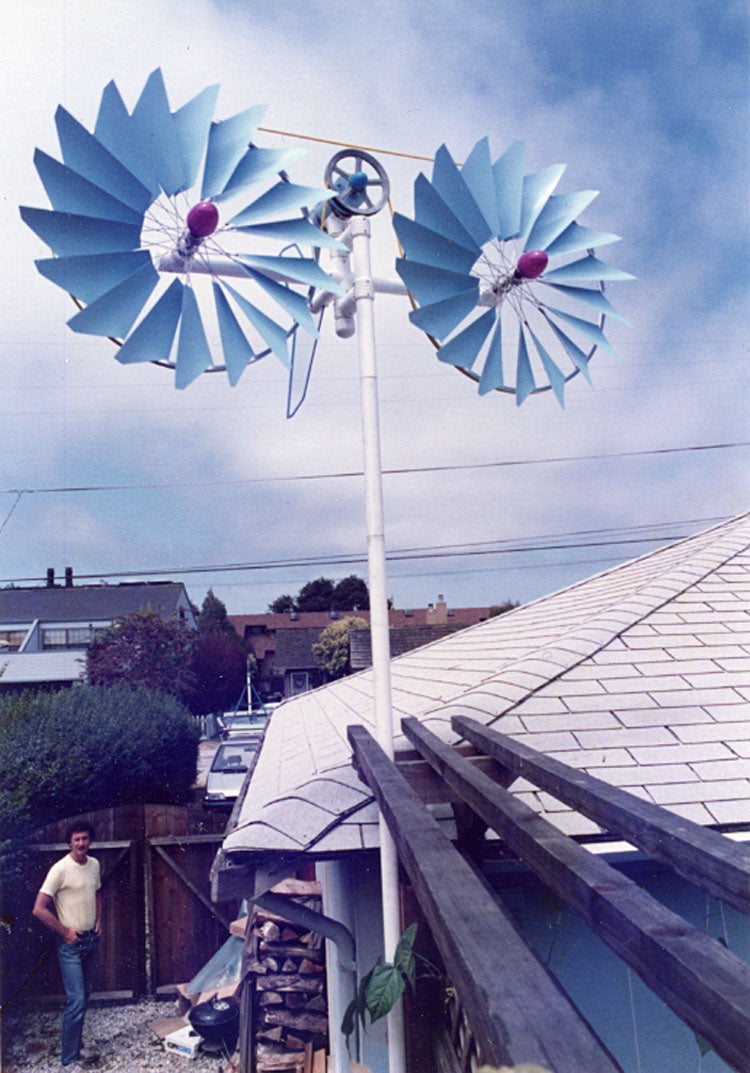
Here is a variation with only one generator. On both two wheel models the horizontal PVC must be strengthened with rigid metal electrical conduit or water pipe. The balance on this model was improved by having the generator closer to the pivot point. Want more power...add more wheels or start a mini windmill farm. Our concept all along has been the windmill equivalent of a solar panel...modular, friendly and cheap to build.
Step 7:

Note the specialty outdoor furniture PVC connectors. Two such connectors were used...a five way connector and one way slip connector. The connectors were secured by screws so they could be disassembled. The five way connector is the one used in the back supporting the horizontal cross piece and the tail. The horizontal bar has a metal pipe in the center to provide the needed rigidity. The top PVC connector supporting the generator is a three way connector cut so that it forms a cradle and the generator is mounted to it with radiator clamps. All the pulleys used the models are hardware store grade.
The special fittings can be ordered over the internet at:
http://www.littlegreenhouse.com/accessory/pvc.shtml


