

Introduction: Temperature and Humidity Meter


Whether in chilling winter or oppressive heat, we all need to measure the degree of the hotness or coldness so-called temperature. The temperature and humidity meter provides the same. This meter is equipped with the DHT11 Temperature and humidity sensor. The advantage of using DHT11 is its lower cost with higher accuracy.
This meter also calculates heat index.
Accuracy of DHT11:
Temperature:+/- 0.2 C
Humidity: +/- 5%
So, Let's start the adventure...
Step 1: Gathering the Materials Required


Things required:
- Arduino UNO
- Breadboard
- 16x2 LCD Display (I am using 1602a LCD model)
- DHT11
- 220 Ω Resistor
- 10 kΩ Potentiometer
- USB Cable
- Jumper wires
Step 2: Before You Start


Before making an awesome project, check that you have done the following things
- Have Installed an Arduino IDE on your PC (Otherwise, You have to code online)
- Had connected and soldered Pin headers to your LCD(if it is not soldered already)
- Make sure you have not connected any USBs or power source to Arduino while building the circuit; else it may give you a minor electric shock.
Step 3: Connecting LCD to Arduino


Insert LCD and Potentiometer to the Breadboard.
Follow the instructions given above in the circuit diagram to join the LCD to the Arduino.
Recheck the wirings.
Now, Run a raw code to determine whether Arduino is connected to LCD properly or not.
For this connect Arduino to your PC and open Arduino IDE
Choose your board(Arduino UNO) and port (usually COM3,Port may vary) on the IDE and then compile and upload the given code on the hardware i.e. ,Arduino.
Try changing the potentiometer resistance value by adjusting the knob of potentiometer.
If the LCD shows the message "Test successful!" then you have successfully installed LCD to your Arduino.
Proceed to the next step
Attachments

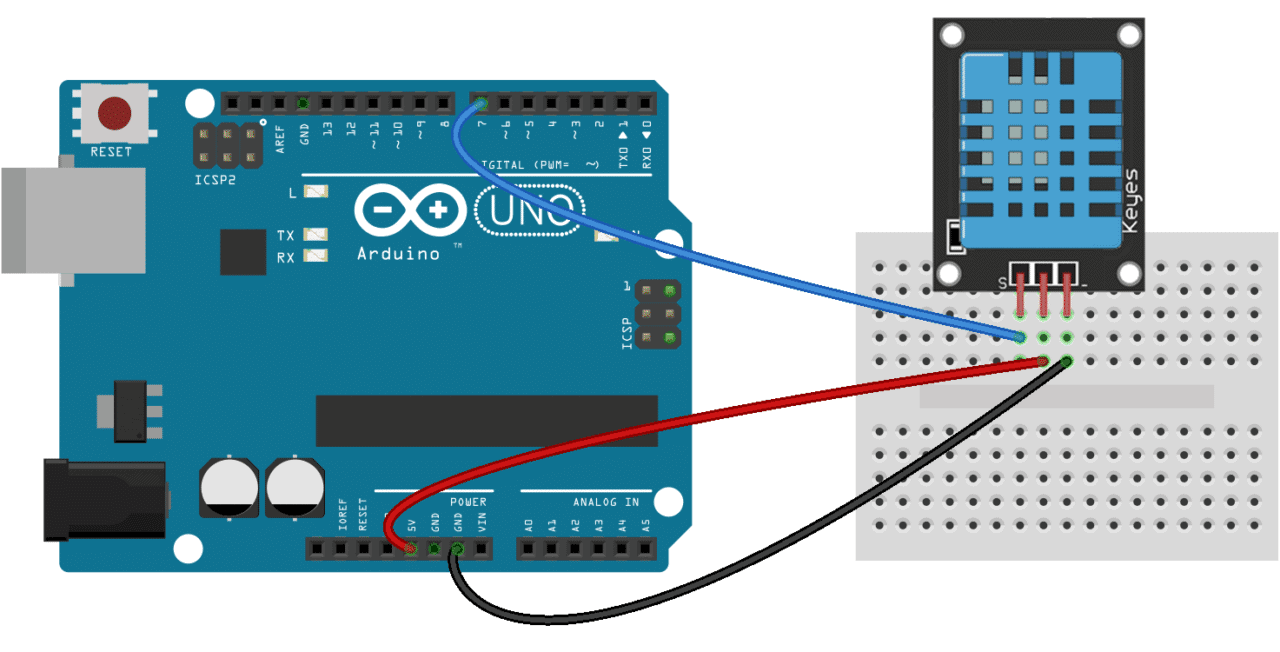
Step 4: Connecting DHT11 to Your Circuit


Pin DHT11 in your breadboard in a corner
- Connect the leftmost Pin(S) to Digital Pin 8
- Connect the middlemost Pin to Positive terminal of the breadboard.
- Connect the rightmost Pin to the Negative terminal of the breadboard
Step 5: Installing DHT11 Library


Disclaimer:Do this step only if you have not installed DHT library
Steps:
- Download DHT library through the link given below
- Open Arduino IDE on your PC
- Go To Sketch section of the tab ,then click on Include library option
- Then click Add .ZIP library option
- Choose the library downloaded earlier and then click Open.
- Close the IDE(No need to restart P.C.)
Congratulations, You have added DHT library to your IDE.
Attachments
Step 6: Coding the Circuits


Steps
- Open Arduino IDE
- Connect Arduino to your PC
- Choose your board(Arduino UNO) and port (usually COM3) on the IDE
- Run and upload the code. (Code Link below)
Step 7: Final Move


Now, you are only a step away from making a portable temperature and humidity meter.
- Attach Arduino to cardboard or put it inside a box depending upon your choice.
- Connect a 9V external power source to Arduino.
- Set the right contrast by turning the knob of Arduino
Now you had made a temperature and humidity meter
Think about other things you can do with this
- Try remixing the code if you want or
- Adding any additional sensor or accessories. It's up to you.
Let me know in the comments section what you think about this project or if you have any questions.
This Instructables is brought to you byLAB Studios.

Participated in the
Arduino Contest 2019


