

Introduction: Tent Trailer Roof Re-build
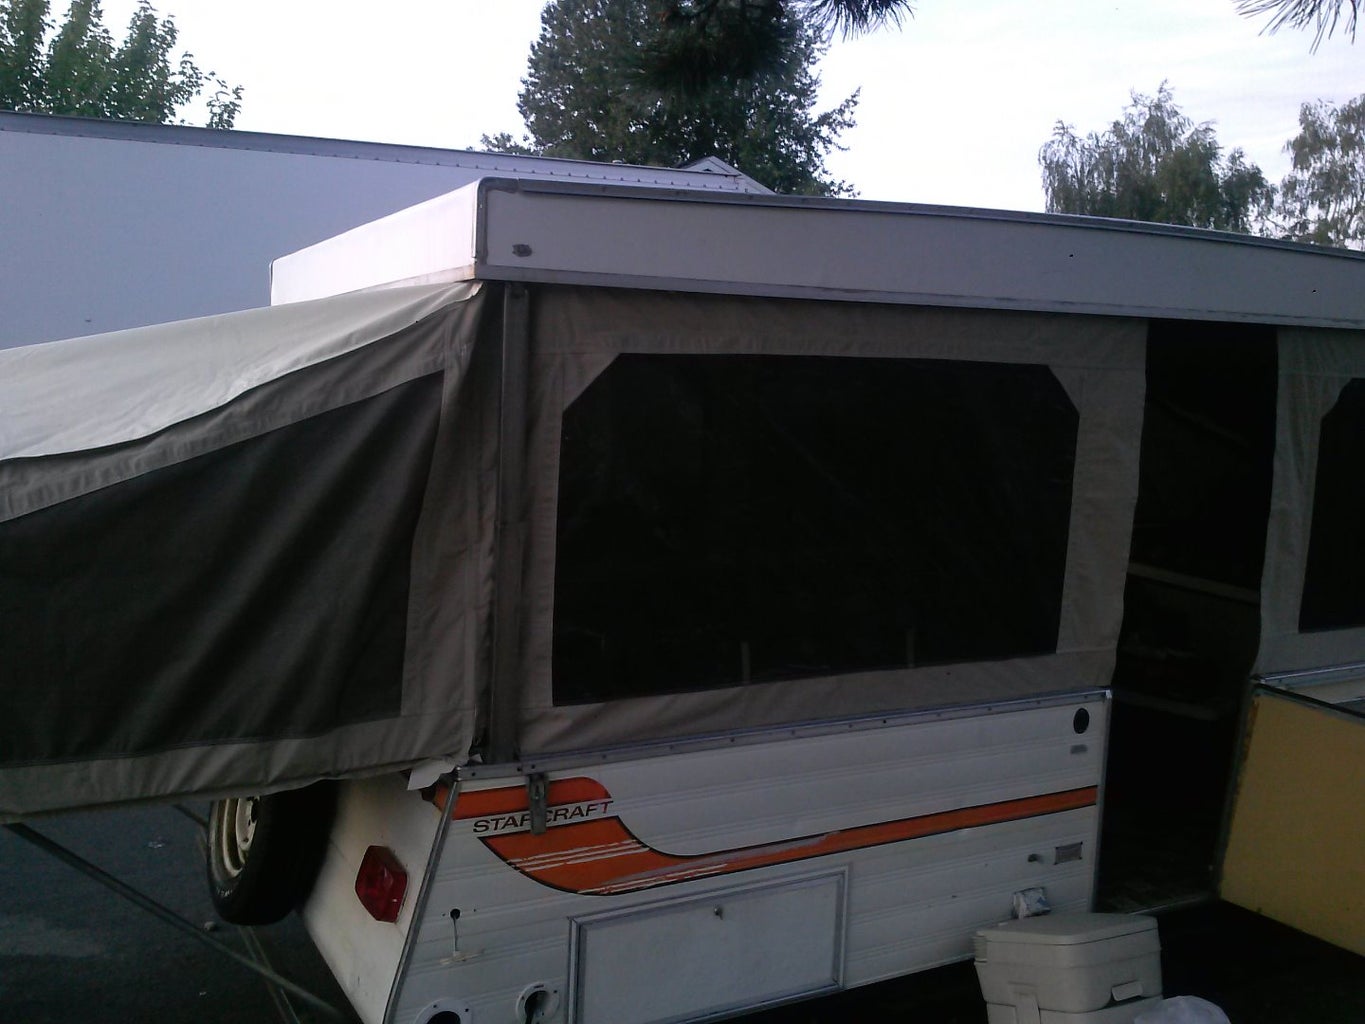


1978 Starcraft Galaxy Swinger Roof Re-build and Canvas Replacement
May / June 2015
Owner - Troy Crivellone
- As with many old tent trailers the roof on my ’78 Starcraft was not working at all. The metal roof had many many pinholes and dry rot that in 2012 I attempted to redo the inside ceiling portion of it, thinking that the water was still just coming in through the roof. I scraped off all the Styrofoam (using paint thinner to liquefy it) and started from the metal roof down. I cut the metal by accident in one spot so I had to tape up the roof at that cut and once it was all done it looked nice but the water kept coming in. Fast forward 3 years and I finally decided to use a tax refund to fund the roof tear down and complete rebuild along with new canvas as it was in just OK shape with many rips, and bad screens on some windows. Below is my photo journey of the build along with descriptions and how to instructions on how to do this yourself. We started on a Saturday morning and finished the main parts by Sunday afternoon. Trim and reinstallation was done later that week. 4 people total helped with 2 (myself and my friend) doing the majority of the actual build. My wife and his wife did a lot of scraping of old putty tape and cleaned a lot of the metal we saved for the trim and rails. So 4 people would be ideal, and more fun, but it can be done with 2.
Materials List for a 14’ long roof
Versiweld TPO 060 10’x 15’ (TPO rubber roof, found at roofing supply places) $150
Versiweld TPO 302323 Bonding Adhesive (5 gallon bucket only, used about half)… $150
2 pieces of 1” x 12” x 15’ side boards $60 (lumber supply, not home depot or lowes)
2 pieces of 1” x 10” x 7ft boards for front and back of roof
4 pieces of 4’ x 8‘ x2” thick White foam $100 (I used the existing foam from3 years ago)
8 - 2”x2” wood pieces for Ribs and cut pieces for any roof vent frames
3 pieces of 4x8 sheets of underlayment (for top of the roof for the rubber to adhere to)
3 pieces of your choice of ceiling material (I used wood paneling)
Enough sticks of wood molding to finish off the roof edges. 45 feet +/-
Wood Glue
Metal screws for reinstalling the trims and roof channel with trailer bulb seal
Wood screws for underlayment, ceiling material and rib installation
Foam board adhesive for foam to underlayment and foam to ceiling material
60’ of butyl tape for trims, channels, vents and upright post holes and latch pieces
4 Paint roller covers with a tight pile, paint tray and floor coverings that can be trashed
Hot knife to cut foam
Silicone sealant (1 tube or left over tube from previous job, won’t need much at all)
Table saw, miter saw, jigsaw, screw gun, / “ drill bit for post holes and / “ for latch holes
Router to route the bottom edge of the boards to fit into the bottom channel
Nail or staple gun for interior molding
Hammer, crowbar and Awl for removal of old and installation of new canvas

Step 1: Remove the Old Roof


Start by removing the canvas and canvas rails from the interior roof and the lights any vent shrouds and ceiling mounted items (door holder, etc). If you want the lights and vent in the same place as before then measure them out before you remove them so you know where they went. Remove the screws for the bottom channel that has the bulb seal, but same the bulb seal if it’s good. Don’t remove the channel yet as it will help with removal. Once the roof is detached from everything but the 4 uprights get 3 more friends and some pizza and beer and have them help remove the roof. Lower it down and unscrew the bolts, but keep them for replacement measurement later. I kept all my screws and bolts until I was done. If the bolts can be re-used then good, but you should use new screws in place of where old screws were. Some of mine were pencil points when I took them out from all the water damage.
Step 2: Remove All Trim and Tear Apart the Roof

Lay the roof on the ground and start removing everything else, awning rail, corners, and roof vents. Save the side metal pieces for a template for the new wood. Measure where the vent was as if you are replacing in the same spot. I relocated mine, so this is the perfect time to add a new vent, move one or add AC (because this new roof will support the weight of an AC unit). Clean off the metal parts as best you can mainly removing any butyl or putty tape to ensure a clean seal upon reinstallation.
Step 3: Measure Measure Measure


Take your side metal panels and trace them onto the new side wood boards and then measure for the front and back panels by using the bottom channel. This was an issue for us as we used 1” thick wood and the factory used the pressboard type wood and it wasn’t as thick as the new wood, so we basically cut out the two sides in the shape of the old piece, with a high arch in the middle tapering down to the ends. It went from about 11” down to 8”. We then put those two boards in the channel and then measured the distance between them for the front and back boards and the ribs as well. So cut the sides, front, back, and ribs up to the measured lengths. We put the front and back pieces inside the side boards, so the side overlapped the front/back. You will need to router the bottom of all 4 sides to fit into the channel due to the increased thickness of the wood.
Step 4: Assemble the Framing


Place the wood into the metal bottom channel to ensure all 4 sides match up in the channel and with each other. Sand down if needed. Remove from the channel. Pre-drill two holes on the 4 sides and screw the sides to the front/back. Find the center of the sides and pre-drill and screw in one of the 2x2’s at the center. We had to add a second 2x2 next to one rib due to the where the underlayment top pieces laid down at. We had one piece overlap one rib too much and not enough room to screw on the other two pieces of underlayment to the ribs. Equal space the remaining ribs while putting one at the front and back up against the front/back wood. This will be mainly for stability and attachment of the ceiling material.
Step 5: Attach Underlayment to Top


This step is pretty easy and specific to your roof length. We used 3 pieces of underlayment sheeting from Lowes as it was 1/4“ thick and not too expensive. It will be covered by the TPO rubber so it’s mainly for the TPO to adhere to. Due to the placement of the ribs we decided to lay down 1 piece from side to side and the other two front to back (see photo). This allowed us to screw the underlayment to the ribs and the side/front/back boards. Make sure to sink the screws or at least be flush with the underlayment, so your roof doesn’t have little circles all over it. I also used wood glue on the ribs when I laid down the underlayment. Cut out the area(s) where your vents will go before putting the TPO on. Once cut out, make a frame out of the 2x2’s around each vent opening and screw it to the ribs and the underlayment. Screw from on top the underlayment down to avoid anything poking the TPO.
Step 6: TPO Rubber Installation


This is where you’ll need a friend or make sure your current work friend is ready to do this. Maybe schedule this part after a meal and a rest period or first thing the next day. The place you buy the TPO will advise you at what temps to put on or not put the TPO but don’t do it in 32 degs.. or 100 degs.. We did it in about 75-80 and the glue dried FAST… So I would say 65 to 70 would be ideal, but that all depends on a lot of factors of your climate.
Unroll the TPO rubber and drape it completely over the roof BLACK SIDE DOWN. Make sure it drapes over all 4 sides and has overhang. Try to equal it out, but it’s not important as long as each side overhangs the bottom edge of the wood by at least 2-3” if not more. I’ll mention it again later, but keep any big scraps or strips for repairs and such later. Now flip one side over until you get half of the roof showing, like your folding a tarp (cause we all love doing that, but you’ll never need a tarp again for your roof after this!!). Get your supplies ready and be prepared to work fast. Go to the bathroom, get the kids snacks and water, kiss your wife or partner, drink some water and do a little Karate Kid meditation to calm yourself. Get your roller out and attach it to a pole and put on the paint cover. Have 2-3 more handy.
Get your paint tray and lay down a large area of something to protect your floor. You can use the cut off pieces of underlayment you have or a large tarp or something you don’t mind losing and it’s not porous. Make sure the floor covering goes from the paint tray to the roof, as this stuff will drip and not come off or out easily. Open the bucket of TPO Adhesive and stir…stir…stir. You can use a paint attachment for your drill but I recommend a clean wooden dowel or stick. You will need to do it several times to keep the glue mixed and ready to go. It’s not fun cleaning off anything so again I’d use a wood dowel. Stir it up good but you don’t have to whip it(whip it good… haha). Have your friend on the other side of the roof and standby to flip the rubber. Pour the glue into the paint tray and start rolling the adhesive on to the black side first then the wood underlayment. This has to be done all at once as the adhesive will start to set on the black side if you wait too long. You can do the wood first if you want to. Don’t go all the way to the edges of the black as that will be done in the next step, so leave a border of the black TPO without adhesive. You’ll know it’s ready to flip when the adhesive is stringy when you lift your finger from it.
Slowly roll the TPO back over the wood. If you have a long wooden rod (like from a closet) that would help. If you get a bubble, you have stop and pull the rubber back off and let me tell you my back still hurts…. Go SLOW and make it smooth. Our first side went down so well we thought, “Man that was so easy!!!” Side two had a huge bubble line about 3 ft long and we had to get 2 neighbors to come help pull it back over and it was the hardest thing ever to pull. Once the one side is down, then do the other side after a break. Stir the glue again
and stir what’s left in the tray if any. Repeat and GO SLOW!! Once you’re down with both sides, smooth out any small bubbles if possible and take a break (cover the glue bucket in between applications). I’m not going to tell you that it was 100% smooth and we have no bubbles.. There are a few and I doubt anyone would be able to get this on smooth unless you did this for a living. The bubbles have settled and the top is smooth as ever right now!
Step 7: TPO Placement Onto Sides and Corners


Once your break is done, go back and apply the glue to black side of the TPO and the wood sides, front and back. Leave the corners for last, as they are a pain.. Once it’s all set and ready to go attack the corners. I basically tried to wrap it like a present, but you’ll need to cut and overlap one side to the other. I will leave that up to you as it’s very hard to explain, but make sure no wood is showing. You can also just take your 4 corner trim pieces(mine were separate from the main top rails so that helped). Apply some butyl tape to the underside of the trim pieces and once you’ve folded over the TPO, attach the corner pieces with screws. Try to make the TPO as thin as possible.
Step 8: Reattach the Top Trim Rails


Now find your front and back rails and make sure you know what side your front will be upon reinstallation onto the trailer, or decide it by putting the awning rail on one side and the non-awning rail on the opposite. After this there is no going back and everything must follow where the front and back are. I messed up on the wiring and had to run wire all the way along the top of the back side to the opposite end. Smooth out the top angle where the TPO comes down to the side as you attach the rails to insure a good look. Apply Butyl tape to the underside
of the metal trim and get the new metal screws and start attaching the trims meeting up with the corner pieces if your trailer had separate corners. If you are by yourself, then screw in 1 or two at both ends to keep it in place then do the rest of the holes. Same thing on the back. You may have to work the corners a bit as the old roof flexed them. Before you move the next step you should cut the excess TPO rubber roof material from the bottom that is overhanging the edge. You can leave enough to roll under the edge or cut it right to the edge. The bottom rail with bulb seal will attach to the bottom and will have sealant as well, so this is up to you. I cut it flush with the edge and used sealant with the bottom rail.
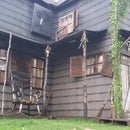
Step 9: Cut Roof Vent(s)

Before you flip the roof to start on the ceiling make sure you have cut the holes for the roof vent. You’ll need to find where you cut the underlayment and cut out the TPO. I left a little bit of a lip around the whole thing that can be then folded into the area where the roof vent will sit and that can help if water ever does get in through the vent area it would run on the TPO and then inside the trailer instead of soaking the wood. Don’t attach any roof vents yet as now you get to flip the whole thing over!
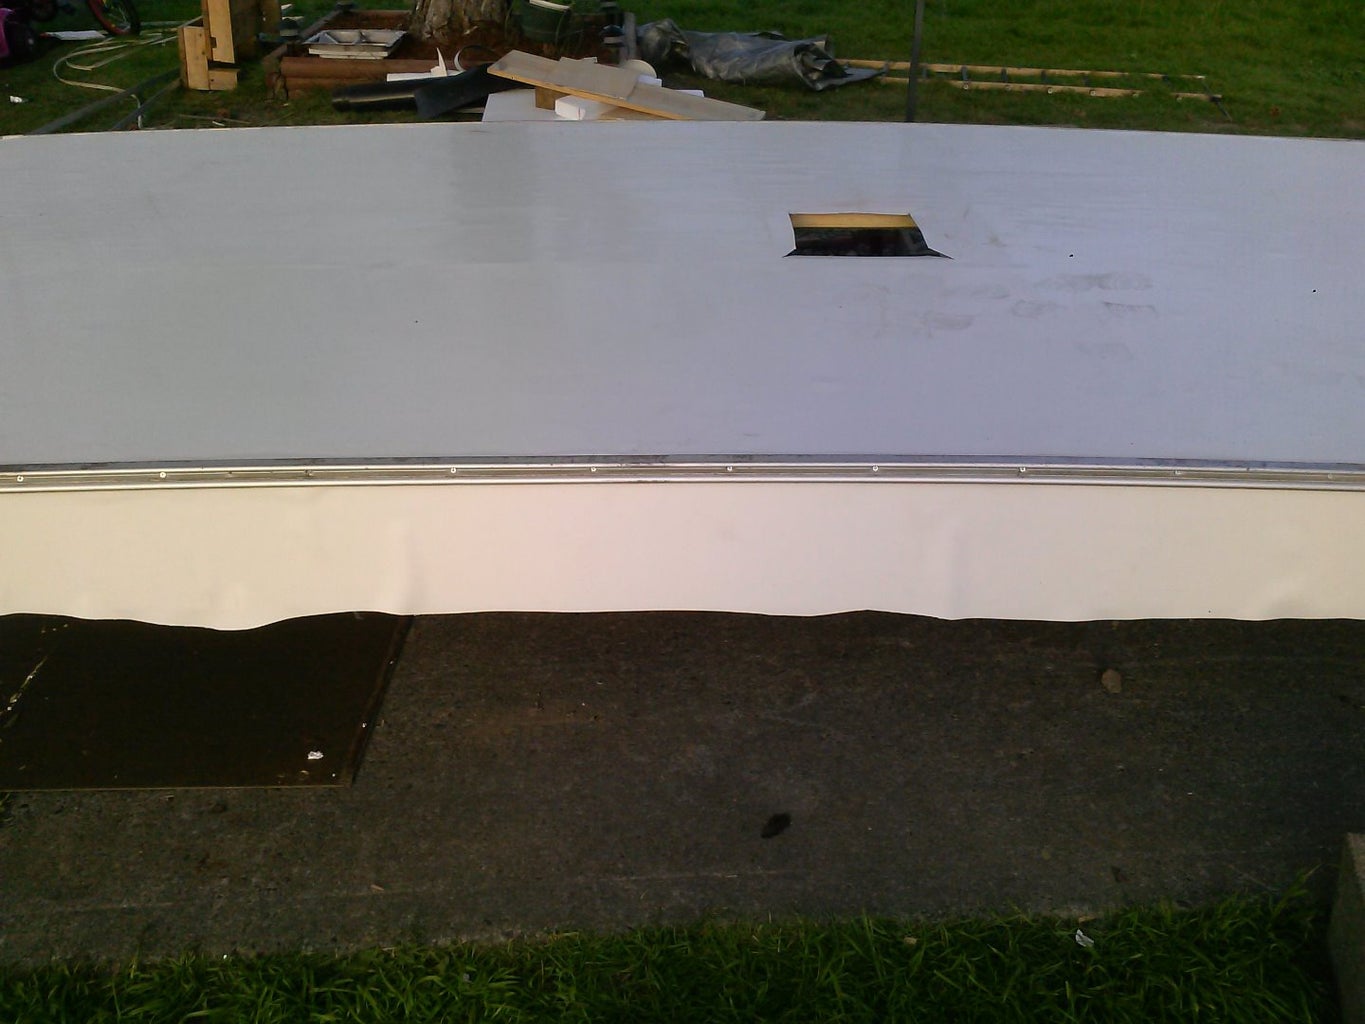
Step 10: Flip the Roof and Attach the Bottom Rail/seal

Find your friend which by now has either cursed your name or is halfway out of town, and flip the roof over. With the side rails on the roof will be separated from the ground, but you could use wood in between the rail and the ground as well. Eventually you will have a lot of weight on the inside when you are gluing the foam and ceiling material, so think about that as well. I let mine sit on the ground and it would rock back and forth if pushed down. Take one of the bottom rails (mine was in two pieces that meet at spots on the front and back. Apply the butyl tape to the trough that the wood will sit in. If you left TPO to roll over the edge you will have to roll that over as you put on the rail. Push it on to the wood edges and check the corners to make sure you get a tight fit. Do this with the other side and screw the rail to the wood. The butyl tape will seal the screws and the wood, and if you left TPO to roll under than that will seal it even more. The old roof had a little gap where the rails meet and the new roof does too. Apply silicone sealant to those gaps.
Step 11: Measure, Cut, and Apply Foam Board and Wiring

Lay out your wiring and remember which side the wiring goes up the canvas. Lay the wiring down and measure how far from the edge to the ceiling light hole is. Mark that on your foam and then drill a hole into the foam all the way through. I had two lights so I centered them on each end. Get out your hot knife or other foam cutting tools and get your foam out. Also locate some very heavy objects like cinder blocks or weights and some scrap to place between the weight and the ceiling/foam. You can use the foam pieces that you will trim off as well. Measure and cut the foam to fit the areas inside the slats. I used the old foam as it was only 2 years old and looked / smelled brand new despite 2 years of soaking, so I had to cut extra small pieces to fill the gaps. One solid piece is ideal. Try to make it as snug as possible so that you have to push it into place. Once measured and cut, take your foam board adhesive and apply it to the underlayment. Go around the edge in a Z pattern and then put some in the middle area as well. I think I used 4 tubes total but maybe more. I’d get 6 to make sure you have enough as you’ll be doing this twice. It doesn’t have to be a huge bead but not thin either. I made mine look like the diameter of a BIC pen. Do one section at a time and lay the foam into place on each section. On the pieces
that have the wiring that needs to go through lay one edge into the space and then feed the wiring through and lay the rest down. Make sure the wiring is between the foam and the underlayment with just one end going down to the roof bottom edge to meet with the canvas. Put weights on each section (2-3 should be fine) and wait about an hour or so to move on. WOOHOO!!! BREAK TIME!!
Step 12: Apply the Ceiling Material


I used wood paneling from Lowes but you can use whatever you want, but remember about weight. So think as thin as possible. Remove the weights and then get out a sharpie or pencil and mark on the side wall where each rib meets the sidewall. This will help with attaching the ceiling. Measure out where your wires are for your lights and drill a hole through the ceiling material to guide those through. Mark where your vent frames are as well as you can screw into those as well. Any where you can screw the ceiling material into the wood will help with longevity. You can choose to add a piece of underlayment or some other thin wood to the parts where the lights will screw into, but the ceiling material should be strong enough to hold the light weight of the lights. Cut the ceiling material to fit the space and make sure the material is facing the same direction, like wood grain and/or lines. I put more foam board adhesive on the foam and then also put wood glue on the ribs and the vent frame. Then one piece at a time, screw in the ceiling material to the ribs and feed the wiring through the two pieces before final attachment to the wood/foam. You should probably pre-drill these as you might be pretty close to the edge of the rib and they will split. You can also use staples as well. Cut out the sections for the vents too. Lay the weights back down on the ceiling using some scrap underlayment, ceiling material or foam and let it sit for a few hours. You may have to do the middle and one end for a few hours and then switch to the other end as your roof should have an arch to it.
Step 13: Attach the Molding Trim and the Lights and Drill Upright Bolt Holes


I used general molding but you can use whatever you want to finish off the edge, quarter round, wide, narrow, etc. Since the lights are so lightweight already you can screw them back into the paneling or ceiling material. Now if you kept one of the old side panels or both, put them back up to the new sides and match up where the
upright bolt holes will go. You could also put the roof back on (step 14) and then drill the holes but I fear the
roof might shift and fall. Drill the holes from the TPO to the inside and clean out the hole. I put butyl tape over the hole so it would be sealed against the washer and bolt head upon install. Then get ready to reinstall the roof back on the tent trailer!
Step 14: Reinstalling the Roof
You’re done!!! Well with the install, now you have reinstall the roof back on the trailer. Find 3 new friends cause you lost all your other friends during the previous 13 steps. Make sure you get the upright bolts, nuts and washers ready. I am sure there are several ways to do this, but I found that cutting four 2x4 boards a bit higher than the uprights when the trailer is “down” and putting them on each corner next to the uprights helps with install. If you don’t you’ll have to have 4 people holding it up while you run around and put the bolts in. So put the 2x4’s on the corners and then lift the roof, but remember to match up where your electrical from the box is coming up to meet the wires coming from the roof(this was a step I missed..). Lift it into place and raise the uprights to meet the holes. Push the bolt through the Butyl tape or add silicone to the TPO before tightening the bolt/washer to provide a watertight seal. Install all 4 sides and test!! Thank your new friends who now hate you too and revel in your brand new tent trailer roof that could last 25-30 years!!
Step 15: Reattach the Canvas Top Rails and Canvas


I bought brand new canvas as well from RVworkshop.com. It shipped very fast and looks amazing. The issue I ran into with installing the top rails is that you have no idea where the old spot was to put it up. The rails don’t go
edge to edge so I did my best to center them. I started by putting the canvas in the bottom rail first and then striking the dents with a hammer and an awl. This sandwiches the canvas inside the rail. It’s loud so do it during the day. Let the canvas hang off the sides and on the bed. I started my rails just above the bulb seal where I could see a tiny bit of wood. Then lower the trailer just a little bit, 1-2 cranks. With the rails, I’d start with the door first, so if you have a hanging door or brackets to attach your door too on the inner roof wall, attach the door and then attach the rails to the left and right. Then center the rails over the beds and the long single side. Fold the canvas into the rails and then attach the screws to the ends of the rails through the canvas rail insert (thick part that runs along the top of the canvas piece). Once all are attached crank it up to check for how tight it is. Some trailers have little wood blocks between the upright and the corners. I had them and they are to screw the canvas to as it rounds the corners. The zippers mainly line up with the uprights not the corners. Make new wood blocks and pre-drill the holes. Screw the canvas to those blocks as well and you are good to go!
Anyquestions please don’t hesitate to message me here or email me at talecriv@gmail.com.


