

Introduction: Textile Trackpad


Functional fabrics can do things like light up, heat people, and sense when they're being touched. This project was developed to show how functional fabrics can be used for applications far beyond apparel and can also be used as design tools.
The Textile trackpad can be used to replace a computer mouse and could, in theory, be used to model, sketch and draw in the computer. This one is just hooked up to a processing sketch, but if you make your own, I'd be curious to see how you make it function!
To make the trackpad textile, you'll need the following things:
- Bare conductive ink,
- Flora microcontroller
- Embroidery TPU
- 4 Adafruit 12 Cap Touch breakout boards
- 10mm conductive fabric tape (3 rolls)
- Nail Polish, or liquid electrical tape
- iron on interfacing (soft)
- A Cover textile
- Heat Gun
- Soldering station
- USB mini connector
- Gauge 30 silicone thread
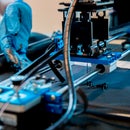
Step 1: Solder Your Electronics


To make your textile trackpad, you'll need to spend some time soldering together the circuit. See the diagram above for how the layout is done. I added vibration motors to shake when you touch the textile, but it's up to you to add any special features!
For the cap touch breakout boards, each one can have an individual address, so you'll want to solder them all to the same clock and data line and then solder pins together on the board to create the unique address.
Step 2: Lay the X Axis


Once the electronics are assembled, you can lay out the X axis by ironing together the embroidery insulation and laying on the conductive fabric strips across the X axis
There should be 17 strips spaced 1.5" apart. Once they are all placed, you can insulate with nail polish where the Y axis will cross (this may not be entirely necessary).
Step 3: Insulate the Y Axis


Place the 23 Y axis strips onto the lightweight interfacing and cut back into strips. The interfacing on the back keeps the X and Y axis from conducting together. You should have 23 strips with backing ready to place.
Step 4: Add the Y Axis


To place the Y Axis, make sure to mark placement lines on the embroidery material. You'll want to place them at a 1.5" interval and ensure they are straight from top to bottom. They can be held in place with double stick tape.
Step 5: Connect Axis to Electronics


To connect each wire to the conductive fabric pieces, you'll want to use a conductive adhesive like Bare Conductive. We placed this at each joint and let it dry. Then, we tested the connection to ensure it would properly conduct.
Step 6: Test


After assembling the grid, you'll want to test it with a simple example sketch that comes with the 12 Cap Touch breakout board. You can touch each lead to ensure it is registered by the MCU and the IC.
Step 7: Press Together Entire Tablecloth


This is where it all comes together! Hem your piece of cover fabric and place on top of the embroidery interfacing. The sticky side should be up. Use an iron or a heat gun to melt the embroidery adhesive and press down the wires and X,Y strips.
Step 8: Program Electronics


Next up is programming the Flora. You'll want to download the 12 Cap Touch library from Adafruit and install. I changed by settings to be more sensitive in the header file and programmed it to have mouse control.
Step 9: Interact With Your Computer in a New Way!


Use the "trackpad" to control your mouse and interact with your digital world in a a new way!


