

Introduction: The 123D Catched Pineapple


I know you are all wondering how you catch, clean, print and assemble a 3d cardboard pineapple, and there is no need to fret. This is a quick tutorial showing you exactly that.
I will be using:
123D Catch, which is software made by Autodesk that you can download as an app.
Meshmixer, another Autodesk program that is used to clean up my catch.
123D Make, also free software by Autodesk.
a lasercutter
my patience
Step 1: Do the Catch
So, I did my catch on a pineapple, but it can be used to catch basically anything that is matt and of a certain thickness. It all depends. For example, a grape stem is to thin, and a metal spoon is to shiny. But you can always try and see what works for you.
When doing the catch you are to take approx. 40 pictures of your thing, in this case my pineapple. You can do this in any way. Either circling around your object, or taking pictures in random order, but try to get at least a couple pictures of each side and of all undercuts that your object might have. This might take a couple tries. Take the pictures using the 123DCatch app. It seems to work better on ipads than on iphones, but it is supposed to work on both.
Upload your pictures and export it up on to the community. Then transfer to you computer.
Step 2: Get Your Catch

Go onto the community and find your catch.
Download your file.
Also download Meshmixer.
Step 3: Clean Your Catch

Import your Project in Meshmixer and clean it up.
This means deleting any surface that the project has been situated on, and filling out any holes that have occurred. You simply mark the parts that you do not wish to keep, and then delete them. By moving into "Inspector" you can also fill out any holes and correct any inconsistencies.
Disclaimer: This is not a Meshmixer tutorial, so I will not further explain how to clean up your project.
Step 4: 123D Make

When you have cleaned up your file you move into 123D Make. Where you choose what the output will be.
I chose to print my pineapple as hollow stacks and in cardboard. You input all info in the fields to the left of you screen and then work your way down through the options.
Step 5: 123D Make .2

The Program shows you how the pieces will be layered. You can change any setting and the software will show you shat changes on the actual model. You also get a sample preview of the plans to your right.
Step 6: Printing

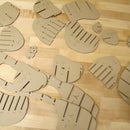
Export the plans and move them into Adobe Illustrator where you change the line thickness to whatever setting you have for a vector cut on your lasercutter. The numbers are in red and by vector engraving them into your pieces you will have a easier time putting all the object back into a 3d piece.
Step 7: Stacking


Organize the pieces and glue them together as shown by the markings on the pieces.
Step 8: Enjoy


