

Introduction: The $2 LED Camera Light for Video and Photos

Ever since digital cameras took decent video I stopped carrying around my DV video camera and instead use my point and shoot digital camera to take a few minutes of MOV or MPG video here and there. The only problem is my digicam is not equipped with a light to brighten up the videos I take indoors. There are some small LED lights you can buy online that attach to the 1/4" hole under you camera, but they cost from $30 to $40 and create a spotlight on your subjects. They also use SIX coin cells and only last 4 hours. I'd rather have a small light that uses rechargeable AAA's and lasts longer. (this one can last about 12 hours!)
So I decided to make my own using parts for less than $2.
The goal was to construct something simply and cheaply.
This is not the most efficient want to drive LEDs but it works very well for the price.
It requires some drilling and soldering skills but its pretty easy.
The only parts are
4xAAA battery holder with switch- $1.39
http://www.batteryspace.com/index.asp?PageAction=VIEWPROD&ProdID=2093
3 White LEDs 60 deg viewing angle (you can also try 4 LEDs) 12 cents each
http://www.buy-leds-online.com/560mw7c.html
10 ohm resistor - 5 cents
http://www.allelectronics.com/matrix/One_Quarter_W_Resistors.html
Phillips head 1/4-20 aluminum screw 3/8" long 10 cents - Hardware store
You can probably get all these parts from you favorite online electronics store, but if you want the same wide angle LEDs I used or just want to save some bucks on shipping you can buy the entire kit here.
This project will continue to evolve on my site so check it out for updates in the future.
Tools:
*5mm drill bit or #9 drill bit - for LED holes
*If you dont have that you can use a 3/16" size and work it bigger.
*Drill
*Soldering Iron
Here is a video to show how it lights up my bathroom (its the only room where i can block out ambient light)
NOTE: I have a new and improved version with 180 lumens
Step 1: Prepare the Battery Holder

This battery holder is great because it has a cover and comes with a switch. This is going to house your batteries and LEDs. This holder has chambers for 4 AAA batteries but you only need 3 batteries to run these lights. The other chamber is going to give you room for your LEDs and your mounting screw. So go ahead and remove the last spring contact opposite to the switch. It is one piece that is part of the other contact next to it. They should both come out together. You can use a small screwdriver to do this. Insert it through the spring and lift straight up.
Step 2: Drill Mount Hole

If you are going to mount this to your camera you will want to drill a hole in the top so a screw your 1/4" screw can pass through it. If you just want to make a cool flashlight skip to step three.
I chose to make a hole in the main body first and away from the switch and wires. The hole shown here is in a good position because we dont have to try too hard to squeeze the 3 LEDs in place. We also want the head of the screw to fit inside the holder.
Another reason for having the screw come out on this side is so when it is attached to the camera the power switch is on top, the bottom surface is flat, and the battery door and batteries are accessible.
Step 3: Rewire the Battery Holder


Now you are going to do some re-wiring to convert the 4xAAA holder into a 3xAAA holder with space for the LEDs. You have already removed the negative spring contact, but now you have to move the positive contact and red wire to the other end for your third battery. Take a thin flat head screw driver and pry under the positive contact until it loosens. You may have to also insert the screw driver vertically between the contact and the plastic housing wall to loosen it up the locking tab. See first picture
Then pull the contact and wire out of the case. See second picture
Now you will insert this contact and red wire to the other end of the case to complete the circuit. Notice how I am running the red wire inside the battery chamber.
See third picture
Now you will need to run the red wire to the corners like shown to make room for the battery. A small screw driver or thin blunt object helps. Be careful not to cut the wire or break the insulation.
See 4th picture
Step 4: Drill Holes for LEDs


While the wires are off to one side prepare to drill holes for the LEDs. Since the LEDs are 5mm you want to measure 2.5mm from the lip of the case as an easy way to keep things centered. Mark that with a knife or pen. See photos for details.
Then use a marker to decide where the three LEDs should go. I started with one closest to the wires and then spaced my other two about 10-12mm apart. You dont have to be super accurate but it will help for installation if they are evenly spaced.
Drilling Tip! Use a smaller drill bit at first to create a pilot hole because it is easier to keep steady and more precise. This smaller hole will also help keep the larger drill bit from walkingÃÂ which means your hole might not end up where you thought it would.
Try to keep your drill perpendicular to the surface so the LEDs will stick straight out from the body and not at different angles. (For wider illumination coverage you can purposely angle the left and right LEDs toward the outer edges but it makes assembly a bit trickier.) You also dont want your LED too close to your mounting screw.
NOTE: if you used a 5mm or #9 drill bit the LEDs probably fit fine. But if you only have 3/16" available it will be a very tight fit. You might have to work the drill bit around to grow the hole diameter. This is not the proper way to use a drill, but you do what you can.
Step 5: The Circuit


Your LEDs will be soldered together in a parallel circuit. So it might be a good idea to do a dry run to make sure the LEDs are working and they fit properly. See the diagram for reference.
I used LED Calc to help calculate the resistor I needed but I had to be careful what parameters I used.
The batteries are NiMh 1.2V each which should equal 3.6V but the voltage of batteries that are newly recharged are higher than 1.2V per battery. The total battery pack value can be as much as 4.1V for 3 NimH AAA cells. This circuit is not voltage regulated so the battery voltage and therefore current will start high and decrease over time.
To protect the LEDs from burning out you want to limit the current to each to 20mA and you should calculate your resistor value assuming the highest voltage case.
First make sure you choose "parralel LEDs" in the option of that page.
Then set the power supply parameter to 4.1V not 3.6V.
The voltage drop of the LED varies but you can use 3.3V as an approximate.
The current should be 20mA per LED. (* you can run some LEDs with more but this is a safe start)
Your result should be 15 ohms.
** If you plan to use 4 LEDs just change your LED quantity accordingly in the calculation.
Disclaimer:
This circuit was chosen because it uses the least number of components (one resistor) and is simple to construct. Our calculation assumes each LED has the same forward voltage but in reality they can differ by as much as 0.4V. A better parallel circuit would be one where each LED has its own resistor based on that LEDs forward voltage. But for the purposes of this inexpensive and easy project a single resistor design is adequate.
If you have a multimeter you can take the opportunity to test the current through the whole system.
I found it easier to just insert the LEDs backwards for now as shown below. Dont forget to use your resistor between the positive power wire and the positive terminals (longer leg) of the LEDs. You must make sure ALL LED legs are connected to the proper positive and negative wires otherwise you will send too much current to the lit LEDs and reduce their life or blow them out. I used alligator clips to keep the LEDs attached and touch the resistor to the red wire while its connected to the positive LED legs.
Also make sure the batteries are FULLY CHARGED so that you can measure the highest possible current. Divide your total measured current by three and that is an approximately how much current is passing through each LED.
Step 6: Solder LEDs

Use the holes in the casing as a makeshift fixture to hold the LEDs in place while you solder the LED legs together as shown in the photo. This helps keep the right distance between each LED while they are soldered together. Keep the LEDs in the same orientation so each positive leg is connected to the other positive legs, and each negative leg is connected to the other negative legs. You should bend the LED legs close to the LED body because you dont have much space in the battery holder.
Step 7: Install LEDs

Insert the LEDs loosely into the battery holder and bend the LED legs into the chamber with the wires.
You may have to trim the legs a bit. Be sure to keep track of which side is positive before trimming legs!! I also cut some of the plastic to give more room for the legs but you might not have to.
Step 8: Connect Wires

Now all that is left is to connect the wires and resistor and slide the LEDs into place. I have the positive legs on the bottom so the red wire was trimmed to about 1ââˆpast the battery and soldered to the resistor which is then soldered to the positive legs of the LEDs. You should do this soldering while the LEDs are OUTSIDE of the holder. Otherwise you risk melting the plastic. After you solder the red and black wires you should have enough room to slide the LEDs back into the holder and push them through the holes. I used a small screw driver to push on the clear plastic casing. DO NOT push on the legs they will bend and you might create a short. Also make sure that your black and red wires are not touching and that the top and bottom legs never touch! You can always use electrical tape to insulate the exposed parts from each other.
Step 9: Add Screw Stud


Take the short screw and push it as far into the main body as you can. You can use a hex bolt here if you find one short enough or cut it to length, but I found the round head of the philips head is easier to find in 3/8" length and gives more flexibility for adjustment.
The head of the philips screw is wider than the battery slot, so you might want to cut the thin wall as shown below to give it more room. The screw should be able to seat to the bottom of the plastic housing. Dont worry it will not affect the batteries.
The stud of the screw should only stick out about 1/4 inch. If it sticks out much further you might want to try adding some material between the screw head and the plastic body. You can cut a hole in a small piece of paper as a make shift shim if you want. This is also what you can do if the shortest screw you find is 1/2 long.
Step 10: Align the Screw for You Camera


Each camera is a bit different so you'll want to make this adjustment to the camera you plan to use. When you are done the light will be able to twist on and off of the camera with ease, and without the need of a separate knob. You simply turn the light body.
The video is probably the easiest way to explain this part.
Sorry for the ironically dimly lit video.
Here is how you do it.
Screw the light onto the camera but stop short before it aligns with the front face of your camera. If you pushed the screw down tightly in the previous step the screw should follow the motion of the main body and not slip.
Hold the camera and light tightly so that the main body of the light cannot move. Using a philips head screw driver tighten the screw into the camera until it is hand tight.
Now rotate only the light body until the front faces of the light and camera are parallel. Keep an eye on the screw head, it should not be rotating with the main body. If it is rotating it means you have not tightened it enough. If the main body cannot be moved at all then it means the screw was tightened too much.
If this worked out you should be able to rotate the battery holder to unscrew the light and the screw should rotate with the battery holder and the whole thing can come off in one piece.
This method worked well for me without any glue. but feel free to apply some hot glue if you like.
Slide the battery door closed and screw the LED camera light onto your camera. You should feel the camera light get tighter as you approach the final orientation. The installation and alignment are now complete. If you try mounting it to a different camera you may find you need to readjust the screw. This can sometimes be done by simply forcing the camera light to rotate until its aligned again. Or you can use a screwdriver and repeat the procedure above.
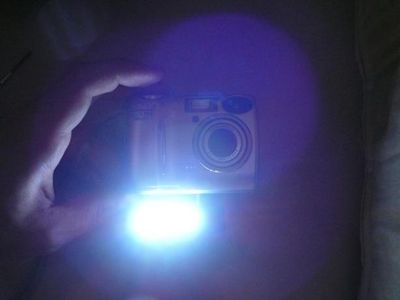
Step 11: Final Product


Now you have a nice clean looking LED Camera Light you can easily attach to any camera.
It even sits flat on a surface.
Check out the test graph.
This was using a 10 ohm resistor, which actually runs the LEDs a bit brighter and uses more current (25mA) and it lasted for over 11 hours.
Check out the manufacturers data sheet youll see that the absolute current spec is 30mA.
The batteries were only 900mAh but you can get 1000mah.
more details and tests can be found here.


