

Introduction: The Budget Suitcase Boombox


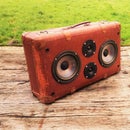


After my last suitcase build i got stuck with a new idea. I wanted to build 4 retro suitcase speakers than retain the look of my previous build while being cheaper, easier to build and less complex overall. I built these suitcases for friends and family and I also sold two of them online. After doing a bit of research on components and planning where to get the things I wouldn’t be able to order online I went through with it and started building. I really hope that you like the end result and I can help you build your own. Even though I didn’t document my building process with pictures I will try to provide you guys with all the necessary steps and tips to replicate one of these builds.
Step 1: Components and Tools


This whole build cost me about 63 euro's for each boombox(~66 dollars). But i recon you can lower the price and increase the usability even more by getting a amplifier with built in bluetooth connectivity like This one.
-Retro suitcase. (17,50 euro)
Make sure the suitcase is sturdy enough to support the speakers. I supported the speakers with wooden boards but more on that later. I also recommend to look in your local antique and thrift stores for these or online on eBay since they are hard to find.
-Class D amplifier (I used an altered version of the TA2024). (5 euro)
I do recommend to get an amplifier with a built in Bluetooth board. This spares you a lot of hassle with charging a Bluetooth module and turning it on and off. Furthermore a Bluetooth module and amplifier that are hooked up to the same power source can cause a ground loop issue.
-Bluetooth module. (8 euro)
As said I recommend to get an amplifier with a Bluetooth board built in. But you can still easily make It work with a Bluetooth module.
-Lead gel battery. (20 euro)
You can use a variety of power sources like lipo, lifo, nimh. But what I like about lead gel batteries is that they are cheap, sturdy and you can place them in any position you want. Don’t forget to get a suitable battery charger if you don’t have one laying at home.
-A pair of two way cabinet speakers. (10 euro's)
I would also like to recommend your local thrift store or eBay for these things. I got mine in pairs for about 10 dollars for a set. Make sure to check the speaker itself for damage on the foam ring and the cone. An overall look at the driver and tweeter should be enough to determine if it’s worth buying. It is also really important to look if the speakers are fitted in a wooden frame with screws or bolts. In this way you can be sure to use the frame later on and that you will be able to disassemble the speaker enclosure.
-Decent amount of flexible electrical wire and speaker wire if you can’t salvage the speaker wires of the cabinet speakers.
-If you use a potentiometer, you should get a volume knob. (0,50 euro)
-A simple on/off switch. (1 euro)
-Some small pieces of preferably MDF
-Some strips of velcro (1 euro)
Used tools:
-Coping saw
-Solder iron
-Wire stripper/crimper
-Pencil/marker
-Marking gauge
-Drill and an array of drill bits
-Array of screwdrivers
-Spanners
-File
-Sand paper
-Wood glue
Step 2: Dismantling the Cabinet Speakers


Apart from getting the speakers out of the enclosure i also salvaged a couple of other things.
-Tweeters
-Passive frequency filters. Although most of the time these are simple condensators soldered onto one of the speaker terminals sometimes you get speakers that use more sophisticated filters. You should always take the filters out of the speaker cabinet for later use. sometimes you have to cut the speaker wires to get everything out. In this case make sure the wires are color coded or do it yourself with a permanent marker for example. You will thank yourself when they need to be soldered on again later on.
-Acoustic dampening. You can repurpise this material in your soon to be suitcase boombox so hold onto it.
-The front of the cabinet speaker, where the drivers themselves are mounted. In this build i will use this wood to reinforce the suitcase and support the drivers. Instead of getting your own material and sawing/drilling all the holes you can demolish the case but hold on to the front part.
Step 3: Mount and Reconnect the Speakers


Speaker setup and cutting holes
Using the fronts of your cabinet speakers you can start to mount your speakers in the suitcase. First you gotta find a suitable setup for the woofers and tweeters. In some cases this means you have to cut up the front to separate the tweeter from the woofer. When you are done with the setup you can simply trace all the holes onto the suitcase. Using the copesaw it should be relatively easy to get through most of these suitcase materials. Next up are the mounting holes. make sure to use the correct drill bit corresponding with the mounting holes of the speakers and/or the bolts/screws.
Assembly
After you are finished cutting and smoothed it a bit with a file and sandpaper you can put the wooden supports and speakers in the suitcase and secure them with screws or bolts. with the speakers in place you can solder back the connections you may or may not had to cut in the dismantling proces. Also make sure the speaker wires are of a decent length so they won't be under pressure when connected to the amplifier when the suitcase is opened.
Step 4: Put in the Rest of the Electronics, Battery Bracket and Dampening


Amplifier
Since the amplifier i used had a potentiometer i had to position it in a convenient way so i chose the top of the suitcase. together with the volume knob i also placed the on/off button there. The amplifier in this build used screw connections for the power and speakers so no soldering needed here. The audio input consisted of a JST PH connector and a 3,5 mm jack connector. In my case the 3,5 mm jack connector didn't work for some reason on all four amps so i resorted to a JST PH to 3,5 mm jack connector cable for connecting the bluetoothmodule with the amplifier.
Main power switch
Get yourself a convenient place to put the main power switch and the solder it to one of the outputs of the battery.
Battery
Because ot the weight of the battery i used it to give the case more balance by placing it in the bottom middle of the case. I also put it to the back wall of the case to act as a counterweight for the weight of the speakers. to get a leveled surface i made a small bracket with MDF. The battery needs to stay put but its also handy to be able to get it out easy for charging purposes. To overcome this problem is stuck two lines of velcro on the MDF and the battery.
Acoustic dampening
If you still got the dampening fabric laying around you can lay it out in the case in a way you like or think works best. Most of the time i lined the sides with it.
Bluetooth module
If you are using a bluetooth module it is important to locate it near a place you can easily reach when opening the lid. Since most modules need to be turned on before use and turned of after, you have to be able to reach them easily. I also used some velcro to mount the modules so they can be taken out of the case to be charged.
And that's it you're done!
I hope the steps are usefull eventhough i miss a lot of pictures of the process. I will definitely make those in future projects.

Participated in the
Amps and Speakers Contest 2016

Participated in the
Epilog Contest 8


