

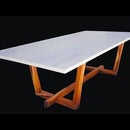
Introduction: The Nicholson Workbench


Are you tired of seeing the same old boring woodworking bench on the internet? Oh you know the one, the Roubo, or French Woodworking Bench. Everyone's got one. They claim it's "The Ultimate Bench", the last bench you'll ever need... blah blah blah. And yes, it's sturdy, it's solid, it's a beast of a bench. I would certainly work on one. But you know what I don't have? $1500 to blow on hardwood lumber. That's my mortgage payment. What I do have? I've got an 84 Lumber by the house here. It's loaded with good quality construction grade yellow pine that is perfect for this bench.
Why is construction grade pine perfect for this bench? It's a carpenter's bench from the 18th century. It was built on job sites. It was built by cabinet makers. It was built by the working man, not the hobbyist. And while I am a hobbyist, with a bunch of fancy power tools to make this easier on me, I appreciate the blue collar aspect of this build and the history behind it.
One of my favorite characteristics of this bench is the variety of work holding options. If you so desired, you could build this bench without vises entirely and just have hold fasts. I went with a quick release vise and a leg vise, but the more traditional versions had wagon vises that were build into the bench itself. Also, a lot of folks may ask about the use of pine when working with hardwoods on the surface. Denting and banging up your surface isn't that big of an issue. What is an issue is weight, and southern yellow pine makes this bench heavy, stable, and as I said before, significantly affordable.
All in all, I'm thrilled with this bench and I encourage you to not only check out the YouTube video but to purchase the book that this was built from Christopher Schwarz's Workbenches. That book has actual plans and a cut list for this and that boring Roubo as well as a lot of the history and the why behind those classic benches.
On to the build!
Step 1: The Lumber


For the most part, this lumber is available all over the United States. If you don't have access to Southern Yellow Pine in your area (I'm looking at you northern states) Douglas Fir is a good alternative. I’m using 16 foot boards because those tend to be the clearest and the driest of the bunch and then break them down into manageable yet oversized chunks pursuant to the cut list from the book. Straight grain is preferred and at times during the build I would actually do glue ups for components in an effort to get the best straight grain. For the aprons I ended up with some cathedral grain which is also acceptable but is a bit trickier to plane.
Since these are construction grade boards, I stickered and stacked them to let them get to equilibrium before running them through the thickness planer to get them just a hair above final thickness. This allows me the opportunity to hand plane everything down to finish without going below the desired thickness. The end thickness of all the components is 1 1/4 inches. Typically, you may have to wait a week or two, sometimes longer before getting to work on these boards. However, here in South Florida with relatively consistent humidity, and my shop being A/C free, I was able to let them dry for a weekend and then got right to work. You can use a moisture meter but I would just touch the end grain and the face grain. If still wet, the end grain will be a lot cooler to the touch than the face grain. Once they feel more or less the same, Bob's your uncle and we're ready to go.
I don't haver a jointer so my milling process is a little different than some folks. I use either a track saw or the taper jig to get that square edge. I'll run through the planer first, square the edge, run the other side through the planer, and then rip the last edge.
Step 2: Legs


The legs themselves are angled at twenty degrees, so I set my miter gauge with the back stop accordingly and then cut the legs down to size. The legs each consist of two boards that are then glued together in an additive joinery fashion. Basically creating a 3x4 post.
Before glue up, I hit them with the hand plane to make sure the mating surfaces are flat. You might also note the shakiness in the old bench here, and that’s a lot of the reasoning behind the new one.
The glue up consists of a piece that is significantly shorter, which creates a half lap that the apron will nest into. That apron that I mentioned before is covered in dog holes is one of the signature pieces of the Nicholson and creates an endless amount of work holding options.
One recommendation I have before diving deep into this project is to get your hands on a bevel gauge. This is an old Stanley that I've been using but you can pick these up for cheap at the hardware store. The bevel gauge will allow you to match angles and helps in your layout instead of constantly having to rely on all your machines to be perfectly calibrated to 20 degrees.
Step 3: Drawbored Mortise and Tenon


The lower and upper rails come together with drawbored mortise and tenon to create two separate leg assemblies. Essentially your front and rear legs. Why drawbored mortise and tenon? And what is drawbored mortise and tenon?
Let's start with the what. Drawbored mortise and tenon is a regular mortise and tenon that has a peg driven through an offset hole which causes the joint to draw tighter together. It's a miracle joint that actually doesn't even require glue to hold strong if you so choose. Why drawbored mortise and tenon? Well, workbenches take a ton of racking forces from all directions. This kind of mortise and tenon is beefy and designed to withstand abuse and maintain structural integrity.
Usually, I would cut the mortise first and then fit a tenon accordingly. Here, I went reversed and did the tenons first and then marked out the mortises. I used a dado stack to get the majority of the waste off the tenons, then worked it down to final thickness with hand tools. For the mortises, I hogged out the waste on the drill press and then cleaned up with chisels. With everything fit, I brought everything together using epoxy as my adhesive to maximize working time.
The drawbored aspect of this is probably the most intimidating for someone who hasn't done it before. I’m drilling the entry and exit holes for the dowels first with a brad point bit. Then after dry assembly, using that same brad point bit to mark the center of the hole on the tenon. Then using a punch I’m going to come in towards the shoulder just a touch to create offset. After that, I’m drilling in the offset hole I marked. Basically, when the dowel is driven through the holes, the offset will suck the joint tighter toward the shoulder. Determining the offset is a bit tricky. In this case I just went one width of my punch tip north. However, a more standard offset is about 1/32 of an inch.
Step 4: The Aprons


The aprons are one of the big highlights of this bench. I planed them down to final thickness with hand planes and then used the track saw to trim up the ends and then add a little 45 degree detail as well. The 45 degree is purely aesthetic with absolutely no function. After that the aprons are glued onto the leg assemblies and then mounted from the inside with 2" construction screws. After it comes out the clamps, I flush the aprons to the tops of the legs with a hand plane.
Then, turning the base on its side, I start laying out and marking for dog holes. I used a 12" speed square, dividers, a punch, and a 3/4 forstner for this. The dividers are set to 4" and that gives me perfectly consistent spacing by walking down the dividers along my marking lines. The punch makes sure the brad point of the forstner has an alignment point and I just free hand drill these by making sure the head of the forstner is going in as straight as can be expected.
Then matching the angles of the legs, I'll rip a strip of pine to act as a cleat for the top to mount into.
Step 5: The Quick Release Vise


In a pivot from the Schwarz version of this bench, I'm going to use a quick release vise on the end instead of a wagon vise. The function is essentially the same and saved me a ton of work to create the wagon vise. However, In needed to build up material to be able to accommodate it.
I’m using the router to hog out material to accept that and cleaning it up with chisels.I glue in one board at a time and clamp each board to the next to build a block to accept the vise hardware. They also get a right angle bracket which again, will help against all the racking forces a bench takes regularly.
To fit the vise, I mark the jaw out and mortise it into one of the boards in the block. Once again, using a router and chisels.
Now the vise screw proved tricky for me. Had I to do this again, I would have cut this out ahead of time with the bench unassembled. Also, if you’re making a longer bench, you probably won’t have this problem at all. But since I’m tiny shop guy, the eight foot Nicholson from the book is compressed to five feet. So spade bits, a jigsaw, and a rasp get me to a point where the vise screw can fit the bench.
Then I bored for a through bolt to mount the vise from the bottom and used lag screws toward the back of the vise which ensures the vise is going nowhere.
I capped the jaw with a piece of scrap oak and used the brad point bit to mark the holes, pre-drilling, and then fired a screw in. This whole face was ultimately screwed in instead of glued in the event the vise ever needs to be changed or removed.
Step 6: The Top


For the top, I’ve ripped a number of different boards for the clearest sections and I’m bringing those together with the domino. Since horizontal alignment isn’t really an issue, I fix the tenons in with the small mortise setting, and then use the medium mortise setting for the receiving mortises. This ensures I have vertical alignment, but allows me wiggle room left to right while waiting on the glue to cure.
After it’s out of the clamps it’s a lot of planing to flatten the bottom, and then trimming the ends. From the underside, I attach the top using 2” screws, which will be replaced later with miller dowels. Then I flatten the top.
To give the holdfasts on the top a little something to grab onto I double up the material in spots where I’m drilling dog holes. Those will be glued and temporarily mounted with 2” screws before replacing with miller dowels as well. Then I tilt it back on its side and flush the top to the apron.
Step 7: More Vise Odds and Ends


For my leg vise I modified a lee valley tail vise screw by putting a hand wheel on it. This is entirely unnecessary but I just liked the look. I had to take the wheel to a machinist to get the holes right and then had some adventures driving in this roll pin. There’s plenty of decent leg vise hardware available out there where you don’t need to customize your own. However, if it is something you're into, you can just pound out the cross pin on the lee valley screw and then replace the handle with whatever you like.
I used some scrap rosewood for the opposing vise jaw, and I’m going to mark it similarly as before, drill out the holes, and then shape it down with a round over bit in the router. The bolts I had on hand to mount it were a little long, so I cut them down with the angle grinder. Threading the nut on first allows for repairing or reshaping damaged threads on the end when unscrewing the nut.
Step 8: Miller Dowels


I've never used Miller Dowels before and I have to say, I'm delightfully impressed. Miller dowels will be replacing all the screws in the workbench top. Why? Over time, I’ll want to flatten the top and I don’t want to risk nicking a screw with one of my planes... or nicking a plane with a screw... or however language works.
These dowels come with a stepped drill bit that matches the topography of the dowel. You just drill, add glue, set, and trim the excess.
Step 9: The Leg Vise (I Know More Vise Stuff)


The leg vise is also made from rosewood and I brought these two pieces together with the domino.
After glue up, I cut it to match the same angle as the legs (BEVEL GAUUUUGE!). Then I’m going to clamp it to the bench and mark out the vise screw, top, edges, and parallel guide.
I’m use the drill press to drill for the vise screw, but I freehand drill for the parallel guide, which is going to attach with a wedged mortise and tenon. The mortise is slightly trumpeted on the side opposite the receiving end, the side facing you on the bench and that's achieved by just chiseling at a slight angle instead of being dead square.
I shape the entire leg on the table saw using some huge bevels to just provide some interesting embellishments to the vise. As a safety note, be extremely cautious when cutting these bevels, especially if you don't have a riving knife, as this thing is begging to bind up and kick back on you.
The parallel guide is made from ash and I cut the tenon itself on the table saw before drilling holes in the tenon to allow for the wedges to be driven in and flex outward. With some scrap mahogany, I’m cut some wedges and then on the drill press, I drill holes for cross pins in said parallel guide.
Then everything gets glue and the wedges are tapped in and later flush trimmed and planed. When dry, the vise screw and wheel are mounted.
Step 10: Dog Holes and Leather


These two topics don't really go together but I didn't know how else to broach this subject with you.
Much how I did on the aprons, dogs are drilled through the top. I’m free handing these again. Since my forstner only goes so deep, I max it out and then switch to a spade bit for the last bit.
Instead of gasket material to line the vises, I’m going with leather and use contact cement to apply. A layer on each side, a bit of time to marinate, and then steady placement and pressure and you’re set. I’ve also heard that you can use wood glue for this as well, but the leather guys swear by contact cement so that’s what I stuck with.
Step 11: Lower Shelf and Plane Stop


I ran some L shaped stretches along the bottom rails to start a lower shelf, set in with countersunk screws. Then to nail this inside measurement for the slats, I clamped two pieces of scrap which will give me a measurement to cross cut some tongue and groove boards to. Pre-made tongue and groove is not mentioned in the Schwarz book, but I was eager to wrap this up so a couple 12 foot boards did the trick. I capped the ends with a fit to size tongue strip and a fit to size groove strip. After getting it into place I just tacked the corners in with a brad nail.
The bench needed a plane stop, so I picked up the lee valley aluminum adjustable plane stop and hogged out the mortise with a chisel. Schwarz mentions these in his book and talks about the unruly bottom shape which makes these a bit difficult to install. This wasn’t the worst, but I would suggest marking it out from the underside, and drilling a hole larger than the screw post and working your way back from that.
Step 12: Finishing (You're Almost There...)


Finishing the bench is easy. Don't go over the top with some fancy finish like Osmo or Rubio or anything like that. This bench is going to take a beating. Danish oil will do the trick. If you're feeling extra spicy some wipe on poly over the top of that isn't a bad idea either. Just use it all liberally and then wipe it off... liberally.
Step 13: You're Done. Rejoice. Celebrate. Enjoy Libations.


You're done. Mazeltov. You now have an extremely fancy thing to make fancy things on. Crack open a cold one. Shout to the heavens.
I got to test out the bench and it’s features and need I say, I am thrilled with the performance, You can actually clearly see in the YouTube video that there is no more bench rock and I have a ton of different work holding options for pieces of any size. This bench is going to be in the center of the shop and double as table saw outfeed, so I’ll actually have two functional sides of the bench and a myriad of work holding options without it pressed against a wall. I also lowered the overall height of the bench by exactly 3/4 inch so it can take some plywood on top for outfeed and assembly purposes. The vises are strong and secure and I can’t wait to get deeper into hand tool woodworking using all the advantages that this bench provides.
Overall, this was a pretty daunting build that forced me to learn a lot along the way. I strongly advocate for everyone to read Christopher Schwarz’s book on workbenches and even get the updated red edition for more insight and know how. The history and the why behind these benches is valuable to the growing woodworker, and at the end of the day, as said in the book, these benches are like lasagna and should be made, not bought.
Cheers! Don't forget to watch the video and subscribe to the channel! Let me know in the comments here if you have any questions, comments, and if you make one of these suckers tag me on Instagram!


