

Introduction: The Optimistic Mechanic's Bug Out Bag


Any hope for the future of mankind in a post apocalyptic world, will require humans to work together, co-operation. Nobody will be able to survive completely alone. Don't get me wrong here, I'm sure there are about 50 people who can, but they aren't even reading this anyway. Realizing that, I figured I should create a basic utility bag to make myself more useful than the average bear. The plan is to include a small 'basic needs' list of items and to be mainly composed of various tools for performing mechanical and electrical diagnostics, repairs, and builds while still being small and light enough to carry. When I say light enough to carry, this is relative. There will be tools made of metal. I haven't figured out how to make metal lighter.
A small note: I have worked as an auto mechanic for over 15 years now. In the past 5 years I have been doing mobile auto repair. I also consider myself eco-friendly, yet the automobile (and many related) industries have been problematic for the earth. Anyhow, I would ride my bicycle with a toolbox on the back rack or take the bus with my tools and car parts in my backpack. On my bicycle, sometimes I would ride eight miles one way. Also, I like to camp and build forts in deep jungly places. I've carried a sea bag containing a 5 gallon bucket with landscaping hand tools and carried water the way back, 6 miles over mountainous terrain. My legs and back were quite sore the following days. What I'm trying to say here is that over time, I have been able to reduce the amount of tools I need to a relative handful to do different automotive or landscaping tasks so I can carry them a long way.
On another and totally different note: in the post apocalyptic world food will be sparse and calorie burning will be at an all time high. Not to mention, all the bad and desperate people in groups and with guns. So, I figure the safest thing to do would be to find a high elevated area, facing south (since I'm north of the equator) where there is a near by clean source of water of some kind and set up a small temporary camp. My plan is to wait and meditate, perhaps hibernate until I can sense the dust has settled. Once people have run out of bullets or zombies have scattered, time to look for decent humans and do some rebuilding.
Step 1: Small Part: Personal Items


Picture one shows survival items like cordage, shelter, fire, containers, water cleaners & flashlights. Some basic needs items to keep me alive. The small white bottle has "2 drops per liter" written on it. It's bleach in a contact solution bottle for cleaning the water filter. The two small bottles next to the green one are for water purification. The bottom right are lighters and dryer lint. The top left is a hammock. The pocket knife on the red bag has a marline spike and can opener. The red bag on the bottom is part of the water filter. It holds 4 liters. The black cylinder thing is the filter element and hooks up to all the tubing. There is also a high quality waterproof tarp and 2 flashlights, the red one is hand crank.
Picture two shows basic hygiene items, things for trade & entertainment. Also shows clothing items. The seeds are for obvious reasons, but must be used wisely because I'll have to harvest seeds from all the plants also and it takes time to grow them. If I lose the first harvest, I'll potentially lose my seed stock too. The zip-loc hold tobacco seed and when properly grown, harvested and processed, can be used for barter. The silver coins are one troy ounce each and also used for barter. I hear the pure silver can be used for medicine, but that's beyond me. So is a first aid kit. Haha. I wish I had some antibiotic cream and super glue. The books are for recreation and educational purposes. Above all else, it is important to keep morale up. Having and maintaing a hobby will help faint the smell of distant burning cities and industrial plants. On the blue rag has a straight razor, tweezers nail clippers and scissors. Next to it on the right shows a leather belt (that I'll actually be wearing, but will also be used to sharpen the razor), diamond stone, 600 grit sand paper (also for razor) and mirror. The orange soap can be use without water sometimes. The top right shows safety glasses (in case of zombie blood), bandanna (in case of smoke or fumes), towel (read Hitchhiker'sGuidetotheGalaxy by Douglas Adams) and two rolls of pants/shirt/socks/underwear. Underneath that are my shoes (I'll be wearing or tied to bag if wearing...), tabbies (where I live is wet and muddy sometimes and these have great traction). The blue thing on top is a rain coat.
Picture three shows various food items. The food items here are mostly emergency rations or to hold me over until I can find a safe place to hunt and gather. If you have ever had wild edible greens then you know they are bitter. Ughg. It takes getting use to. I find with the veggies it is good to flash boil, drain-or drink separately, add salt or hot sauce or mayo. The blue pot holds a pot of rice, the 'calm thing' is magnesium powder to help my muscles relax, help me sleep and help keep me 'regular'. Beneath it is a small bag of rock salt I can grate on food. Chlorella is like a salad in a pill - well, maybe not exactly, but it has lots of good things inside. Under the Cliff bars are nori sheets, good with rice, meat or fish, Yum-Yum!
Step 2: Medium Part: Utility Tool Items

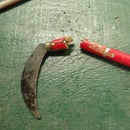
These are mostly tools for protection and camp setup. The sharpening stone and pruning shears will be in the bag, but the rest of the items will be worn on the belt. In case the apocalypse is of the zombie kind, I'll have a fair set of melee weapons, but it would be a shame to lose a tool for good in the skull of the dead. If that happens it would be a lot harder to build traps for camps and such. The belt is a military utility kind and is quick release. The E-tool, I replaced the handle on a while back. I painted my machete white because I kept losing it in the bush (and nobody else has a white one like this). The sling I made from an old patch of leather and some thin rope. The case for it is military style to match the belt. Hatchet, works good.
You may have noticed no guns. I think that in zombie days, especially the onset, firing a gun (without a silencer) is like ringing the dinner bell for them and the more you shoot, the more will come. If there are no zombies, but enemy troops or aliens, still the same. If the apocalypse is nature based, a bullet won't stop the rain. Lots of humans already see guns as hostile, and when people are scared and desperate, rationale changes. I think some will get shot just because they are carrying a gun and 'look scary or bad'. I don't want that someone to be me while I am escaping. If I come across a herd of zombies, my best option is to drop my bag and run or climb a tree. If I come across bad humans, well, hopefully I would have found a gun by then...
Step 3: Main Part: Tools of Choice

If I had the space, a MAP gas torch with plumbing tools like a pipe cutter & solder/flux would be nice. If I had even more space I'd include a chainsaw with 16" bar with 2 cycle & bar/chain oil. And a tire patch kit.
The box wrenches fit on a carabiner and are sizes 20 mm - 8 mm with some standard sizes too. All the 3/8" sockets are on plastic rails and are sizes 20 mm - 8 mm. with 18 mm being a deep socket. The 1/4" ratchet set is in it's own blue box and also holds the 3/8" ratchet with extensions/adaptors, a 5/8", 13/16" spark socket and spark plug gapper. On the top in the middle are allen keys, under it is a torx kit. On the top left are chemicals like RTV silicone, two part epoxy, ptfe paste, dielectric grease, white marking pen, electrical tape and zip ties. Under that is a 1.5kw inverter (12 vdc to 110 vac) with hook up wires and a 40w soldering iron & solder/flux, then spare fuses and multimeter with spare battery (be sure the meter reads ac/dc, & ohms past 40k - for coil packs on cars mainly). All of the items will be wrapped up in clothes and everything in the small backpack. The spray cans on the bottom right are carb cleaner and PB Blaster (amazing stuff).
This is a pretty basic but thorough tool set allowing for most basic diagnostics, maintenance, and repairs for vehicles and small machines like chainsaws and generators. One can possibly repair or install things like CB, HAM, or VHF radios. With access to other building materials, like wires and a battery from a vehicle, temporary electricity can be established. One could even build a generator with a lawnmower and alternator out of a car and keep a small battery bank charged up.
In a relatively protected environment within a community, if someone capable held this tool set, I feel the group as a whole can benefit in several ways. Even if I was on the road, as long as there was fuel available - in some form, I would have confidence to keep the car moving down the road or the generator running and keep electricity flowing.
All these tools weigh almost 20 pounds. That's heavy considering moving through an apocalypse, but a better way to look at it is that I can build a nice space some where and possibly get around easier after things go down, if the vehicle is working. The bag set-up also makes it easy to stash, so I can scout around and I wouldn't have to carry while foraging or watching, and the tools inside will stay dry.
Step 4: The Bags


Here I am using a Navy style sea bag that is water proof when sealed properly, called a dry bag. I think the size here is 30 liter made by SeaLine. It's pretty durable and 'comfortable' under load for about 5 miles at a quick pace, and about twice that at regular pace. I know that is not much, but with breaks at intervals the distance can increase more. But even still, a hard frame back pack would work better, but where I live it rains a lot and all the tools would get rusty.
When I finally get to that comfort station, if I have to go for some reason, like zombies or to get food/supplies, I can pack up all my supplies and stash in a tree or a bush or hole and all my stuff can be safe.
I also have a regular smaller normal kind of backpack I can use for some excursions. All the tool will go inside the smaller bag then inside the larger bag.
Step 5: Packing It


The pictures here sum it up. All of this is hard to fit in the bag, like a game of Tetris. Inside this bag, x-ray would show the tool bag on bottom with clothes and goods on top. These tools get heavy, and the bag will shift and bounce if not strapped on to my back tight enough. And when traveling, the tarp must be strapped to bag and water bottle carried over shoulder with belt. It will be a lot of work lugging this bag around, but with tools, I can attempt to increase the chance or quality of survival and hopefully make it a bit easier for some kind of rebuilding. At least maybe sooner than later if/when the time comes.
Thanks for reading! Open to suggestions.

Second Prize in the
Apocalypse Preparedness Contest


