

Introduction: The Perfect Backpacking Cooking Kit


Undertaking the job of “camp cook” on a backpacking trip is full of choices. It’s hard to balance functionality against weight. This instructable helps cut through all the options so you can travel light knowing you’ve got exactly the equipment you need and nothing extra. Plus it includes two bonus mini-instructables as well.
Step 1: Got Pots?


Unless you are buying into a cooking “system” (in which case you need to buy only their equipment in order for it to work together) you have a lot of flexibility. I recommend you buy a standard three piece cookset consisting of a nesting 1-1/2 qt. pot, a 2 qt. pot, a lid and a “pot grabber” handle. Go for a simple aluminum non-stick set, I use MSR Blacklite non-stick. A note on titanium cookware: though lightweight, it doesn’t transfer heat well, leading to hot spots and burning - not recommended. If you are cooking for just 2-3 people and you’ve planned your meals carefully you can usually get away with just the smaller, 1-1/2 qt. cookpot and a lid and limit yourself to one-pot meals. If your group is 4 or more people, then you would bring the larger 2 qt. pot with lid and if you have more elaborate meals planned (like cornbread with chili for example) you may want to bring both pots, so you can cook different parts of the meal and keep them separate. As you can see, the full 2-pot nesting cookset gives you maximum flexibility.
PRO TIP: Drill a small hole in the lid top as shown in the illustration. Make sure the hole is just big enough that the shaft of an instant-read thermometer will fit through easily. This hole does two things: when used with the instant read thermometer, you can tell when a dish is done. Perhaps more importantly, it prevents you from lifting the lid so much to check on the dish and letting the heat escape. Even if you don’t use the hole for a thermometer, you can use it to monitor the pot if you’re boiling water. Just watch for steam to come out of the hole and you know it’s ready. You’ll save fuel since you won’t be lifting the lid every few minutes to check on the water.
Step 2: Tools of the Trade
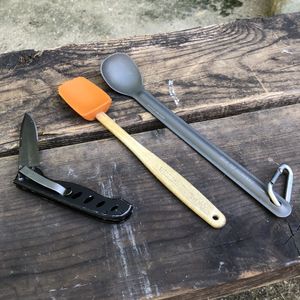

Believe it or not, you only need three utensils to complete your cookset: A silicone “spoonula”: a spatula with a spoon shape (Williams-Sonoma) with a removable wooden handle – overall length about 7”, a long-handled spoon (Sea to Summit makes a nice titanium model) with an overall length of 8-1/2” and a folding lock-back knife with a 2-1/2” inch drop-point blade (Gerber). That’s it.
This complete set: two pots, a lid, pot grabber and the three utensils weighs in at 21 ounces including the mesh bag that comes with the nesting pot set.
Step 3: Simple Lightweight Extras


Small Bowl
I always include a small plastic bowl that nests inside my cookset. It is incredibly useful for mixing up batters or eggs, or thickening a stock using flour. Or even a simple snack serving bowl, say while making fried onion rings in batches. It weighs less than 2 ounces, is about 6-1/2” in diameter, by 2” deep and cleans up really easily. I don’t know the brand, but it must be made of some sort of nylon or other tough, yet flexible plastic since it’s been part of my kit for over 10 years.
Coffee filter
If you really like fresh brewed coffee in the morning, I’ve got a nice mini-instructable for you. If you buy a cheap standard flat-bottomed coffee filter like you find in the grocery store and outfit it with a handle (I used standard copper grounding wire) as shown in the illustration you have any easy basket filter. Usually these filters are packaged in a blister pack – be sure to save the plastic “blister” part as it serves as a handy holder for the filter that protects it. Just boil up your water (make sure the water level doesn’t go above the lip of the filter), and load up the filter with one heaping teaspoon per cup. You’ll need to ladle some of the hot water over the grounds to get them soaked through, but once they are wet you can use the handle that you added to the filter to repeatedly dunk the filter in the hot water until the coffee is dark enough. When done, lift and jiggle the filter to get all the coffee out of it and then set it down in the handy plastic holder (see the illustration of how the "blister" holds the used coffee filter) to keep dirt and pine needles from sticking to it. Pour the coffee directly from the pot to all the waiting cups and pour in your favorite extras (a little Baileys Irish Cream is a welcome addition). Total weight – less than one ounce.
You can also see how these two extras nest neatly in the cookset, so there is no space penalty in carrying them along.
Step 4: Pots and Pans?

You can get pretty far just on the kit that I have described and for 1-1/2 pounds you’re done. This kit will take you on any trip from an overnight to 10 days or more. I’ve fed as many as seven people for over a week using just this set-up.
Of course, there are limits to everything and some dishes just need to have the area and access that you can only get with a frying pan. Trying to do pancakes, or pizzas, fresh caught trout or make tortilla chips or hash brown potatoes just work better in a frying pan. You might be wondering at this point if a spatula needs to be added if you're bringing a pan. The simple answer is no. With a little practice, the spoonula will do the job just fine.
A frying pan is a significant addition to your cookset and I usually bring it when I know I will have a larger group or there is a particular dish that is really a favorite and will make the trip special. The best pans I’ve used are from GSI and they come in either an 8” or a 10” size (diameter measured from inside lip to inside lip across the top of the pan). Both pans use the same removable, folding handle which helps make for easier packing. The 8” pan weighs 10.5 ounces and the 10” pan weighs 15.4 ounces. The handle weighs 2.6 ounces, so you can see that bringing a frying pan is a significant addition to the overall cookset. I usually will bring the 8” pan if I’ve got a group of three, saving the larger pan for a bigger group. Obviously if I’m going to bring a frying pan, I’ll want to plan several dishes around it, to justify the extra weight.
PRO TIP: Bring a small bullseye level (weight = 0.3 ounces) with you and when you set up the frying pan with the stove, before you heat everything up use the bullseye to make sure the pan is level. This will prevent oil or other liquids from pooling to one edge of the pan and make for more even heating and cooking. The picture shows both the 8" and 10" pans, one folding handle and the level sitting in the middle of the smaller pan.
Step 5: Finishing Touches

As mentioned earlier I usually bring an instant read thermometer. I can put it through the hole that I drilled in the pot lid to monitor the progress of a dish that I’m cooking (raw food starts to break down above 160° - so it’s good to know when you hit that point). Also if you have to boil water for drinking you'll know when you've hit the sterilization temperature. I also bring a flint and steel for lighting my stove – never fails even when wet. I haven’t used matches in several years. The “Light My Fire” brand flint and steel weighs about the same as a BIC lighter but lasts a lot longer and is not affected by altitude or temperature. It always works. One other thing that I always keep in my kit is a 2-Part Salt and Pepper shaker (salt on one side, pepper on the other) by GSI Outdoors. The two most commonly asked for seasonings in a single container with screw-on caps to prevent spillage. Perfect.
All the “little things”: pot grabber, spoon, spoonula, thermometer, flint and steel, salt and pepper, bullseye level and knife I put into a small Eagle Creek mesh zipper pouch. As shown in the picture the combined salt/pepper shaker is in the lower right hand corner of the pouch with the flint and steel directly to its left. You can see there is still room to bring along some additional spices, the pot handle and whatever extras may be needed for the trip.
Step 6: Bonus


Here’s something that is so versatile you won’t want to camp without it. I call it the Ultimate Cutting Board, made from a Frisbee. Now you can’t just cut directly on a Frisbee or it will soon be destroyed. But if you get one of those thin, tough, plastic cutting board sheets, about 0.025” thick, and then trim it to match the curve of the underside of the Frisbee as shown in the pictures, you’ll have the perfect protective surface. Plus the lip of the Frisbee catches all the loose bits of stuff that you are cutting. You could use any size Frisbee that suits you, but I’ve found that the 175 gram Ultimate Frisbee sits nicely on my lap and has the capacity to do the big jobs when you’ve serving a larger group. Hence the name: the Ultimate Cutting Board! Double Bonus – it can serve as a clean surface for you to gather and hold your cooking ingredients or use it as a serving tray for snacks. It’s perfect for mixing dough (without the insert) or even as a makeshift saucer sled in the snow!
I know there’s lots of information contained in this instructable so I’m happy to answer any questions that anybody may have. I hope you got one or two useful tips from this one. Enjoy and happy camping!


