

Introduction: The Red Dragon Instructable


Here, as a follow up to Make A Cardboard Dragon!, I have added this instructable to fill any voids left in aforementioned tutorial. Essentially all the same steps were followed, and have included pictures showing all steps.
Step 1: Gather Materials and Tools


All the usual paper and cardboard working tools are needed. Colored paper, scissors, cardboard, glue, acrylic paint. And time...lots of time.
Step 2: Cut Out Cardboard Parts First


Draw the head and other parts onto cardboard, following the pictured templates. I have shown sizes to make this step easy. I use the bandsaw, but they can be cut with scissors and or a craft knife or scapel.
Step 3: Glue These Parts Together As Shown


Just follow the picture image notes, and you will have the foundation of the dragon, ready for painting and embellishment(s).
Step 4: Cut Out the Cardboard Circle Now.


I made my circle about 23 inches in diameter. It was easy to cut on the bandsaw. This needs to be primed, and both sides will need to be covered. If done now, paint will be dry when you are ready to put the final coat on towards the end.
Step 5: Prime All Cardboard Parts

This probably isn't necessary, but I like to do it as it gives brighter colors on the final product.
Step 6: Paint Primed Cardboard Parts


For this dragon, I chose a bright red paint. Apply so that coverage is total, and allow to dry. Next, paint the scales on the dragon by diluting your base red with a pale yellow. Use a 1/4 inch "scruffy" brush and just dab on in the pattern shown. Practice a little, but the goal is to put just enough color on the dragon to simulate scales. Do not pat them on in a straight line, rather make semi-circular patterns to contour the areas you are working on.
Step 7: Cut Out Head "Fins"...


These are the parts that surround the dragon...I guess you would call them "fins"...they're fan fins! Fold the pieces of paper by scoring first, and then alternate with a "valley" fold and a "mountain" fold. Your results should look like those pictured.
Step 8: Attach All Pieces to the Head


When you are satisfied with the pieces you just cut out, they can be glued on to the cardboard. Try to attach them in a symmetrical manner so that they appear equally aligned. Follow the pictues for help.
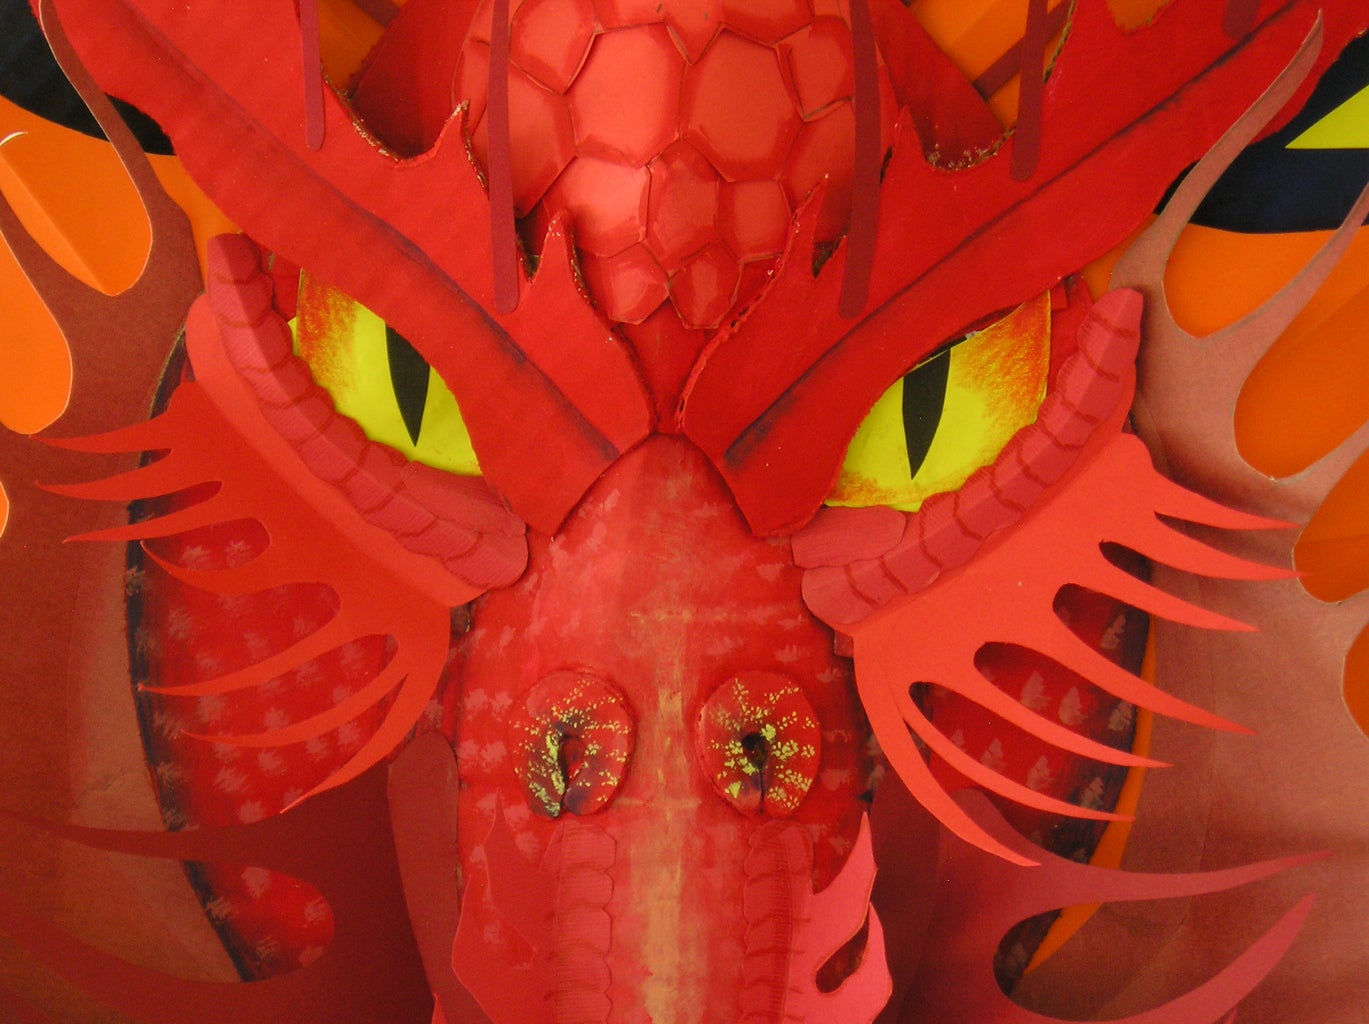
Step 9: Make Scales for Skull


Here, I cut out pieces of paper in a roughly hexoganal pattern. See pictures, and note that there are three sections. The lowest section was my first, so I pieced it together, but it could be cut as one piece. The other two pieces are cut as shown. Three pieces are made so that they are flexible enough to adhere to the "skull" which is the cardboard "skull cap."
Step 10: Make the Eyes


Here, make the eyes using five layers of paper: Eyeball is yellow; which surrounds a black aroura, area around Iris is red, iris is white, and the pupil is black. This can be any other combination, experiment, and see what you can come up with. Fish eyes might work!
Step 11: Draw and Then Cut:Eye Lashes, Nose Fins, Spines, and Large Fan Fins


Look at the pictures, and draw from them. For a good fit, measure the eye socket, for example, and make the eye lashes fit that dimension.
Step 12: Make a Tongue


The tongue is made with a red paper and has a fork in the end. Before attaching, curl tongue by using your scissors and holding the paper against one of the cutting edges, pull the paper through while applying light pressure with your thumb. Curl one in in one direction, and the other end in the opposite direction...Gives it that "lifelike" appearance.
Step 13: Cut Out Some Flames


Any dragon worth his salt is a fire breathing dragon, so let's add some now. Following the pictures, cut two pieces of red and two pieces of yellow as shown. Cut some semi-circles in all pieces to mimic actual flames. Glue the red on top of the yellow, score the two layers with the bone folder, and fold up lightly, then glue to the snout.
Step 14: Paint Cardboard Circle.


Since the cardboard has been primed and dried by now, it can be painted with the color of your choice. I used black for most of the circle, then filled in the outer 4 inches or so with brilliant aquamarine (deep blue). I like the contrast, and seems to go well with the orange.
Step 15: New: Updated 8/26

I wanted to make a sign out of the Red Dragon, so proceeded to cut the letters out of cardboard, made a new, larger circle, changed the eyes and added a few other pieces to the eyes and nose. See pictures.
Participated in the
Halloween Contest
Participated in the
Gorilla Glue Cardboard Contest


