

Introduction: The Simple 30 Minute Floating Shelf


So during the house renovations we always said we wanted some floating shelves, in the bathrooms and other areas.
Buying a floating shelf in my opinion is actually a waste of funds, because what you get is not unique and comes out of a factory 13000 km's away in Asia and doesn't really look that good, since it's wrapped in plastic or melamine.. Worst of all is they are pain to install and takes more the a half hour, to install just brackets, let alone do the measuring.
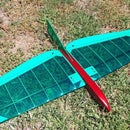
These two shelves where made form Rustic french oak that I had lying around. These pieces of wood where off-cuts from other project the where planned all-round (PAR - in some lumber shops). They where such stunning pieces of wood I really had to find something to do for them.
Anyways lets get cracking, this is the simplest way to make and install a floating shelf, it doesn't even need anything to hold it in place, it's that good - even if I must say so myself ;-)
Supplies
- a piece or two of stunning wood
- 8mm or 12mm stainless steel threaded rod 1000mm will do
- 8mm or 12mm Masonary and wood drill
- 5mm wood drill bit
- sanding sealer or Linseed oil (or other finish of choice)
- Sand paper - (120grn, 180grn, 240 grn and 320 grn)
- paint brush
- lacquer thinners and mineral turpentine
- vacuum cleaner ( keeps the wife happy)
- cordless drill, Hammer drill and maybe a drill dress (makes life easier)
- angle grinder if you have one or a hacksaw
- spirit level or a laser level
- Carpenters gauge
And 30 minutes
Step 1: Preparing Your Shelf


So I am not going to go into preparing the wood for the shelf too much as is really simple to get a a really beautiful finish a very short period of time. This is the longest step of the entire Instructable.
The wood is 320mm X 120mm X 30mm that I used for this Instructable, I trimmed the edges square on the compound miter saw, the piece off wood was sanded starting at 180grain paper down to 240grain paper.
Now is the time to do some drilling. I used a drill press because it really simple, but there is a little trick that I like to pull, more on that shortly Start by marking the center line, this was done using a rulers and an good old fashioned cutting gauge. Then mark the same distance from each end, the distance isn't really important but it must be even on each side, I worked 40mm, and then made a mark. Now measure the distance in between the two holes, write it down.
Grab the 5mm wood drill bit, and center it on the mark, drill the hole about 10mm deep no more. Replace the drill with the correct drill bit to match the stainless steel threaded rod, in my case it was 8mm. Here is the trick, tilt the drill press table to 0.5 degrees off to the side. if you drill this by hand then take a guess, else just drill straight. Now drill the holes down to 100mm, be sure not to drill right through.
Back to Sanding, sand with 320 grain paper, and then clean the wood with lacquer thinners, the reason for this two-fold. One to clean the wood of oils from ones hands and dirt and the other is to help the sanding sealer to draw into the wood.
Grab the sanding sealer, or Linseed oil and apply the sealer with a brush, and using two chopsticks leave it to dry suspended on the end of a table or work bench using a brick. This should dry in about 5 to 10 minutes. linseed may take up to two days or more... Lucky I didn't do it with linseed, that way else this would be a 30 minute shelf, start to finished.
Step 2: Preparing the Wall


While the sanding sealer dries lets drill hole sin the wall to mount this. It should be remembered that this mounting method works very well for homes with brick walls. If you have wood wall you either need to put in a hard point, measure when there supports are or you will need to get a dry wall anchor that will hold a shelf, but these will never as robust as if it was mounted to a brick wall. Having built my own house I can tell you it's solid
Start by marking the correct height you want the shelf to be at, make a pencil mark on the wall. Grab the laser level or a spirit level and draw a straight and level line so that you can makes the second point. Remember I said write it down? Well, now go on and mark the second point at that distance, in my case it was roughly 260mm.
Once you are happy drill the holes, be sure to drill the holes as straight as possible, drill these down to 90mm or there about. Using the drill and the vacuum at the same time you won't have to clean at the floor.
Lets get the threaded rod prepared.
Step 3: Cutting and Installing the Threaded Rod


I made two shelves, so, I measured out 4 pieces of 160mm each. I used an angle grinder with a thin stainless cutting disk. Make the cuts and then using a angle grinder sanding disk, round the edges and don't cut your fingers, ask me it's sharp.
That's as simple as that, by now the shelve is probably dry. Go grab it and push the thread rod in, this will be a little bit of a tight fit. So now when you push in the threaded rod, you will note that the threaded rods point inwards, this has a very useful function, to apply pressure one the shelf to wall joint preventing it coming adrift from the wall. Now you know why the two threaded rods are angled slightly inwards
This step is now completed, these piece of chrome rod can handle round 30 to 40 kg, maybe more because of the tight fit against the wall
Step 4: Installing It


Now this is evening simpler then the previous step mate up the holes and push it in. If it's tight just nudge it in with the palm of your hand. The Shelve will not come out unless pulled really hard.
No mess, no glue, no fuss...winning
In the second shelf, I added a stainless steel toilet role holder and that got installed too. In total mine took 25 minutes start to finish. no fasteners, glue or fuss. Want to remove it, sure but it will take a little effort, wiggle right and left till it comes out. The thread on the rod makes it stay together.
Instructable Done.

Participated in the
Shelving Contest


