

Introduction: Time Lapse Movies


Connect a camera to your computer and install some free software to generate cool effects from scenes around you. Ordinary events become fascinating as their time gets speeded up. For example, this sunrise:
Attachments

Step 1: The Hardware

You will need:
1. A computer
2. A Camera
Allow me to elaborate. You are reading this on a computer, so you are evidently in possession of item no.1. Item 2 requires explaining further. I do not mean those black light tight boxes with a lens at one end and film at the other end, I mean one of those light tight boxes with a lens at one end and a CMOS or CCD sensor at the other, which can be connected to your computer, whereby you can see the images on your computer screen.
Allow me to interpret the bit of verbiage above. You need either a webcam or a video camera and a capture card.
If you have a webcam on a USB port, you are limited by the length of your USB cable. You will have to carry your computer around, or bring your project to your computer.
If you try for the video camera and capture card solution, this gives you more freedom as the video cable between the camera and the capture card can be any reasonable length up to a few tens of meters.
Yet another solution is a digital still camera with a memory card inside it, and no cable at all between the camera and computer, but right now I shall not go up that, high quality and resolution (and cost!) route.
People who know loads will tell you that by this route, you are limited to fairly low quality movies, below 320x240 or so. That is okay. You can amuse yourself and your more easily amused friends with movies of fairly low resolution.
You have to remember that movies of high resolution need more expensive equipment to make, take up more space on your hard disk, and take up more bandwidth when you try to share them with your friends.
I'm trying to keep things simple and cheap.
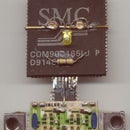
That big round thing is a USB Webcam, and the other two are CMOS video cameras. I have used upto 25 meters of four conductor ribbon cable (ground, +12V, video and spare) between camera and capture card with no ill effects.
Step 2: The Software

You will need all the bits of paper / disks / list of websites etc that came with the webcam or capture card when you bought it. For starters, you need to see the scene on your monitor when you point your video camera or web camera at the original.
Then, when you've gotten tired of playing with that, head over to these websites and download and install them:
1. Irfan view ( http://www.irfanview.com/ )- this is a great image viewer, and I use it for most of my image file manipulations and all my image renaming needs.
2. Fast movie Processor ( http://www.winsite.com/bin/Info?500000009888 ) - this program does a great job, easily assembling a collection of series of pictures into a movie
3. VirtualDub ( http://virtualdub.sourceforge.net/ ) - This does everything to a video file that you need to do, I use it to add sound to the movie.
If you have windows xp, it will have windows movie maker installed, which is a great tool indeed and easy to use.
All these are free to use for personal use - except windows, which you have to purchase to use. But if you have already paid for the windows you do not have to shell out extra for using the part of it that does movies.
Step 3: Set Up the Software

Instal Dorgem and play around with it. You will be using it to get a directory full of images, either when something moves (motion detection) or at timed intervals (time lapse). Read the help files, push and pull every button in sight and eventually after a few bloopers and lots of wasted time you might get the hang of it.
I generally set the capture interval to 1 second and motion detection ON when I am trying to capture activity (like people walking across the road in front of my house).
I generally set the capture interval to 15 sec and motion detection OFF when I try to capture some natural phenomenon (like the sun or moon rising, or clouds drifting and changing shape).
The filename is generally set to cap
So, you will have a directory full of consecutively numbered images and FMP or virtualdub or Windows Movie Maker will make them into a movie for you. Set a frame rate of around 15 or 10 frames per second.
So, you need to set up all the above software and learn to use them.
And yes, that really is my computer.
Step 4: Set Up the Hardware

Plug your camera in, and adjust things so that the "preview" function in Dorgem shows you the scene you want to capture.
If you want to capture a flower opening, for example, you will need to find a cable large enough to bridge the distance between the farthest out you can get your computer to go, and the nearest in you can bring your flowering plant in. If you go for a wireless camera it might be really neat.
Focus well. Ensure that lights will be sufficient, and that nobody is going to trip over your cables (or steal them).
The screenshot shows Dorgem being set up to store files with the filename safe seconds tag - '%g'. This will result in a filename unique for a given time of day.
Step 5: Capture!

You just leave your computer and camera alone to do their thing, and when, at the end of a few minutes / hours / days (?) you have a directory full of images, start to work on that material.
Leaving the camera alone is important, because in a time lapse movie any movement of the camera will cause a shaky movie which people might find objectionable. So it is all the most important to be most careful while setting up, so that you anticipate the movements of your subject so that you do not have to move the camera.
Perhaps it is best learned by capturing lots of would-be movies, looking at them, and throwing them all away before you come up with one presentable movie.
The screenshot is that of the irfanview "rename" dialog. You need to renumber all your image files in numerical order before you can combine them to a movie.
Step 6: Process

Processing is done in two steps:
1. The files are renamed using irfanview in consecutive numerical order. This makes it convenient for the conversion to movie.
2. The renamed files are converted to a movie using FMP, virtualdub or WMM. A suitable sound track may also be added at this stage.
The screenshot is that of Dorgem, where you enable or disable motion detection. When enabled, this allows you to capture only those scenes where something interesting takes place.
Step 7: Overview

This is how I made the movie shown here. This might not be the only way to do it. It is certainly not the best. But doing it this way has worked for me, and I am too lazy to try and find alternative ways to do it.
1. Point the camera at something where something is happening, eg: A sunrise, a moonrise or a busy street.
2. Set up Dorgem to store captured images in a directory with time related file names ( cap%g.jpg ).
3. Wait.
4. Exit Dorgem and fire up Irfan view. Rename those files in numerical order. Exit Irfan view.
5. Start Fast Motion Processor (FMP). In the dialog which asks for input files, provide the name of the first frame. FMP will add the rest of the frames automatically.
6. Set up video compression and frame rate. I use MPEG4 and 10 fps in most of the cases. Play around with the frame rate. Some movies look good at a slower rate (5 fps), some would need a high rate (25 fps) to look good.
7. Save the video file. Exit FMP.
8. Open the movie in VirtualDub and add a sound track.
9. That's it! You have made a time lapse movie with sound.


