

Introduction: Tiny Scrying Skulls


Do you want to know if you will be rich, if they like like you, what your future holds, how you will do in an instructables contest? Are you tired of the vague answers given by magic 8 balls and ouija boards? Do you think just carrying a bag of tiny raven skulls with cryptic markings is just plain cool? If you answered yes to any of these questions you are in the right place. Come along with me and I'll talk you through how I made these tiny corvid skull divination tools.
Step 1: Tools, Software, and Materials
Tools
- Anycubic photon or other UV resin printer
- Two Plastic pickle jars
- A UV light source(The sun counts)
- A rotating display thingy
- Sandpaper
- Metal Scribe (or other sharp pointy scrapey tool/nail/screw)
Software
- Maya & Mudbox(Only if you want to make your own skulls from scratch)
- Anycubic's slicer or slicer software of your choosing
- PrusaSlicer
Materials
- UV Resin (I used anycubic green)
- Acrylic paint
- Paper towels
- Rust-oleum triple thick glaze clear high gloss spray paint (or other clear high gloss protective paint)
- Disposable gloves
- isopropyl alcohol 91%(used for cleaning off uncured resin
Step 2: Research and Modeling or Downloading the Stl


If you just want to get to the printing and scrying download the attached .stl and hop to the next step. If you want to know more about how I got to the stl file read on.
I picked up this project because I wanted to teach my self some of the tools for doing more organic modeling. Up to this point I've been pretty much just using Autodesk Fusion 360. However through my work I have access to the full Autodesk suite of software and I figured now is a good time to broaden my horizons. I knew I wanted a raven skull so I turned to an image search to find the reference images. Armed with a top down and side view of the Skull. I ended up using Maya to make the basic shape of the skull following this tutorial. From there I loaded that .obj file into Mudbox and got to sculpting following this tutorial. The end result is the above .stl file. I am very much a novice digital sculptor so if you have any guides or tutorials you recommend please feel free to let me know in the comments.
Attachments

Step 3: Scale, Multiply and Slice


First I started importing and scaling my Skull file in Anycubic's included slicer but needing 26 skulls I quickly realized it was going to be to tedious. So I fired up Prusaslicer and used it to scale the skull down to 20.83mm and them multiplied it 25 times. From there I arranged them on the build plate and used the export buildplate as stl function. It was way quicker then doing it natively in Anycubic's slicer. With my skull army imported into Anycubic's slicer it was time to slice. I went to the community maintained google sheet to dial in my settings. From there it was time to slice the file and fire up the printer.
Attachments

Step 4: Pour, Print, and Post Process


With the file loaded onto a usb drive I put on my protective gloves and filled the printers vat with resin. With the printer ready to go I started the print and set a timer for 30 minutes. I like to check before it has been running too long in case I have a failed print that way I loose less resin if somethings gone wrong. It looked like I lost a few skulls but I decided to soldier on and just print the rest because I still had more than half of them. When the print is done I rinsed off the excess uncured resin in my isopropyl alcohol baths. I use a two bath system to make the alcohol last longer. The first one gets dirty faster and the second one stays mostly clean. It was overcast when I was working on this project so I used my UV light box to cure the skulls for 15 min. Once they were cured I used my thumb to break off the support nubs. It was time to scrape the runes into the tiny skulls.
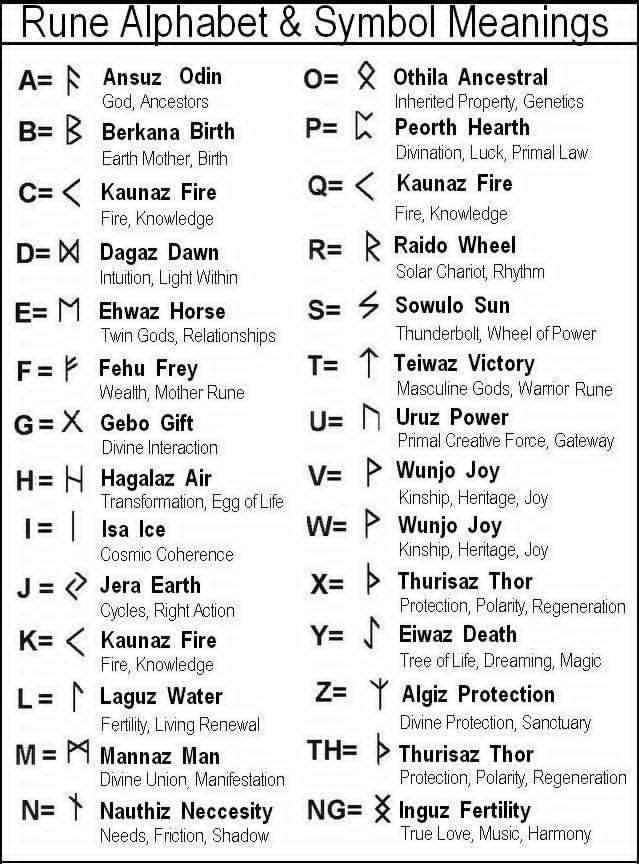
Step 5: Writing, Coloring, and Sealing(your Fate)


Using a sharp pointed object I scratched the runes into the crow skulls. Once the runes are scratched in apply a dollop of acrylic paint then wipe away the excess with a paper towel. This leaves only paint in the carved runes. When everything is carved and colored I took a break to let the paint dry. With the paint dry I spray painted them with the high gloss glaze spray paint. This will protects the skulls and makes them more translucent. Once they are dry I was ready to pry forth the secrets of future, present, and past. How might you do that you might be wondering... Well there is an instructable for that written by Creepyhollows. Thanks for taking the time to check out this instructable. I hope you enjoyed reading it as much as I did making it. I hope the skulls fall always in your favor.

Participated in the
Tiny Speed Challenge


