

Introduction: To Infinity (Tables) and Beyond

Using this guide, you will be able to construct a fabulous marvel of modern science known as the “Infinity Table”. There are infinite ways in which you can build such a table, but this guide will cover one specific design and build-process. This table will be a 34” by 76” fold-able infinity table.
Infinity tables are tables that utilize the traits of one-way mirrors to create a visually infinite space within the table. The tabletop is a one-way mirror, so that you can see through the mirror into the table. The bottom of the intra-table space is a regular mirror. This configuration allows the two to reflect off of each other, creating a rift in the space-time continuum. An illustration of this concept can be seen above.
Step 1:


Use router to cut 0.75” wide and 0.5” deep groove in all 2” x 4” wood boards, 0.25” from the bottom of the board. This groove is where the floor of the intra-table space will be set.
Step 2:

Cut 2 of the 2” x 4” boards down into 4 38.5” pieces. Then, cut a 0.25” deep, 0.5” wide groove into one corner of each of the 38.5” boards, until 1.75” from each end of the board. These pieces will make up the sides of the table. They will be referred to as “A boards” from now on.
Step 3:

Cut a 0.25” deep, 0.5” wide groove into one corner of 2 of the remaining 2” x 4” wood boards. Then, cut the boards into 3 29” pieces each. These pieces will make up the ends of the table, and the partitions between the folding sections. They will be referred to as “B boards” from now on.
Step 4:

Assemble 1 A board and 2 B boards into a “U” shape, with grooves facing inward, as depicted above. Then, screw the boards together like this. Repeat this step to create 2 “U’s”.
Step 5:

Cut the plywood board into 2 30” x 36” boards. These will be used as the floors of the intra-table sections.
Step 6:

Slide each plywood board into the “U’s” that you made in Step 4, fitting the plywood into the grooves in the boards.
Step 7:

Slide the mirrors into the grooves in the “U’s”, so that they each lay on top of the plywood.
Step 8:

Place the remaining A boards onto the open ends of the “U’s”, closing them into rectangles. Screw these boards into place.
Step 9:

Cut the LED strip into two 10’ strips. Apply each strip to the inside perimeter of the wooden rectangles.
Step 10:
For each table half, cut a small groove into one of the wallboards of the rectangle in order to allow the LED wire out of the rectangle, so that the lights can be plugged in.
Step 11:
Apply the one-way mirror film to both sheets of acrylic.
Step 12:

Place each acrylic sheet into place on top of the table halves, so that the sheet sets into the groove.
Step 13:
Seal the crack between the wood and acrylic using the silicone glue and putty knife. After applying glue, let dry for at least 24 hours.
Step 14:

Connect the two table halves using the 2 hinges.
Step 15:

Attach the door latch locks to both sides of the table, so that it spans the gap between the tables. It must be attached so that when it is latched, it will prevent the table from folding.
Step 16:

Cut the 4” x 4” wood board into 4 2’ sections.
Step 17:

Attach these sections onto the corners of the table using the brackets. These sections will act as the legs of the table. Place a straight brackets on each outer face of each leg and screw into place so that the legs are attached to the body of the table. Place 1 corner bracket in the corner between the leg and the table, as indicated by the arrows above, and screw into place.
Step 18:
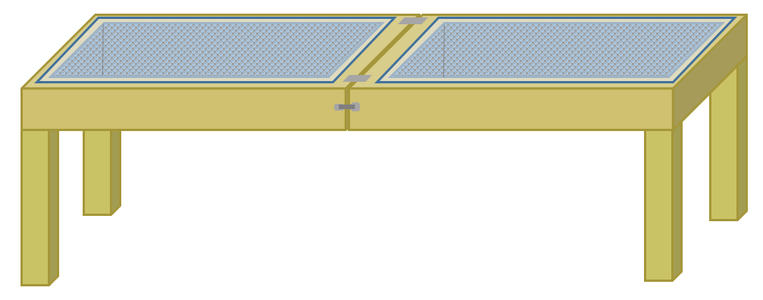
Plug in the lights and enjoy your completed infinity table!


