

Introduction: Turn a Cable Spool Into a Side Table / Dog&Cat Bed


This is my first intructable, so please bear with me and I welcome any suggestions you may have to make this better.
I saw this spool on a construction site and knew right away that I wanted it for something! That's how it usually starts... It sat in our garage for almost a year, since I didn't have the right tools first and then no time. We have this empty corner that desperately needed a side table and we have a cute dog that I like to spoil, so I knew for a while what I would do with the spool. I did the project by myself for the most part and it didn't take very long, so should you have some extra help, this will be done in no time at all.
Step 1: Safety
Please use common sense when working with any power tools and wear protective gear!
Step 2: What You'll Need
- Wire spool
- Pliers (I used slip joint and tongue & groove ones)
- Sander / Sand Paper
- Nails (I used 11/2")
- Drill
- Clear Finish (I used Varathane Polyurethane "Gloss" http://goo.gl/2bzwWu )
- Wood Glue (Optional)
- WD40 (Optional)
- Stain (Optional - I used Varathane Stain & Poly "Dark Walnut" http://goo.gl/K7Wfqx )
Step 3: Disassembling and Cleaning/Sanding


The spool is held together by three metal (spindle's? Sorry, I'm German) with a nut on one end. I had to use some DW40 to get them loose a bit, but of course one of them really put up a struggle. I found it easiest to move the slats so the spindle's are exposed. I used some tongue and groove pliers to grab and hold/counter push it while I rotated the nut on the outside. Once that's done the whole thing falls apart already.
I brushed off most of the dirt with a simple broom and then sanded the most important sides (the top piece and all the slats, exterior only), since I didn't want to spend too much time on this and felt bad for making so much noise with all the close neighbors.
Step 4: Staining and Finish


Use gloves when working with stain and make sure to mix the stain well before using it. I used an old rag, but a brush will work as well to apply it to the wood. If you're using a brush, it's good to have something to wipe the leftover stain off again. I did one coat of stain.
The stain already has poly finish in it, but I wanted some extra finishing. The polyurethane applies very easily and dries quickly. I did a total of two coats on the top and slats. I didn't have too much poly left over and it worked out just fine.
Step 5: Reassembling

Final step is to reassemble the whole thing.
We laid out the round base and slats to determine the layout and gaps etc. and just used a pencil to mark the spots. To make things easier, we drilled pilot holes for the nails. We secured each slat by first applying some wood glue and a total of three nails. Three might be a bit overkill, but that seemed good at the moment. Once the slats were all attached, we simply turned the piece over and placed the round top piece under/inside it (upside down of course) and attached the slats all over again on the opposite side.
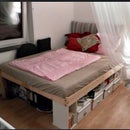
Step 6: It's Done!


We only put a few blankets in it, since it's not a "real" dog bed. She already has one and this is just a small space for her to hang out in, but I'm sure a dog bed would fit in there nicely.
I'm entering this in the pet contest (http://goo.gl/EOJ1Tz ), so please consider voting. Thanks guys! :)
PS: have a quick look at my other instructables.

Runner Up in the
Animals Contest


