

Introduction: USB Floor Pedal Number Pad


Because I go above and beyond in my quest to make learning fun (and what's the least fun thing to learn at primary level...? yes... times tables!), I thought I know what will make this more interesting: a floor number pad!
Perhaps even more exciting would be to use a foam mallet and key in the numbers 'whack-a-mole' style, however I didn't have one to hand so the images and video above demonstrate my invention as a floor pedal... apologies as it doesn't quite convey the level of excitement I was hoping for, but in the classroom I know it'll be great... you can have league tables, tag-team relays etc.
This is plug-and-play, so you simply plug in the floor pedal via USB to a computer and it will automatically function as a number pad. In my video demonstration above I've kept this primary school themed by coupling the floor pedal with Scratch (a programming language for children) so it's multi-disciplinary too. You just plug in the floor pedal to a computer running Scratch and away you go. As a classroom exercise you can use this to motivate computational thinking by challenging pupils to add a timer via the Scratch program, or anything else they can think of for that matter. So as a classroom learning aid this could be quite a useful tool and motivator.
To make the floor number pad I used:
- An Arduino Leonardo
- Momentary push buttons (red and green)
- A Micro USB Host Cable Male to USB Female OTG Adapter
- Jumper wires
- Some M3 Stand-offs
- A box, preferably with a sloped lid that opens (I used a writing slope, though if you wanted to go bigger perhaps a traditional children's writing desk - the top part)
Step 1: Preparing the Board

This whole idea revolves around a keyboard matrix circuit; a key press is correctly identified as an intersection point between a certain row and column (the pins on the Arduino will correspond to either a row or column). There's a great page explaining how key matrices work here.
I used a 4x3 grid but just excluded one of the intersections: I only needed digits 0-9 and an enter button, so only 11 in total were required. I consequently drilled 11 holes in the lid of my writing slope. As the thickness of the wood for my writing slope was too thick to accommodate the threaded part of the push buttons I had to drill a recess, part way through, from the back (inside) of the lid with a spade-type drill bit - in fact this part was drilled first, then I went completely through with the correctly-sized drill bit - the order is important otherwise I would have lost the centre guiding hole.
Step 2: Wiring Up

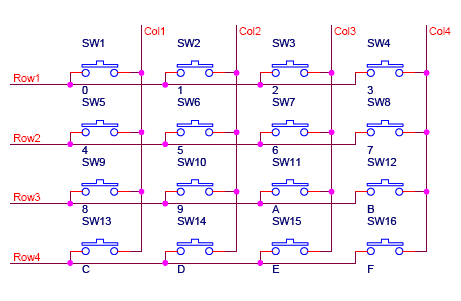
Once the holes were drilled I positioned the push buttons through then tightened in to place with the nut. I then wired up the terminals as per this diagram - where you see a dot along each wire, I used the Quick Splice Wire Connectors, to splice the wires together. This wasn’t entirely necessary (I could have just soldered 2 wires directly from the terminal) but I had a load of the wire splicers and it helped me organise the circuit – so I used them.
Step 3: The Code

Finally I had to attach the end of each row and column to a corresponding pin on the Arduino - I used pins 9, 8, 7, 6 for the rows and 12, 11, 10 for the columns. I then uploaded the following sketch to the Arduino (attached to this step).
Finally I drilled out a hole for a Micro USB Host Cable Male to USB Female OTG Adapter and attached it to the Arduino on the inside. This way I can just store a long length male-to-male USB inside and just take it out and attach when needed – it just tidies things up a bit, so there isn’t a cable hanging out the back when not in use.
That's it. Job done. Just attach to a computer via a USB cable when needed.
Attachments


Participated in the
Invention Challenge 2017


