

Introduction: Ugly Reindeer Movable Horns


Few days ago my wife gave me an idea for this project, so here it is - movable reindeer horns :)
At my wife's work everyone wear reindeer horns and I wanted to make something similar, but different than everyone else, so I used Arduino and micro servo motors to make the horns move.
Supplies
- 9V battery
- PLA or ABS (brown preferably)
- Super glue
- Cable ties
- 4 x M3 x 20mm screws
Tools:
- Soldering iron
- 3D printer
- Wire cutters
- Mini Philips screwdriver
Step 1: CAD Design


I designed the horns in Fusion 360 and all the files are available to download here. There are also files to print the box for Arduino and battery that you can clip to your belt.
I would recommend to use Cura for slicing model, but if you have your favorite slicing software that works well there is no reason not to use it. I printed model in PLA and 20% infill is more than enough. It takes about 3 hours to print electronics box at 0.2mm layer resolution and another 2 hours to print reindeer horns parts with 0.2mm layer resolution, but that depends on the speed of your printer of course. For the horns you need to use support material and I used 8% infill for that.


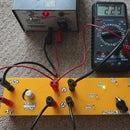
Step 2: Electronics Assembly


Here is the diagram that will help you to solder all together.
- Servo motors are soldered to Pins 8 and 9 (remember to use about 1.5m - 2m cables)
- Positive leg of the battery clip is soldered to mini on/off switch and then to Vin on Arduino Nano
- Solder 1.5m - 2m cable to 5V (it will be used to power both servos)
- Solder negative battery clip cable and one 1.5m - 2m cable to GND (long cable will be used to connect both servos to the ground)
After you finish soldering the arduino can sit inside the 3D printed box and you should have 4 long cables coming out from the box (Pin 8, Pin 9, 5V and GND).
Step 3: Uploading Code to Arduino


Here is the code that you have to upload using Arduino IDE and instructions how to do that.
- Open Arduino IDE
- Open the code [File -> Open -> colour_instrument.ino]
- Connect Adruino Nano to PC/Laptop using USB cable
- Choose COM port [Tools -> Port “…” -> COM…]
- Choose Arduino board type [Tools -> Board: “…” -> Arduino Nano]
- Choose Arduino Nano processor type [Tools -> Processor: “…” -> ATmega328P] [It is possible that you will need to change it to ATmega328P (Old Bootloader) depending on Arduino Nano]
- Verify the code
- Upload
Attachments

Step 4: Headband Assembly


- Make two small holes in
plastic headband for the servo arms (you can use 3mm drill or use hot soldering iron to melt holes)
- Glue the servo arms at the bottom of the headband (see picture above)
- Insert the servo motors into the arms and secure with the screw (both screw and servo arm should be included when you buy servo)
- Solder both positive cables (red) from servos to 5V cable that goes to Arduino
- Solder both negative cables (black) from servos to GND cable that goes to Arduino
- Solder signal cables (orange/yellow) from servos to Pin 8 and Pin 9 that goes to Arduino
- Secure cables with cable ties (see picture above)
Step 5: Final Assembly


- Switch on the Arduino to test if the servos are moving
- Put on 3D printed horns onto the servo motors
- Close the lid of the box (Arduino plus battery) using M3 screws
- Put on the headband with horns and feed the cable under your t-shirt and clip the box to your belt
- Every time you switch the device on the servos will move at random angle, random speed and at random intervals
- Enjoy and Merry Christmas :)
Here is a link to the video: https://www.youtube.com/watch?v=t91QAYWJAW0&feature=share&fbclid=IwAR3ptEX_4Fv8zDR3plMzXlPYa3b9EPd19xsjj4tlbl9gLFFQGfRJSs8S4Kw

Participated in the
Ugly Sweater Speed Challenge


