

Introduction: Ultimate Router Table & Storage Cabinet (table Saw Extension Wing)


This is a super versatile router lift and storage cabinet built around the Rockler ProLift router lift that lives in the extension wing of my table saw accompanied with some t-track. The whole cabinet is made from ½” aromatic cedar Purebond plywood that I had left over from my plywood dresser build. The drawer bottoms are all made from 1/4” plywood and those function as drawer bottoms, drawer slides, drawer pulls, and even drawer stops because of the orange PVC piece mounted to the front that I plan on using to label the drawers. The door over where the router is located is made from an acrylic sheet with embedded wire mesh. I reused the legs that came on the saw, but drilled and tapped some holes into the side of the cabinets and bolted them on. It’s actually a much more solid solution than what came on the saw, but I’m getting off topic.
Step 1: Materials & Tools
Materials & Parts:
1/2" Plywood for main cabinet https://thd.co/2KUIZnJ
1/4" Plywood for cabinet back and drawer bottoms https://thd.co/2KUIZnJ
Wire mesh acrylic
Cabinet hinges
Wide T-Track http://bit.ly/2lgOwZZ
Regular T-Track http://bit.ly/2JQhRt6
Router Table ProFence http://bit.ly/2JZYAo9
Router Lift FX http://bit.ly/2otzljq
Pro Lift Router Lift http://bit.ly/2lgcy7k
Cam Clamps http://bit.ly/2lgtqLe
Power Switch http://bit.ly/2t3K9pB
Router Speed Controller http://bit.ly/2JPdIFQ
Waterlox Tung Oil finish http://bit.ly/waterloxjackman
Dust Collection Parts:
Flat Dust Port http://bit.ly/2K2MTgA
Router Table Dual Port http://bit.ly/2lgNo8P
2.5" Expandable Hose Kit http://bit.ly/2xhnDO4
Blast Gate http://bit.ly/2MxlG49
4" T-Connector Fitting http://bit.ly/2tkF0c3
4" Keyed Bridge Hose Clamps http://bit.ly/2tlmGzg
Dust Right Dust Collector http://bit.ly/2JOA1vn
Dust Collection Hose Clip http://bit.ly/2I2EBQC
Dust Collection Remote http://bit.ly/2t86imG
Tools:
ISOtunes bluetooth hearing protection http://bit.ly/2uIsq7M
Drill Bit/Driver Combo http://bit.ly/2nAOUlu
Push Blocks http://bit.ly/2I2zYWT
Glue Bottle http://bit.ly/2K01UMZ
Table Saw Sled http://bit.ly/2lfnAtE
Router Bit Holders http://bit.ly/2K2tVqk
Feather Boards http://bit.ly/2ymZ2IG
Router Bit Straight Bit Set http://bit.ly/2ypMH6A
Router Bit Set http://bit.ly/2K4RiQ2
Palm Router http://amzn.to/2obmZeX
Router Edge Guide https://amzn.to/2I8jVH3
Miter Saw http://amzn.to/2j614UM
Drill and Driver http://amzn.to/2wy5wSZ
Crown Stapler https://amzn.to/2K3TnIN
Band Saw http://amzn.to/2j4auNu
Drill Press http://amzn.to/2jgpN57
Wood Rule http://amzn.to/2gdizmg
Step 2: Pulling Out the Table and Installing the T-track


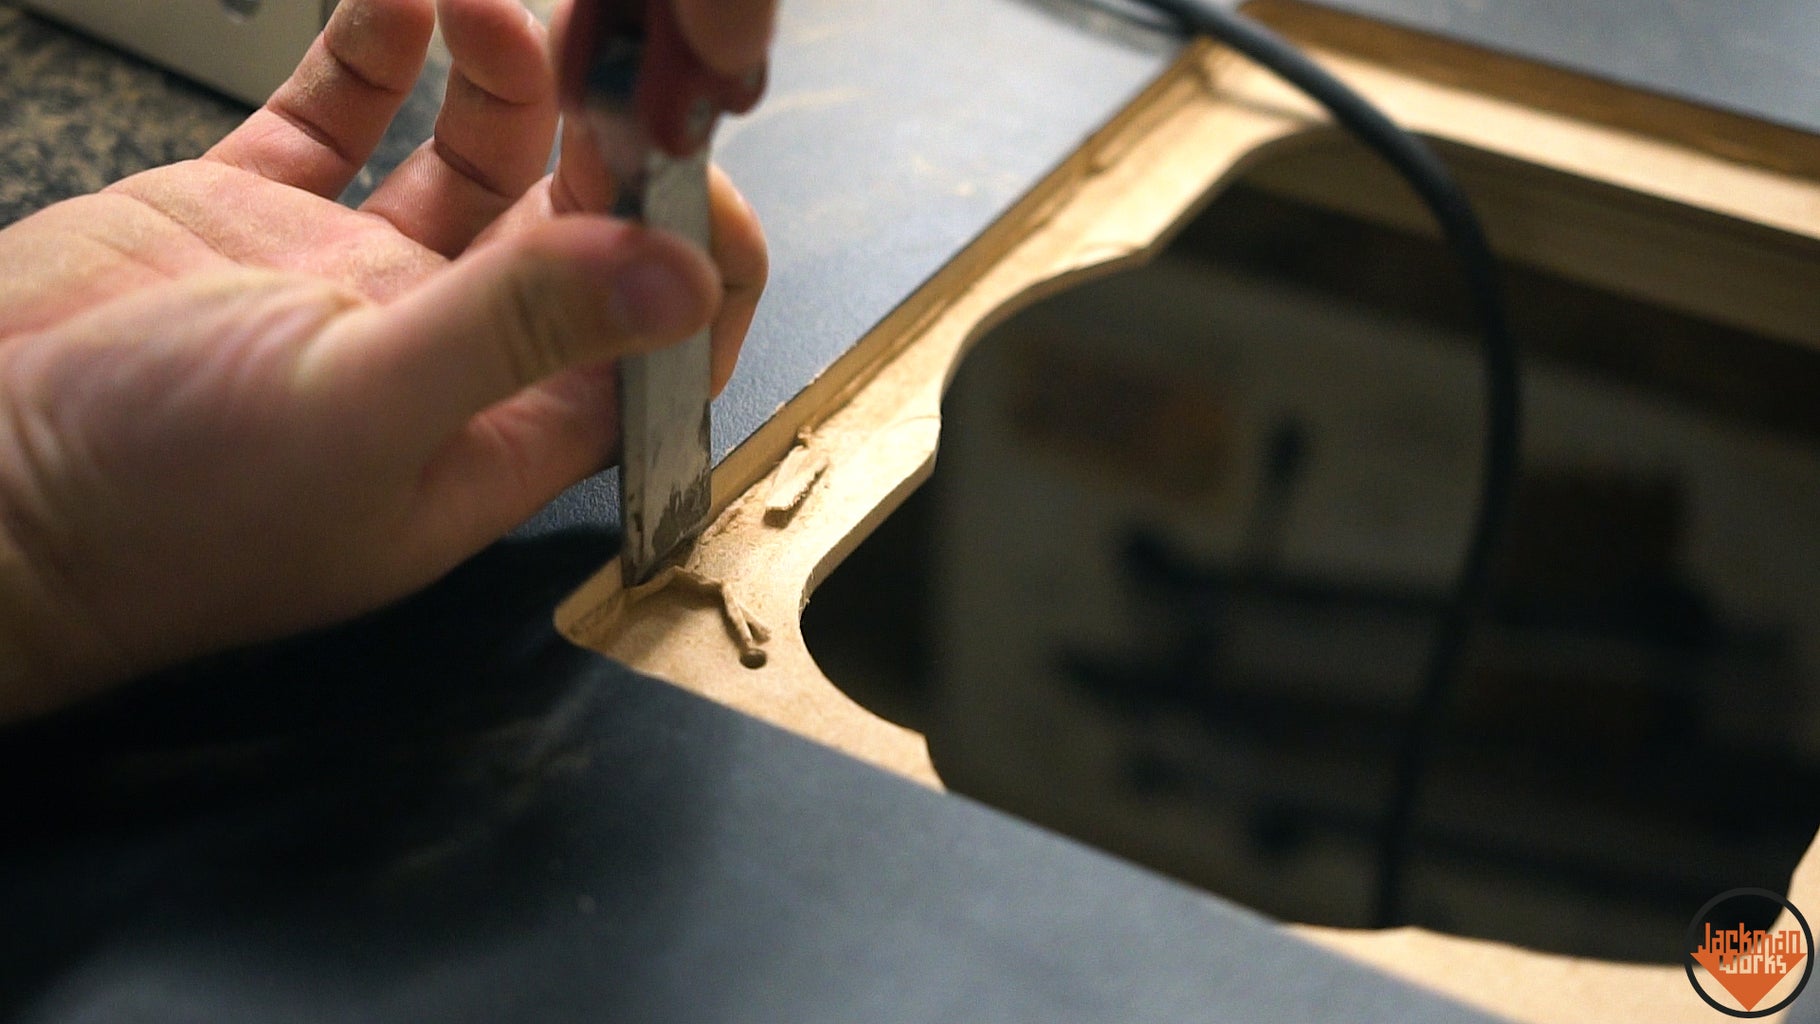
I start by pulling the extension wing table out of my table saw, which sounds easier than it is. It's somewhere in the middle of the assembly process when putting together the saw new, so it's really not supposed to come out this way and puts up quite a fight, thanks Obama. Luckily, I already cut out the hole for the router plate a couple of years ago so that's done (except not really, you'll see why later).
I first determine where the wide t-track is going to go. This is going to extend the full width of the table and will serve as a location where I can install hold-downs and also feather boards in the wider slot. I achieve this with a dado bit in my router and an edge guide to hold my cut parallel to the edge of the table. I continue making the slot wider until it holds the t-track with a warm embrace.
There we go, that thing slid in there nice and tight, oh yeah. For the thinner t-track, I pull out the fence that I'm adding to the router table and use that to mark the minimum width. I perform the same operation with the router to make these t-tracks fit into their respective slots.
The t-tracks are then cut down to length on the miter saw dictated by the slots that I cut in the table top. For now I fasten down the thinner blue t-tracks with some screws, because I'll be modifying the larger t-track before final install. Notice there is no way for me to get bolts into the blue t-track at this point, but you already noticed that, you observant cat.
Step 3: Modifying the T-track for T-bolts


I install the table top back in place where it was before. A long piece of t-track that I can trust to be straight is used to make sure that the surface is level along with the rest of the table, then I bolt it in place.
To modify the wider t-track to allow for bolts to enter the blue t-track, I cut out a notch on the miter saw. This is done carefully so that I just cut the front side where the nut will pass through.
The wider t-track can now be installed into place with some screws as well. You can see here how the bolts can now slide into the blue t-track. These are what I will use to hold the fence in place. I'm a rebel, so I ditched the hardware that came with the fence from Rockler and instead installed the cam levers instead. These will be super fast and easy, exactly to my liking.
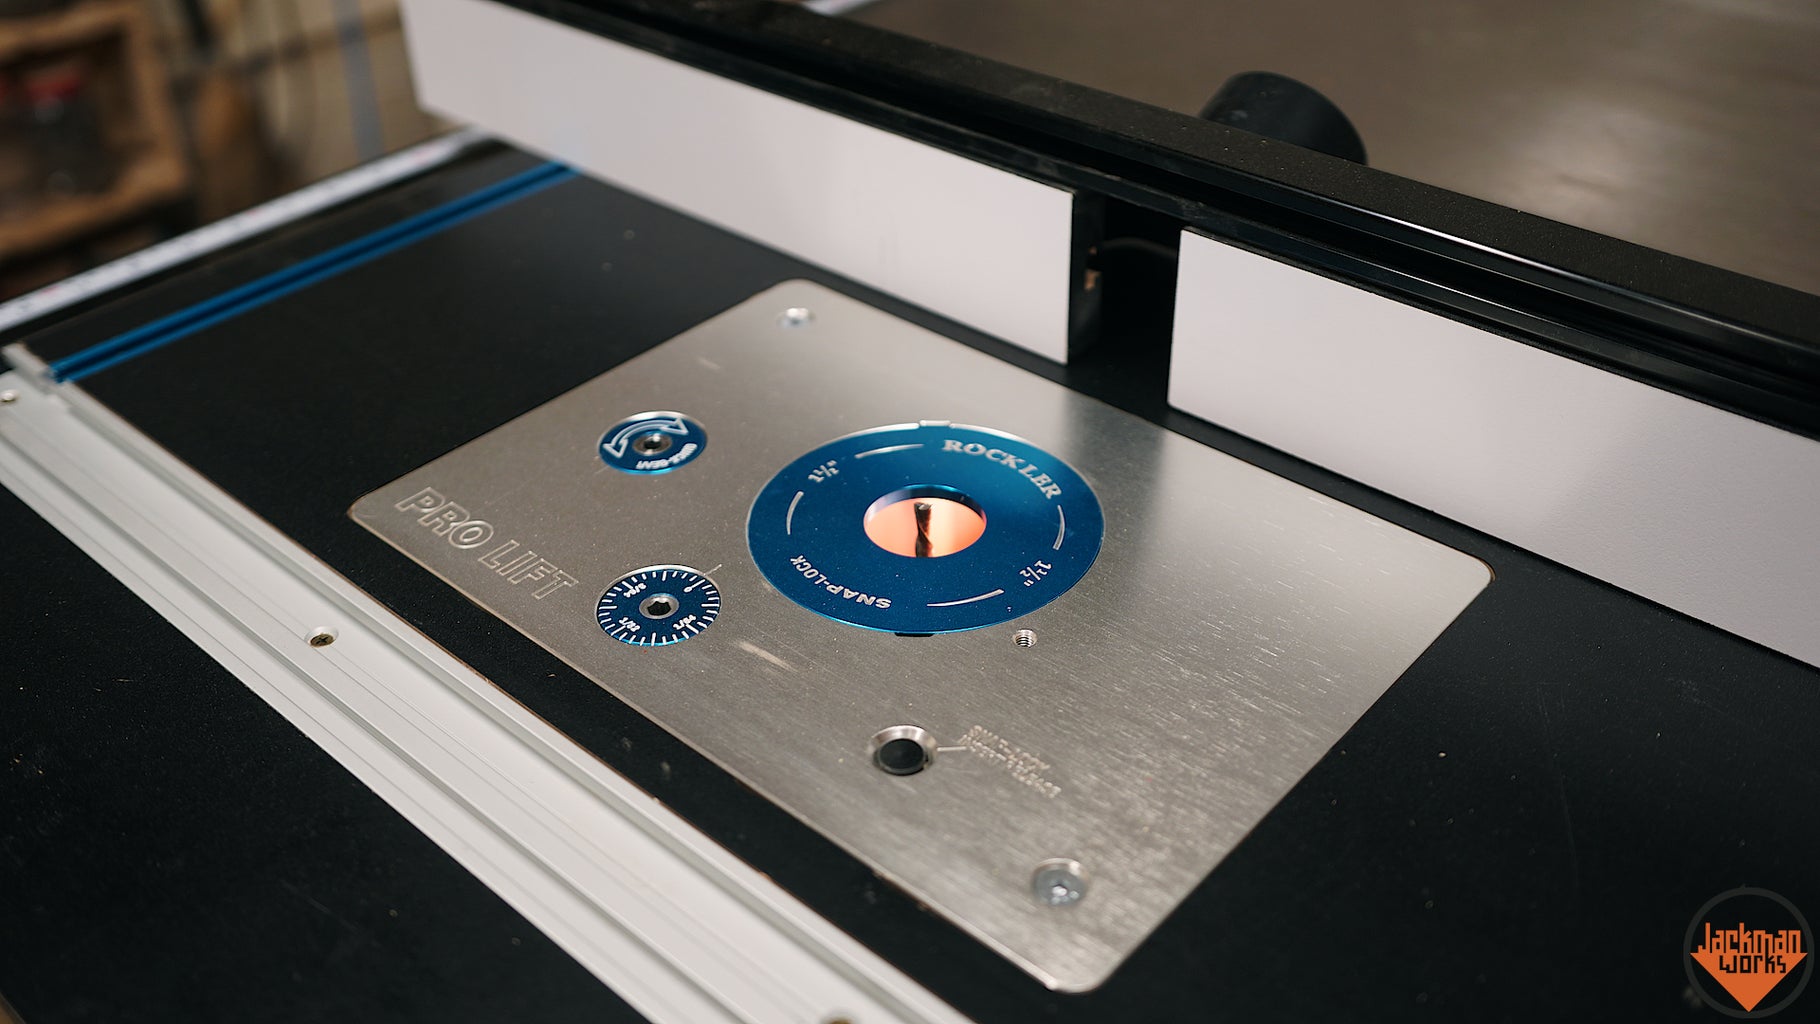
Step 4: Installing the New Router Lift


Excuse me? Did someone say mail time?! Well looks like the postman is forcing me to upgrade my router lift, I can't say no to that man.
Anyway... I swap out my router from the old router lift for the upgraded and beefier Rockler Pro Lift router lift that is brand new. I like beefy, so I like this lift, you can't argue with my logic, don't even try.
So the router place (the big silver metal plate) on the new router lift is thicker than the old one. I'm not like most people, but on store bought router tables they will give you extra thickness and some leveling feet to fit different thickness router plates. Well I'm sorry to say I'm like most people now. I use my router to cut the depth down and fine-tune that cut with a chisel.
I then install some t-nuts to the underside of the table and thread in bolts at each corner to act as leveling feet and I can finally install the new lift in place.
Step 5: Milling Down the Plywood


Now onto the fun part, playing with my wood! For the cabinet portion of the build, I used some 1/2" Aromatic Cedar plywood because I had it left over from a dresser I just built, and because I'm just an elegant type of guy, you can't fight it. Definitely take a few seconds to check out that dresser build if you haven't yet, it's sexy, if I do say so myself (I do).
Using my new router lift (yea) I cut 1/4" slots along each of the sides of the cabinet. These will be used a tracks where the drawers will slide.
No dust collection on the router table yet... something I might have to address.
Step 6: Fitting and Assembling the Cabinet


I remove the legs from the extension wing of the saw. The saw will stand find without them, but putting a moderate amount of weight on the table (i.e. my butt) will cause it to tip, so I'll be installing these back later. I use the bolt hole in the metal angle that held the leg on, but I use it instead to hold the cabinet up. I mark the location and drill the hole in both sides of the cabinet.
One last hole that I drill is in the bottom of the cabinet and that is a 4" hold in the bottom. This will accept the dust collection port later to help keep me from making a mess (it'll try at least). Each of the sides (and the center panels) are installed inside of a dado that I cut and fastened with glue and staples. I use staples because they're much stronger than brad nails and I still needed something thin because there isn't much material left to fasten into after cutting the grooves out of the bottom.
The whole cabinet box can then be installed into place. Before putting it in place, I drew a line 1" down from the top of the cabinet and used that to make sure it was lined up parallel when I installed it. It's first installed using the bolts from the saw and then I level it out using my line and screw it into the table. I also need to make sure again that the table is flat in relation to the cast iron surface of the table saw because those bolts are what was holding it in place. This should theoretically be the last time I have to do this.
Step 7: Installing the Back of the Cabinet


You may have noticed that there was no back to the cabinet yet, well pat on the back to you! I waited to install it because I wanted to notch around these cross members under the extension table. This will allow me to completely seal off the section where the router lives to be able to better fine-tune the dust collection. I hold the back panel in place and mark it out for the notches and then cut those out on the table saw.
I cut it down to size until I have a perfect snug fit and then fasten it in place with glue and some screws. I also need to cut out a hole for the cord of the router to pass through, otherwise I'm to have to manually power my router and I don't have that kind of energy. I use a forstner bit to cut a hole big enough for the plug, but this leaves a large hole because the cord itself is much thinner. To seal this up better, I burnt my logo on a piece of the same 1/4" plywood and cut it out with a notch in the bottom, this nestled up against the cord nicely.
Here you can see it from the inside of the cabinet. The cord passes through the hole and is capped off with the circular plate. The big gaping hole in the bottom is for dust collection, be patient, it's on it's way.
Step 8: Attaching the Drawer Pulls


The bottom of the drawers are then cut to size from 1/4" plywood. The width is enough to protrude into the groves on either side and then the length leave a little extra on the front to act as a drawer pull. I also add a label to the top of them so I can label each drawer later, but this orange PVC piece will also act as a drawer stop. I temporarily clamp the orange piece in place so it sits flush with the front of the cabinet.
I then sand the edges flush with the plywood and screw it in place on either side. Rinse and repeat for all of the drawers.
In my vast collection of Jackman hardware land, I didn't have any tiny screws that were short enough for this operation. I thought about using rivets, but I wanted these to be removable, so my best option was to use my shortest screws and just same them down flush with the plywood. It made for a good visual anyway, so win-win?
Step 9: Installing the Drawer Fronts and Drawer Boxes


The drawer fronts are all installed in place by centering them against the PVC pieces I just installed and screwing them in through the bottom of the drawer.
For the top 2 drawers, I wanted actual drawers with sides. I made drawer boxes out of 1/2" plywood and glued and screwed them together. I then fastened them in place with glue and staples through the bottom of the drawer.
Step 10: Making and Installing the Router Storage Plates


The rest of the drawers will hold various route bits. For this, I use some 3/4" plywood to make plates to hold all of the bits. Not all of these holes will holds bits, but it will give me great versatility to store some wider and thinner bits at the same time. You can see here that each hole has 2 different sized holes in it, peculiar, eh?
Well this allows me to store both 1/4" shank router bits and 1/2" shank router bits in the same holes. I first drill a 1/2" hole half of the thickness of the plywood and then drill the rest of the way through with a 1/4" hole.
These plates are then just screwed into place through the drawer bottom and they can then be slid into place!
Step 11: Preparing the Acrylic Door


Now the center compartment needs a little something. I want to seal it off from the front too, to get better suction from the dust collection. And to do that, I use whatever I've got, like how about this scrap piece of acrylic embedded with a wire mesh?
I just had to include a close-up of this stuff. I don't know that it serves any practical purpose, but man does it look cool. And that is EXACTLY what we are going for with this build.
To fasten the door in place, I need to look for the right hinges in my collection. I have a tool box full of stuff like this that I've dug out from the trash. So many people throw away the junky particleboard furniture once it starts deteriorating, but oftentimes it has some really great hardware on it. Well that hardware finds it's way into the tool box for projects just like this. These hinges here have a 3/8" back set and are sprung loaded which will keep the door shut, PERFECT for this job.
The plate of the hinge is just a little too tall and interferes with the drawer bottoms, so I shrink it down a little bit with some grinding on the sanding disk.
Step 12: Installing the Acrylic Door


The hinges are simply screwed into place and then I mark out the door so I can notch it around each of the hinges. This will allow me to make it tight against the right side of the opening and inset the whole piece into the opening. By the way, I cut the sheet down to size on the table saw using a table saw sled, cutting acrylic was a hot mess as usual, always a good time.
Those areas are then removed on the bandsaw.
To install it, I predrill holes for each of the screw just slightly under the diameter of the screws. This acrylic can be brittle stuff with enough friction, so it's key to make sure it's not to tight of a squeeze. But once that's good to go, it's just a matter of screwing them in place.
Same thing is done with the pull on the door, except I drill some through holes and screw it in place. The pull is just a custom piece that I made by gluing PVC to both faces of a piece of 1/4" plywood, that way it matches the labels/drawer pulls on all of the drawers.
Step 13: Remove the Protective Plastic.

But I'm a fan of honestly, and let's be honest, this is the only thing you came here to see... Breath it in folks. For some reason I felt like this deserved it's own step.
Step 14: Reinstalling the Legs


Alright, moving on. Last part of the structure is just installing the legs back in place. The way that they are installed on the saw is right against a 1.5" piece of wood and MDF and relies on that for structure, but I'm going to do one better because my steel toes like to kick things. I cut down the leg a bit shorter so it fits under the edge of the table, measure it for parallel with the front of the cabinet and drill 2 holes to mount it.
I then just tap each of these holes using a regular thread tap. Because there is no room inside of the cabinet for a nut, this will allow me to just thread a bolt directly into the side of the cabinet. Plus, wood threads are immensely stronger that you would ever expect.
Step 15: Adding Power Switch and Dust Collection Piping


So I bolt the legs on each side and then add a few accessories. Most important is the auxiliary power switch. With this, I can leave the power on the router turned on all of the time and instead use this to switch the power. That means I no longer have to bend down and reach under the table to turn the router on, everyone wins in that situation.
And lastly, the much anticipated dust collection can finally be installed (am I the only one who gets all hot an bother by this? Yes?). So I used to have a single hose running from my dust collector to my table saw and to incorporate the new router table, I just cut the hose and install a t-fitting there. I also install a couple of blast gates to control the air, and an inlet plate gets screwed to the bottom of the router table cabinet.
Something else that I think is pretty slick, is the t-fitting connection to a smaller 2.5" hose that fits into the router table fence. I cut it just the right length to reach to the fence, and then when I'm not using it I installed this hose clip to the side of the cabinet so it can be stowed out of the way.
Step 16: Applying Finish and First Cut


And finally, I can't call this thing complete without pulling out the true color of that fleshy color cedar. (I'm not sure if that's a good thing) But I apply a couple of coats of Waterlox tung oil to all surfaces of the cabinet and then reinstall all of the accessories back in place.
And then there's the first cut and the money shot!
Step 17: Glamour Shots


Thanks for checking out the build. Now allow for me to provide the full Jackman experience, checkout the build video, satisfaction guaranteed or your money back!!
---------------------------------------------------------------------------------------------
Thirsty for more? You can also find me in other places on the interwebs!
My Website: Essentially my entire life
YouTube: Me, in moving picture form
https://www.youtube.com/jackmanworks
Instagram: Preview my projects as they progress #nofilter
https://www.instagram.com/jackman_works
Twitter: Riveting thoughts, in very small doses
https://www.twitter.com/jackmanworks
---------------------------------------------------------------------------------------------
Note: This post contains affiliate links. Thank you for supporting what I do!

Participated in the
Woodworking Contest


