

Introduction: Unique Wood Shapes Without a CNC Machine


Making smaller curved uniform parts out of wood or other materials is typically difficult to do if you don’t have a CNC machine.
If you're like most folks (and me) you don’t a CNC machine in your garage workshop. So how can you make uniform parts?
This Instructable will describe how this done.
Step 1: Making a Template


By the combination of a simple wood jig and a template of the shape you want to make you can reproduce beautifully crafted parts and shapes.
As shown above:
In the first image:
- On the right side is a small plywood template of the desired shape I wanted reproduce.
- In the middle is a rough cut wood piece that has the template shape traced on its surface. (More about this soon).
- Finally on the left is a finished wood piece that is the exact shape of the template and which also has a very nice curve cut in to the edge of it.
In the second and third image are different examples of template shapes and their associated finished wood pieces.
Before I describe the method that works for making these parts I would like to briefly describe what was tried first and which did NOT work well and actually was very dangerous.
Step 2: Table Top Router - How Not to Do This!


{Safety Note:High speed routers are dangerous and the spinning router bits are very sharp. Hearing and Eye protection must always be used when operating such equipment.}
My first several attempt at making these parts was to use a router table, a router, and a router bit that had a ball bearing on it. The idea was to attach the rough cut wood work piece to the template via several wood screws. (Between the rough cut wood and the template was thin spacer washers which are needed to separate the wood piece that will be cut from the template, this allows the router bearing to trace the template and the router bit to cut the wood part.)
As shown in the images, the wood and template was carefully moved into the router bit. The idea is that the bearing on the router bit would limit the amount of wood cut away by the router bit because the bearing would ride on the outside edge of the template thus limiting the cut. This does work to a point, but several problems exist doing the routing in this way:
#1 Your hands are way too close to the router bit!
#2 If the wood is not perfectly feed into the router bit, the router bit WILL cut too deep and actually pull the wood from your hands and fling the wood across the room at high speed. I have a nice dent in my garage wall from this. Lesson Learned …and I still have my fingers this time.
So how do you do this in a safe way?
Step 3: Making a Safe Way to Reproduce Small Parts

After thinking about the problem, I realized I needed to lock the work piece down so it could not move and that I would use the router as intended (by keeping both hands on the handles of the router).
In order to do this I needed to make a jig which would hold the rough cut wood and template securely and also enable a way for the router to be used to trim the wood piece as intended.
The following is the steps to make the very simple jig design that developed (and which has work very well for me) and also details how to use the jig.
The size of the wood jig parts detailed here will need to be tailored for the template size you are trying to reproduce.
In this case the large wood boards used were 1”x12” pine and the smaller thin wood strips used as stand-offs are 1”x4” pine. (I chose pine because it is cheap and very easy to cut. I also tried to pick out boards which had very few knots in them. )
*Note the relative size the template compared to the overall size of the boards used. This will be important in the next step.
Step 4: Time to Cut the Router Surface to Match the Template

Trace the template shape to the middle of the router surface board.
Next freehand a dotted line (as shown) around the tracing of the template. The space between the dotted line and the trace of the template should be about 1.5x the size of the router bit diameter you are planning to use.
Next cut out the material within the dotted line. (The reason for this will be clear in the later steps.)
Step 5: Cut Time!


Cut the material out as shown. In this case I am using a small table jigsaw.
Don't worry about making the cut perfect! Close is good enough.
Step 6: Time to Make the Jig

Time to mount the stand-offs shown earlier to the base of the jig.
Using wood screws attached the wood stand-offs to the large wood piece that will be used as the base of the jig.
The exact placement of the wood stand-offs are not critical. The only thing that needs gauged is to insure that the stand-offs shown on the top base of the jig are matched to the width of the router surface board you cut. (See next step.)
Step 7: Mounting the Router Surface Board


Next attach the router surface board as shown above.
Step 8: Marking the Securing Holes

Now for the "trick" of the jig...
The template shown in these instructions used 3 mounting wood screws... see the three holes marked in the image above.
What will occur next is that each hole is drill to a size slightly larger than the screw size that will be used to attach the template to the rough cut work piece. The exact wood screw size you pick, as well as how many attachment screw (3, 2,..more), will depend upon your actual template size.
Step 9: Attachment Wood Screws

After the jig base is drilled the wood screws can be slid through from the bottom of the jig.
Step 10: Attaching the Template and Rough Cut Wood Piece to the Jig


Now for the fun part...
In the above image note the tracing of the template in the base of the jig. In this image a simple wood triangle spacer was made to lift the template up from the base of the jig. The exact size and thickness of the spacer will vary depending upon the thickness of the rough cut wood piece and the router bit you have selected.
Next the template is added along with several spacer washers. ( You will need to add enough washers such that the rough cut wood piece sits level with the surface of the jig's router surface. )
When everything aligns well the wood screws are tightened... this secures the rough cut wood piece and template to the jig so that it can not be moved!
Step 11: Router Time!


In the associated images, several item key are illustrated.
In the first image the router is shown sitting on the router surface and the rough cut wood piece. (When the router is used an even cut occurs because the router's bottom is sliding on top of the surface of the jig's router surface and the rough cut wood work piece's surface. )
In the second image a closeup of the router bit is shown. Note the shape of the router bit and the bearing location.
The third image shows several key details which must be right in order for the jig to work correctly:
#1 The top surface of the rough cut wood work piece must align with the surface of the jig's router surface.
#2 The rough cut wood work piece and the cutting edge of the router bit has been horizontally aligned such that the router bit will cut the edge of the rough cut wood piece in the desired manner. (This alignment is normally done by adjusting the depth of the router bit from the router. Many router's have fine adjustments built into them for this purpose.)
#3 The template has been spaced such that it aligns with the router bit's bearing. (Be careful to insure that the router bit does not cut into the template.)
Instructions for using the Jig with Router:
#1 Follow the alignment notes above.
#2 The Jig must be securely mounted (screwed or clamped) to a table.
#3 The Router usage direction is dependent upon the direction of rotation of the router bit. In the case of the equipment used here, the router bit rotated counter-clockwise (as viewed from the bottom of the router ). As such, when using the router to cut the rough cut wood piece, I moved the entire router tool around the work piece in a counter-clockwise direction. By using the router in this way the router bit cuts in a more even pattern.
#4 Take many slow even and light cutting passes at the work piece.Don't try to cut the entire shape in one pass.
#5 Practice on scrap wood first!
Step 12: Example of Finished Routed Part!

After making several passes with the router, being careful to not remove too much material with each pass, the finished shape is made!
As shown in the image, the finished wood work piece has the exact shape of the template and also it's edge has been shaped to match the router's bit shape!
Step 13: Finished Routed Part Removed From Jig

After the finished wood piece is unscrewed from the three wood screws it can be removed from the jig and it is ready for any sanding and final staining/finishes you may like.
It should be noted that many other parts can now be quickly made by installing the next rough cut wood piece into the jig (as long as the thickness of the rough cut wood parts remain the same, else a bit of fine tuning will need to reoccur with the spacers.)
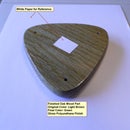
Step 14: Examples of Wood Parts Made With Final Finishes Applied


The above images are wood parts that I have made with this jig. The above parts also illustrate different wood types and final finishes that can be applied to make each piece unique.
I hope this jig/router technique helps others that are on a limited equipment budget make the things that are in their dreams and imaginations a reality!

Participated in the
Full Spectrum Laser Contest 2016

Participated in the
Hand Tools Only Contest 2016


