

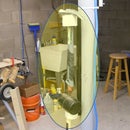
Introduction: Kinetic Art Animation With Upcycled Dollar Store Solar Flowers ($10 Project)


Motivation: I've always been intrigued by synchronized multiple metronomes from Mythbusters show. But rather than use rather expensive metronomes, could I just use some old dollar store solar flowers taking up space in my closet?
Approach: So in keeping with my el cheapo theme, I constructed a frame using four dollar store 5 x 7 picture frames that I gutted and hot glued together. A couple of wood scraps, four small eye-bolts, foam-core board, and dental floss, and I was in business. Total cost about $10 and 2 hours construction time.
Result: A pleasing, rhythmic synchronized motion was reproduced (watch video). Overall I was delighted with result vs cost and time invested.
Usage: Relaxing & entertaining, good parent & child build, and perhaps science fair project.
Step 1: Parts and Tools

Parts
From the dollar store (I used Columbus Ohio area Dollar Tree) ...
(4) 5 by 7 picture frames with flat front and side edges (no fancy molding!) I got mine for $1each at Dollar Tree
1 piece Foam-core board (you could also just use corrugated cardboard)
(2) Solar Flowers (these seem to be a seasonal item, so you might need to hunt around a bit.
From Hardware or home store ...
(4) small eye-bolts. got mine at Menards
(2) 1/4 " thick wood scraps 3/4" and 6 3/4" long
Tools
Saw and Utility knive
Drill and 3/16" bit
Hot Glue gun and clear nail polish
Pliers
Small Bubble Level
Step 2: Construct Cube


a) Begin by locating the retraining tabs located on the frame backside and then bending them outward to release the glass and backing board of all four frames.
b) Then use pliers to pull all tabs free of the frames.
The overall dimensions of the completed cube are 10 1/2 " high, 9 1/4" long and 7 3/8" deep. I highly recommend a dry-run before you start hot gluing the frames together. All glue joints should be between the top frame face and side frame face - see photos. For the sake of clarity, I'll refer to the four frames as #1, #2, #3 and #4 . .
c) Lay the first frame (frame #1) on your table backside down.
d) Hot glue frames #2 & #3 upright to frame #1 on opposite ends of frame #1 - see photos.
e) Hot glue frame #4 on top off of frames #2 & #3. Assure the frame #4 backside is facing up, see photo.
f) Keep all joints as square as possible.
Step 3: Fabricate Swing Platform and Wooden Support Bars


a) Using 1/4" thk by 3/4" wide wood strips, fabricate two eye-bolt mounting bars per Drawing_A PDF file. Note you may have to adjust the bars 6 3/4" length if your frame's inner width is not 6 3/4" - see photo. For example if your frame inner width is 7", then make your bar 7" rather then 6 3/4".
b) Create the swing platform by cutting a 6" x 10" piece of 1/4" thick foam-core board, then drill four 3/16" holes per Drawing_B PDF file. Note you may have to adjust the 7 5/8" hole spacing if the inner frame length is not 8 3/4" - see photo. For example if your frame inner length is 9", then make your hole spacing 7 5/8 + 1/4 = 7 7/8". The important thing is that the eye-bolt holes and the swing platform holes match up, so that the support strings between the eye-bolts and swing platform hang straight.
Attachments

Step 4: Final Assembly


a) Place a thick support (tray or book ..) inside bottom of the frame, them rest the swing platform on top of it.
b) Install eye-bolts in mounting bars, and then position the bars at the extreme ends of the top frame.
c) Thread a long length of dental floss thru two holes at one end of the swing platform and then tie off to eye-bolts on that end. The floss should suspend the platform just barely above the support. Repeat on the opposite end.
d) Remove the support and adjust the floss, eye-bolts and platform to ensure the platform swings freely without contacting the frame, and the platform is level on both ends and lengthwise. Take your time with this step, smooth synchronized swing motion depends on it!
e) When adjustment are complete, "lock it in" by hot gluing floss to swing platform and mounting bars to top frame - see photos. I also used clear nail polish to fix floss to eyebolts. Cut off excess floss.
Step 5: Initial Test and Things to Try
Get it working:
a) Place assembly on a level and well light surface (direct sunlight is best). Assure each flower gets an equal amount of light.
b) Align the flowers directly across for each other, and centered overall relative to the swing platform, and far enough apart to avoid touching when swinging.
c) Wait for the flowers and platform to synchronize - that is both flowers swing left together while the platform swings right and vise-versa.
d) Once in a while the system might enter an alternative stable dynamic state where the flowers swing in unison but in opposite directions (one goes right while the other goes left and the platform stays mostly still). This occurs because there are an even number of flowers (2). Giving the platform a nudge should break this state.
Things to Try:
e) Test what happens as light level changes - how does the swing frequency and amplitude change?
f) With only one flower - how does the swing frequency and amplitude change?
g) Will the flowers ever synchronize when place a regular table top?
h) What happens if you shade the light to one flower?
i) Geek out by attaching a small magnet to swing platform and recording motion with hall effect sensor and Arduino
Science fair project?
For more technical explanation see these links Harvard , Ohio Wesleyan and Research Paper. In particular the research paper provides lots of mathematical meat. Also, in this project, the swing platform is in effect itself a pendulum
Enjoy !

Participated in the
Trash to Treasure


