

Introduction: Using Tft Itead 2.8 Arduino UNO Sheild on MEGA


Tft touch screens are amazing graphical interface that could be used with MCU's specially arduino.
It has wide color range, and good graphical ability and good map of pixels , can be used in applications that needs graph plotting, images viewing, monitorring numerous outputs (such as analog values, temperature , distance, voltage ... etc.) and much more.
There are alot of tft modules out there, the one I got and I gonna use here is ITEAD STUDIO .. 2.8 ITDB02 SHEILD.
It's a sheild for arduino UNO, what I gonna show here is how to use it with MEGA. for a very loggical reason ,, the PROGRAM STORAGE MEMORY .
Step 1: The Tft Screen


This is the sheild I gonna use here :
https://www.itead.cc/itead-2-8-tft-lcd-touch-shield.html
its originally made for the arduino UNO boards, but it can be used with mega. there are two main problems while using it with the uno, the storage memory, and the pins usage! It,s hard to use the unused pins (by the screen) because all the pins are coverd with the sheild! for that resons we use better the MEGA board.
You should note that this module can be use 3.3 or 5 volt to supply , ofcurse on uno or mega, we can use 5v while booth of them are operate at 5V.
To make the sheild useable with the mega board, we will need the following :
HARDWARE :
• arduino mega
• tft 2.8 LCD (itead studio)
SOFTWARE :
• arduino IDE
• any program that can open the C,C++ and Header(.h) files ..
the one used here is (CODE :: BLOCKS)
• and the UTFT Library
• and you can use it's accessorize such as, UTocuh Lib.
in the next step I gonna show how to edit the utft lib to use the tft uno sheild on mega.
Step 2: Edit UTFT Library


the UTFT Lib is very good library that is used to drive a large number of tft screens modules. our module is included.
after you have installed the library, you should see something like the first image. these are the files of the library.
this library is one of the big libraries, it takes about 30kb of the arduino flash memory! this is too much for arduino uno! you can almost add nothing to the code with this library.
the MEGA has 256kb of program memory, this is very good space and can do very good things with it, in addition, there are 54 pin most of them still free to use, and the analog just 5 are taken of 16. this is most often more that enough for most projects.
after downloading the library, you need to open it's files, and edit something in it!
open the UTFT library file to see something similar to the first pic, then open the folder named "hardware", you should see the families of the mcu's (AVR,ARM and pic32) the mega and uno are from the avr family, so we open it.
now you should see the arduino's mcu that uses(ie. the uno uses the Atmega_328p ) and you can see a header file named "HW_AVR_defines" ... this is our target.. open it with some program (CODE :: BLOCKs is used here).
one quick hint, the UTFT Library is very big lib that operates depending on the board or mcu that's used, and the module that is defined. the main utft file call the definitions of the hardware depending on your entries , so when you choose from tools-board---> arduino mega . it call the defintions of the arduino mega, to know the pins connection to the module you have sellected too.
what we gonna do here, is to edit something in the library that make the mega, uses the right defentions when you use an uno sheild with it. The utft library developer add this feature to the library, all we have to do, is to enable it.
we can do so by :
1. open the file with the name "HW_AVR_defines"
2. you should see something like pic2
3. read the note at the start of the code
line 6 says that you should "Uncomment the following line to enable this feature"
4. uncomment the line 7, that enable the defintions of uno sheild on mega.
5. save and exit.
6. move or copy the library file to the aruino IDE libraries directory (suppose you know how to do it :3 )
now we are done with this step! in the next step we gonna show how to use the library and define the pins on the mega.
Step 3: Define the Tft Lcd

after you have edited the library and added it to the arduino directory. you should be able to include it in your programs.
now i gonna show you how to define the right tft module that you have in your hand.
the tft screen that we used is named on the module 2.8 ITDB02 we should find its module name in the library, open the library file and go to the documentation , you should see three files
• UTFT
this file show all the functions and commands that included in this library.
• UTFT_Requirement
this file has the information about the modules and how it's related to the library, like pins configurations
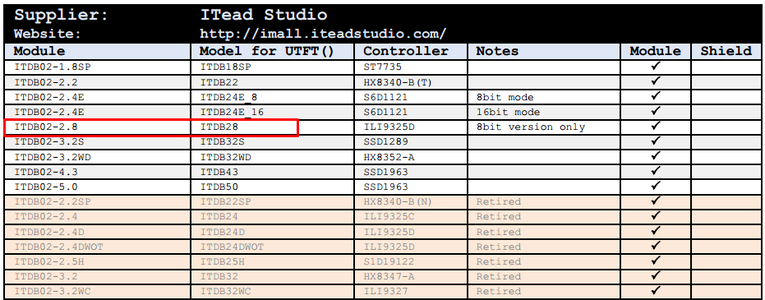
•UTFT_Supported_display_modules_&_controller
this is our target, this file has the names of the modules and sheilds that is supported by this library, you can see in it a list of module names and module names for the UTFT which you should use to define your module.
our module named 2.8 ITDB02 ,, looking for it we find the name : ITDB28 and this is what we gonna use.
now to define an utft object on the arduino ide, we use the command :
UTFT name(module,Rs,Wr,Cs,Rst); witch is mintiond in the UTFT.pdf file.
we should give a name to the object, lets call it as example "myGLCD"
then we name the module, which we found it called ITDB28 , then we sellect the pins, i'm not going to explain what these pins are(it's noted in the data sheet and UTFT_Requirement.pdf file), but you should know that for this sheild, it's located on the A5,A4,A3 and A2 pins.
when you open one of the examples that's included in the library, you will get a note about what pins you should use, don't forget that you use arduino uno sheild, on mega board!
so we gonna define it very direct, as the analog name (A5-A2).
the final command is :
UTFT myGLCD(ITDB28,A5,A4,A3,A2);
# note that pins, 19,18,17,16 in the arduino uno are the pins A5,A4,A3,A2. relatively.
Now you are ready to use the screen! :D
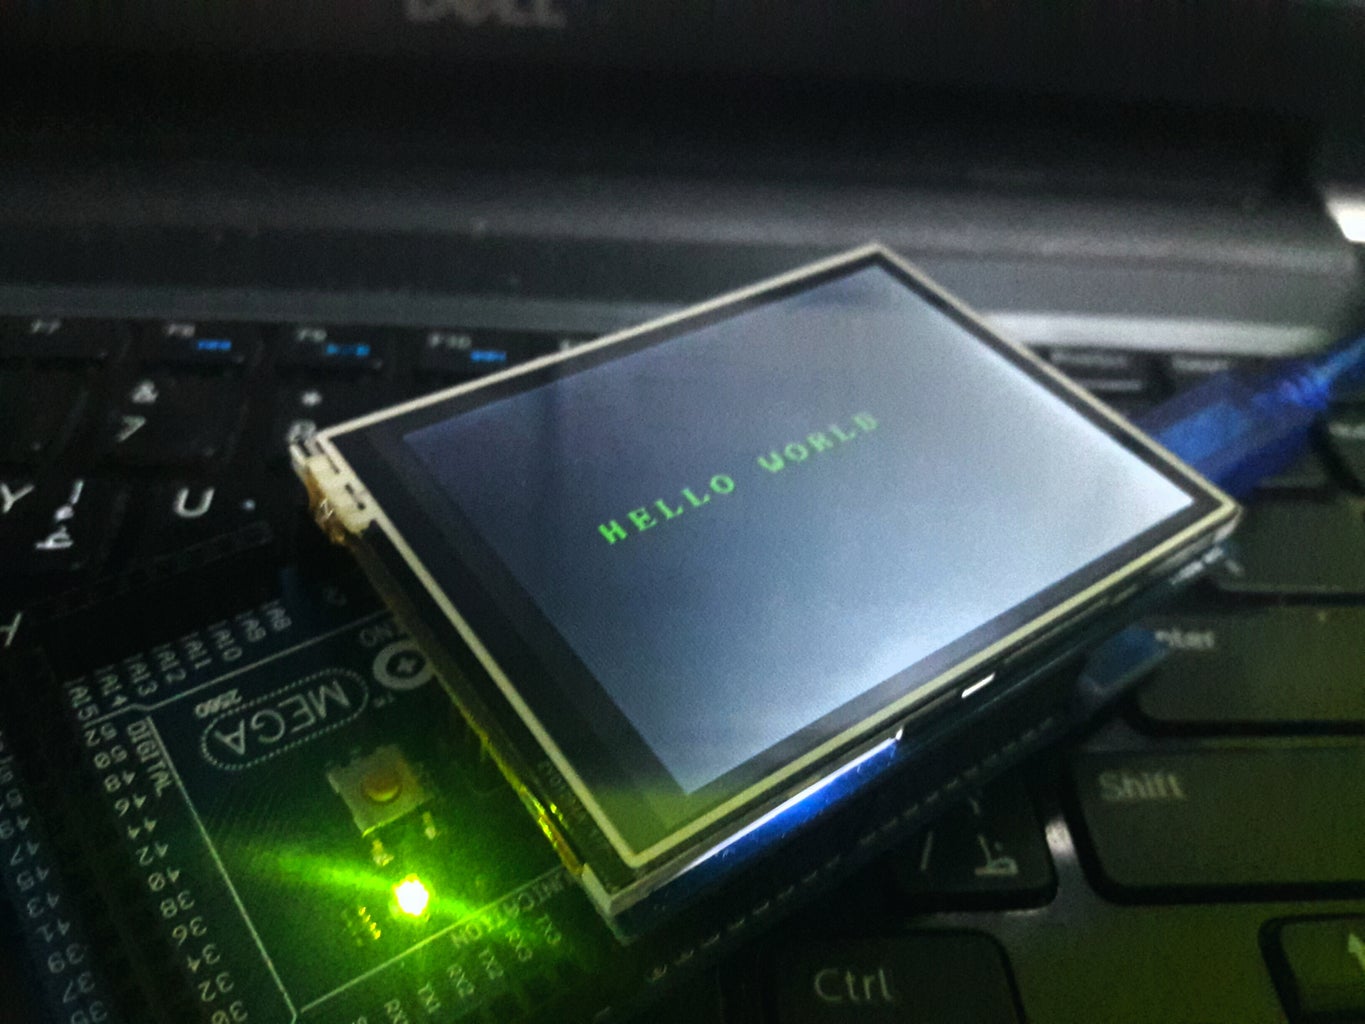
Step 4: HELLO WORLD!
Let's print as an example, HELLO world .
this is the code :
// main code from Rinky-Dink Electronics, Henning Karlsen.
// web: http://www.RinkyDinkElectronics.com/ // edited by : Motaz bany amer // // This program requires the UTFT library. //#include <UTFT.h>
// Declare which fonts we will be using extern uint8_t BigFont[]; extern uint8_t SevenSegNumFont[];
// Remember to change the model parameter to suit your display module! UTFT myGLCD(ITDB28, A5, A4, A3, A2);
void setup() { myGLCD.InitLCD(); myGLCD.clrScr(); myGLCD.setFont(BigFont); } void loop() { myGLCD.setColor(0, 255, 0); //green myGLCD.print("HELLO WORLD", 45, 100); while (true) {}; }
Step 5: Touch Test!

the edit on the main UTFT Library definition also ablied to the accessories, to use the touch feature in the screen we can use the UTouch library
you can download the library from the quick-link in the first step, just add it to the directory, then you can find some examples to use it.
from the examples lest on the arduino ide open the UTouch list then open the example named "calibration".
we need to do some edit to the code, remember that we use arduino uno sheild on the mega board!
for the UTFT definition, just do as the previous step, for the UTouch object definition, there ia are some change you need to make, you see the is in the note, to use arduino uno board, you should call the configuration :
(15,10,14,9,8 )
this configuration is valid for arduino uno (pin 15 = A1 and pin 14 = A0) and further more for another module, this module has the pin 9 and 8 reversed!
keeping in mind that we use mega board, the correct configuration that valid to this case :
(A1,10,A0,8,9)
just change to the correct configuration and upload the code!
you should see have the output in the pic on your screen.
actually, this code is used for calibrate the screen, after following the instruction on the screen, you will get the result of the test, it's the x,y calibration, you can ooen the utft library source code , find those parameters and edit them! however it's not essential thing to do, but it suppose to give you more accuracy whit your touch coordinations!
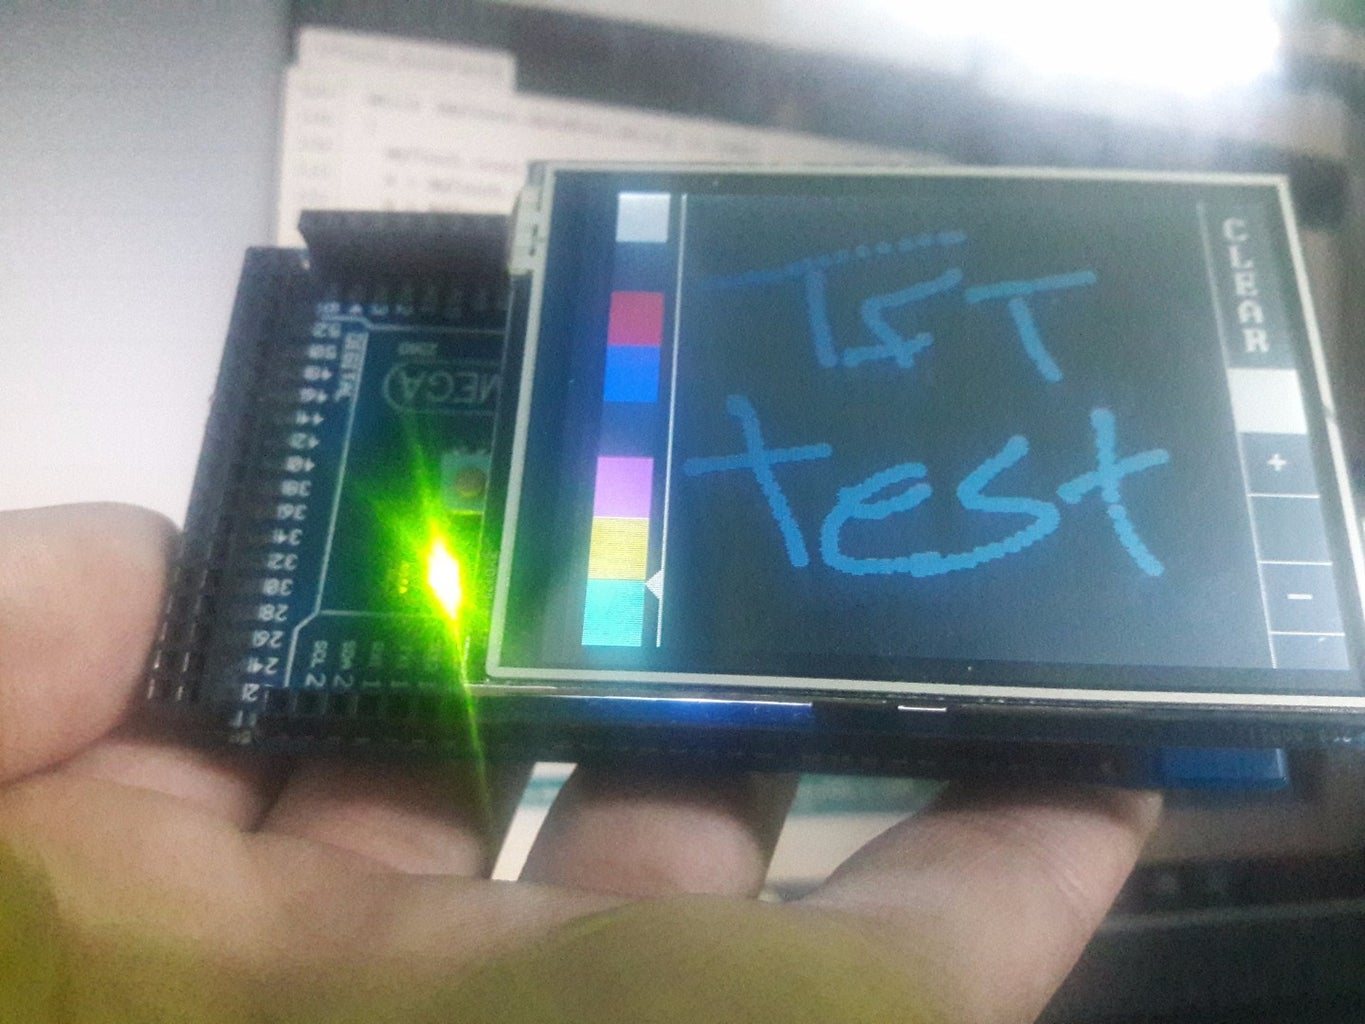
in the image this is a test of the tft screen with "Utouch quickPaint" example.
Step 6: Done!
this is all here, imagine what can you do with such screen and features with all these free pins and memory! on mega board!
good luck, hope this was usefull ^^


