

Introduction: Victorian Vanity and Mirror


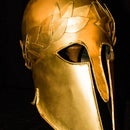
This Vanity and Mirror were built for a production of Lynn Nottage's Intimate Apparel. The director provided me with an image of the vanity he wanted for the production, and my job was to create one as close to the image as possible [Source Image: https://www.instructables.com/files/deriv/FPG/LOX7...]
First thing first, it's very important to recognize that because this piece is made for the theater, speed and durability are key to the build process. This means that not all of the of the techniques here are "fine furniture" technique. In order to increase speed, shortcuts are made to create the look of carving and applique details. The vanity has one working drawer in the center, with four fake side drawers.
For this project you will need:
Lumber:
- Rough cut Poplar
- 1/2" A/C Plywood
- Wiggle wood
1 Sheet of Mirrored Plexiglass
Various Wood Applique
Corded Half Round Applique
Power Tools:
- Tablesaw
- Chopsaw
- 4 1/2" Sander Grinder
- Center Finding Doweling Jig
- Corded Drill with 1/2" Predrill Bit
- 4" Cutting Grinder
- Drill Press
- Router (with Roundover bits and Rabbet bit)
- Orbital Sander with 120, 150, and 180 grit paper
- Biscuit Joiner
- Brad Nailer
- Bandsaw
Other:
- Wood Glue
- Hot Glue Gun
- Elmers Glue
- Tissue paper
- Pipe Clamps
- C-Clamps
- Metal Scab (square of Sheet Metal with screw holes)
- Paint and Glaze to create Wood Grain Texture (it is possible to stain, but the appliques and plywood will stain a different color than the poplar)
Attachments

Step 1: Legs, Legs, Legs

This project is separated into big two sections: The Vanity and the Mirror. We are going to start with the vanity.
The first step of the Vanity begins with the Cabriole style legs. After patterning out entire vanity(I patterned the front elevation of the vanity on butcher paper in 1:1 scale. This way, all measurements can be taken directly from the drawing.)
Using the 1:1 drawing of the leg, cut out a luan pattern of the leg profile. Using a luan pattern makes it much easier to trace multiple times.
After planing a plank of rough cut poplar, cut sections to the length of leg and glue up a blank. It takes about three or four thicknesses of board to fill the profile of the cabriole leg. Once the glue has dried, measure the thickest length of the cabriole leg and cut the blank to exactly that thickness, on two sides. (It may take more than one pass on the table saw to safely cut such a thick blank. Be patient and safe!)
Trace the profile on one side of the blank, then flip it so the mirrored image is on the left side of the board.
This is somewhat complicated to put into words, so I've attached an extremely helpful step-by-step article from Woodcraft [http://www.woodcraft.com/articles/660/stepbystep-m... ] Following this tutorial, using a "hinge" is helpful but if you cut too far, you can also use masking tape or hot glue on the "waste".
Once the profile is cut on both sides, sander grinders and orbital sanders can be used to shape the leg. The goal with this step is to hide any resemblance of the shape of the material you began with.
Step 2: Let's Start Clamping


Once all four legs are complete, measure and cut poplar to the width of the vanity, minus the thickness of the legs to create a stringer.
Using a center finding jig, measure and predrill three 1/2" holes on the stringer. You can then use plugs to mark the dowel points onto each leg.
Using a drill press, drill 1/2" holes, glue in 1/2" dowels and pipe clamp together.
Repeat this step for both sides of the table, then again to connect the two sides to create the full length of the table.
Quick Tip: After the table is pipe clamped together, if it is wobbling or seemingly unlevel, clamp the table down onto a work table to force it into square.
Attachments
Step 3: Jigsaw Time


Using the 1:1 scale drawing of the front of the desk, draw the drawer details and the curves for the leg openings.
Place the table on its backside. Using a drill with a large predrill bit, drill a hole into the corners of the center drawer. Place the jigsaw blade into the hole and jigsaw the drawer opening. Jigsaw the curves for the leg openings and sand.
Step 4: To Install the Drawer


Because the drawer is only being used a few times in this production, it was not necessary to install drawer glides. The drawers were held in place by offcut poplar toggles. They were cut to length, glued and shot into place with a nailgun.
I chose to use a dove tail jig to build this drawer, but that is definitely not necessary. It does make a tighter fit and a more attractive looking seam, but you can definitely get away with gluing and shooting a drawer together to install.
Attachments
Step 5: Building the Tabletop


The table top is built from a plywood square with a biscuit joined poplar along the edges. This is in order to save on poplar while hiding the "plywood edge".
First in order to pattern the tabletop, measure and cut an undersized plywood rectangle. Biscuit join lengths of poplar to all four edges of the plywood rectangle. Draw the tabletop design, keeping the detail centered and far from the plywood.
After clamping the top to a workspace, jigsaw cut the tabletop design. Route a decorative round over with an Ojee router bit and lightly hand sand with 180 grit sandpaper.
Step 6: Decorating the Legs and Drawers

As I mentioned before, in order to speed up the process of creating a decorative table with intricate carving, fine furniture techniques were not always the preferable way to do this.
The most notable step of using "shortcuts" to stick to the spirit of the vanity, was the "carving" detail on the legs.
Intricate carving takes a lot of time, skill, and patience. In the theater world, that is not always a practical option.
In this case, cutting decorative shapes in microcell foam was a quicker alternative to carving. Using hot glue is perfect for adhering microcell to wood.
The next step with decorating is to glue and bradnail half round wood applique to the drawers and around the bottom edge of the stringers.
Any microcell detail should then be covered with a few layers of papier mache to add strength and get rid of hard edges.
Step 7: Now on to the Mirror!


For the mirror, the first step is to create a 1:1 pattern on butcher paper.
Carefully cut the mirror shape onto mirrored plexiglass with a bandsaw. Work slowly and keep the plexiglass supported while cutting to avoid cracking the mirror. The mirror should be cut with about half an inch of overlap to the inside edge of the frame.
Trace the pattern onto 1/2" Plywood, bandsaw and route a round over onto one edge. This will be used as the back of the mirror
Using poplar, pattern and cut the outer frame of the mirror in segmented pieces(I cut them into 4 pieces). Once cut, route the inside and outside edge of the frame with a round over bit. Flip each side upside down, and using a rabbet bit cut a channel into the frame, so the mirror sits sandwiched into the frame.
Working piece by piece, glue and brad nail the mirror into place. C-clamp pieces as you go.
Attachments
Step 8: Making the Mirror Base


Working in three sections; the base and each arm, cut and round over the pieces to size.
The mirror and base should now be attached with metal scabs and screwed in place.
For the curved pieces on the side of the base, cut a scrap of plywood with the desired curve. Using wiggle wood(which is bendable plywood) shoot the plywood into the curve and laminate another section of wiggle wood into the first. Once the glue has dried, carefully remove the plywood from the finished wiggle wood pieces.
The finished wiggle wood pieces can then be attached with a scab and screwed into the base.
Wood appliques can now be glued and brad nailed in.
Step 9: Final Steps
The base can now be screwed into the vanity with 3" screws.
The whole piece can then be painted with a series of paint glazes and sealed.
The final step is to attach drawer hardware to the real and fake drawers.
Good luck with this instructable, if you have any questions please let me know!
Thank you,
Sam
Attachments

Runner Up in the
Glue Challenge 2016

Second Prize in the
Tables and Desks Contest 2016


