

Introduction: Vintage Exercise Bike – Friction Pad Upgrade


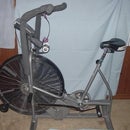

The first upgrade to my 1980’s Panasonic EX-1000 flywheel exercise bike was to replace the stock felt brake pads. The OEM felt pads were the same size as the rubber brake pads on street bicycles. The felt pads had worn down, were glazed over with oxidation and crud, and weren’t working well. At the time, replacement pads of the same type weren’t available. Schwinn spin bike friction pads used on the DX900, IC-Elite, IC-Evolution, etc. were available but didn’t fit the caliper.
I tried substituting the complete Schwinn DX900 tensioning system, but it didn’t fit. That left modifying the existing hardware.
The attachment tab on the Schwinn pad needed to fit through the caliper loop but was too big. To get it to fit, the loops of the caliper loops were slowly and carefully hand-filed and fitted to the tab. Although the walls of the caliper were reduced, they were still adequate for an exercise bike.
This upgrade was well worth the time.
Step 1: Parts, Tools, and Disclaimer


Parts
Brake Shoe Pad with Bolt and Spring for Schwinn (DX900, IC-Elite, IC-Evolution, etc.) – make sure you get them with the bolts, springs, and washers so you can mount them. Also, they are a left and a right pad.
Note: The mounting tab, with the machine screw, is 0.980 to 1.050 wide (top to bottom, about a 3.5% taper) and 0.240 thick
Tools
Pressboard (for the template, a cereal box will do)
Utility knife with a sharp blade
Cutting pad
Riser (for making template, I used a pad of Post-its)
Fine point pencil (e.g. 0.5 mechanical pencil)
Ultra fine tip Sharpie
Chalk
Small round file about 1/8”
Small flat file about 1/2”
Caliper (measuring device, not the brake part, optional)
Note: I recommend using hand files because there is greater control and less heat than using a rotary tool.
Note: Chalk your files. It will help keep metal filings from sticking between the file teeth.
Disclaimer
I like this disclaimer from the author Samuel M. Goldwasser (http://www.repairfaq.org/sam/captest.htm) - “We will not be responsible for damage to equipment, your ego, blown parts, county wide power outages, spontaneously generated mini (or larger) black holes, planetary disruptions, or personal injury that may result from the use of this material.”
Add to that the usual admonitions to use safety equipment, be careful of hot, sharp, or rotating parts and equipment, and be cautious around electricity. Also, if you change it, and they can tell, it probably voids your warranty.
Step 2: Remove the OEM Pads.

- Loosen the tension knob completely.
- Remove the nuts and washers from the tension arms.
- Undo the caliper nut and partially compress the caliper to slide out the bolt. Pay attention to the location and orientation of the spacers. They are different shapes and have curved and flat faces.
- Slip the caliper assembly off of the flywheel.
- Undo the friction pad nuts and removed the OEM pads.
Step 3: Make a Template


- Set the Brake Shoe Pad on the pressboard with the tabs facing down. Rest the shorter tab on a riser to make the pad approximately flat. Press on the pad to hold it in place and trace around the two pointed tab with a fine point pencil,
- On a cutting pad, cut the marked straight edges. Then cut the rounded ends by pressing the point of the knife into the pressboard at very small intervals following the rounded mark. Remove the cutout.
- Slip the template over the tab to check the fit. It should be snug. Trim to fit if necessary. If you aren’t satisfied with the template, make it again, there is lots of pressboard in a cereal box.
Step 4: Shape the Caliper


The red outline corresponds to the mark you will make with the template. The second loop is after filing.
- Place the template over the outside face of the caliper loop. Adjust it so that the metal remaining after filing will be as evenly distributed around the hole as you can make it. Mark the caliper with an ultra fine tip Sharpie.
- Squarely file out the hole until the Sharpie color just disappears. Begin test fitting the tab as you approach having no color left. Slowly file and test fit until the tab just slides into the caliper and seats on the shoulder of the tab.
- Repeat for the other caliper loop.
Step 5: Assemble

- Insert the pads into the inside of the caliper with the square tab toward the front. Remember that the caliper mounts on the back of the stem and is reversed. Install the pad bolt with a washer, the spring, and a washer on it. Finger tighten the bolt. Do both sides.
- Slip the pads over the flywheel and install the caliper bolt, spacers, washer, and nut. Tighten the caliper nut.
- Reattach the tension arms and tighten the nuts until the pads are close to the flywheel and an even distance from the flywheel. The nuts on the tension arms should be at the same place on both arms. Tighten the lower nut against the upper nut to lock them in place.
- Twist the tension knob to increase the friction and test ride to find the correct resistance for you.


