

Introduction: Visualize Bluetooth in a Long Exposure Photo


Bluetooth is a technology we rely upon almost every day to connect devices to our phones, tablets, laptops, IoT devices, and all kinds of other tools. But Bluetooth is a highly intangible, untouchable technology. Almost all of us have at least one Bluetooth peripheral in our homes, like speakers, headphones, vehicle entertainment systems, smartwatches, and fitness trackers. However, considering how integral Bluetooth is to our daily technology usage, it is very difficult to answer even seemingly basic questions about the Bluetooth connections are almost always using:
- How does distance from a Bluetooth peripheral affect our Bluetooth connection?
- What kinds of obstacles can interfere with Bluetooth signals?
- How do you optimally locate a Bluetooth device to provide the strongest connection to your phone?
In this Instructable, we will answer these questions and more by building an app that will allow us to see the invisible Bluetooth signals around us with visible light.

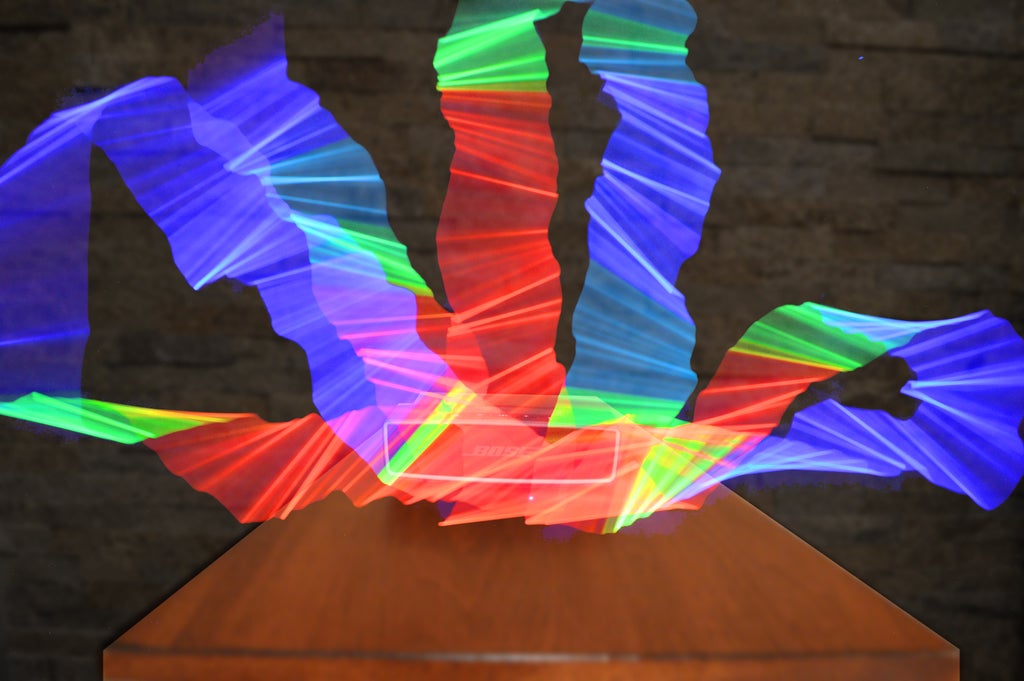
Not only does this produce a rather beautiful effect, but it also gives us a simple tool to analyze the Bluetooth signal in the space surrounding different Bluetooth peripherals.

This Instructable will show you how to use an Android application, together with a DSLR camera and a few other basic materials, to produce your own Bluetooth strength images to answer fundamental questions about your own Bluetooth devices.
Step 1: Gather Your Equipment
You will need a few pieces of equipment for this project:
Android Phone
We will be using a bespoke Android application to power this project. There is a bunch of information about the app in the next few steps but for now just know that the app requires an Android phone running Android version 5.0 (Lollipop) or newer. In this project I am using a Google Nexus 5X.
DSLR Camera
The Bluetooth signal visualizations we will be creating in this Instructable are achieved using long exposure photography. You will therefore need a camera capable of doing long exposures. This will probably be a DSLR camera with a bulb setting.
Camera Tripod
When shooting long exposure photography, it is essential that the camera remain totally stationary, otherwise the images will be blurry. This means that you will probably require a tripod.
Camera Remote
This may or may not be necessary depending upon the type of DSLR you are using. Some cameras (like my Nikon D3200) require a remote to use the bulb setting without holding down the shutter button manually. I use a simple, cheap wired remote with a locking shutter button.
Step 2: Install the Bluetooth Light Painting App


For this Instructable, I created a relatively simple Android application that connects to a Bluetooth peripheral, measures the signal strength of that connection, and translates the signal strength to a color. To enable your Android phone to map out a Bluetooth signal, you will need to install the app.
Install from the Play Store
The easiest way to install the Blue Paint application on your device is the same way you likely installed all your other applications, from the Play Store. The Blue Paint app is currently published in the Beta channel on the Google Play Store. Simply follow the link below or search for the app in the Play Store app on your phone to install the app.
![]()
Manual Install
The second way to install the app is to do it manually from the source code using Android Studio. This method involves a little more work, but it also allows you to modify any of the application code you want before installation.
To get started, if you don't already have it, you will need to install Android Studio.
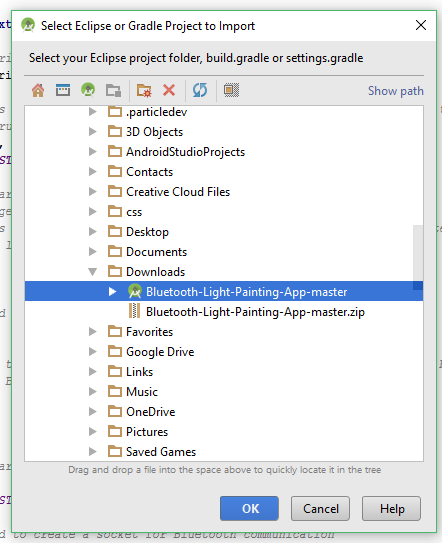
After you have Android Studio installed, head over to the GitHub repository for this project and download the zip file that contains all of the source code for the project. Once the download completes, un-zip the file into the directory of your choice.

After downloading the repository, open Android Studio. In the File menu, select New > Import Project.

You will be presented with a dialog box. Navigate to the location where you extracted the .zip file obtained from GitHub. Select the top level directory and click the OK button.
You will then be guided through a bunch of other screens for configuring the imported project files. You should be able to stick with the defaults for all the screens that Android Studio selects. Just spam the Next button until you get to the last screen where you can click the Finish button instead.
After the project loads into Android Studio (which might take a minute) you can run the application on your Android phone. With your phone connected to your computer via USB, click the Run button in the Android Studio toolbar. It is a green play button. This will launch the Android Device Manager. At the top of the screen, you should see your connected phone.
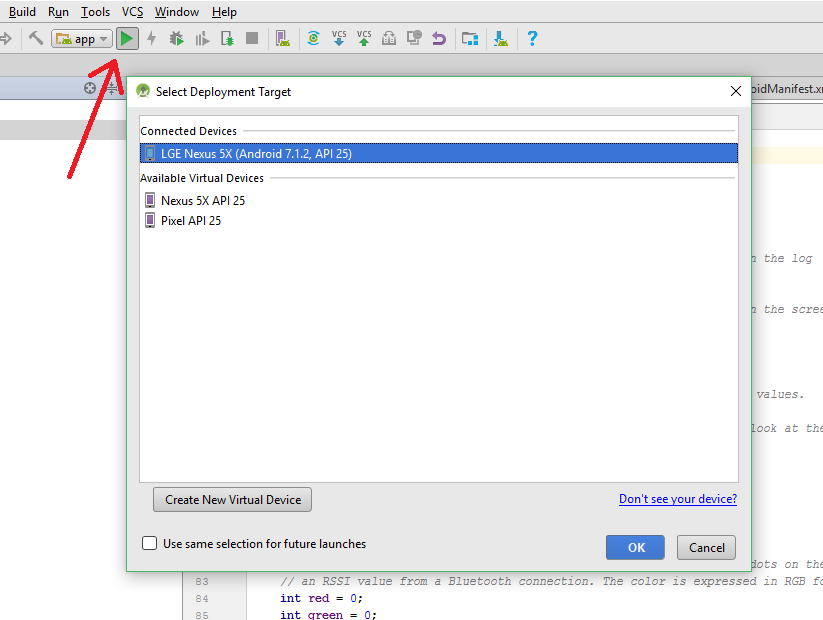
If your phone does not appear in the list, it is likely you just need to enable developer options in your settings menu to allow Android Studio to connect with your phone. The procedure for doing this varies slightly from phone to phone, but typically you go to Settings > About phone and find an item listing your Android Build Number. To enable developer options, simply tap this item seven times.
Step 3: Using the Blue Paint App


Now that you have the Blue Paint app installed on your phone, it will be useful to know how it works. Using the app is easy. When you run the app, you will be prompted to choose the device for which you wish to map out the Bluetooth signal. If the connection fails, the app will try to help you fix whatever issue caused the failure.
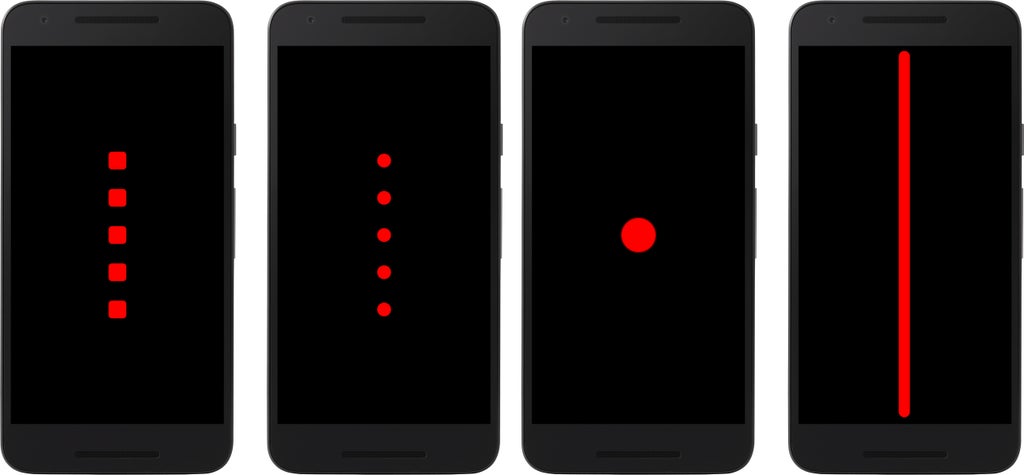
Once you select a device, you will be taken to a mostly-black display with a series of dots in the middle of the screen. If you move the phone around your Bluetooth device, you will notice that the dots change color.
The dots will appear red with a strong Bluetooth signal, green with an intermediate signal, and blue with a weak signal.
You can change the style of dots by swiping left and right on the screen. The different types of dots (one is a bar the length of the phone) produce very different effects in the long exposure photos.
You can also change the minimum RSSI by swiping up and down. Making the minimum RSSI closer to zero basically shrinks the color scale. The color of the dots will turn blue closer to the Bluetooth device if the minimum RSSI is closer to zero. This is useful if you want to create Bluetooth visualizations zoomed in closer to your device.

Step 4: Set Up the Scene


With the Android application installed on your phone, it is time to set up your Bluetooth device and the room in which you will be taking your long exposure photograph to visualize Bluetooth.
There are a couple keys to getting the best results from your long exposure photography. First and foremost, the room in which you take the photo has to be totally dark. The post-processing we will do later on will go much more smoothly if the long exposure photos have completely black backgrounds, with the light from the Blue Paint app being the only thing visible in the photos.
The second key to success is to make sure you make a mental note of the field of view for your camera ahead of time. Since you will be standing in front of the camera in total darkness, you will need to know how far out from your Bluetooth device to move your phone so you fill up the frame the way you want.
The last key for success is to (if possible) set up your scene with a dark background. The background does not need to be black or anything, just avoid backgrounds that are too lightly colored. Later on, when we work on post-processing the images, the long-exposure photographs will show up with much brighter colors if the background is somewhat dark. Light backgrounds are not bad, and the images still look good, but the colors look more washed out on a lighter background than a darker one.
If you don't have a good place to set up your scene with a dark background, it is always possible to darken the background during post-processing. Since we will be doing some work in an image editor to overlay the long-exposure photos on top of the normal photos, it is not too difficult to darken the background at the same time.
Step 5: Take a Normal Photo


Alright, it's time to start capturing photos. Before doing your long exposure shots with the Blue Light app, first we need a normal photo. This normal picture will be used as the background during post-processing. The long exposure photos visualizing the Bluetooth signal will be overlayed on top of the normal photo.
With the shot set up the way you want with a desirable background and enough space around your Bluetooth device for the Bluetooth visualization, take a photograph of the scene under normal lighting.
Step 6: Capture Your Long Exposure Photo


The time has finally arrived for the main event of this Instructable, capturing the long exposure photo that will enable you to visualize Bluetooth signals.
To capture the photo, set your camera to bulb setting and turn off the lights. With the shutter open on your camera, move your phone with Blue Paint around in the space surrounding your Bluetooth device. You will want to move the camera at a slow-ish pace to get nice colorful patterns in the photograph. Be sure to experiment with your scene and technique to get different effects.
The video below shows the general process of capturing your long exposure photo. This would obviously be done for real in total darkness.
Step 7: Prepare Your Normal Photos


Although they look interesting by themselves, in order to provide some context for the long exposure photographs, we will do some post-processing to place the long exposure photos on top of the normal photo. I am using Adobe Photoshop for this Instructable, but the post-processing does not require anything too sophisticated. You just need a photo editor with layer control and layer blending options.
Starting with the normal photograph of your Bluetooth device, I find that the finished images turn out better if you blur the background of the normal photo. This helps to make sure the background is not too distracting for the colorful patterns in the long exposure shots.
In Photoshop, simply use the lasso tool to select around your Bluetooth device. Then, in the toolbar, choose Select > Invert. This will select everything in the photo except the Bluetooth device. To apply the blur, choose Filter > Blur > Gaussian Blur. I find that a value of approximately 15 works well for the blur.
Step 8: Add Long Exposure Photo Layers


We now have a normal photo of a Bluetooth device with a nicely blurred background, but that is not the point of this Instructable. To add the pattern of colors from the long exposure photograph, first open the long exposure photo in Photoshop.
First, I like to bump up the saturation of the colors a bit. This is done in Image > Adjustments > Hue/Saturation. I usually bump up the saturation to about +50 or so. The increased saturation will make the colors show more brightly in the finished images.

Next, copy the entire photo and paste it into the background image as a new layer. The long exposure layer should be on top of the background.
Finally, we will need to blend the long exposure photo layer into the background layer in a way that eliminates the black background of the long exposure photograph. There are several different blending options that will produce slightly different results. The type of blending you use will depend upon the characteristics of your long exposure photograph, so you will need to try a few options until you find the one you like most. In Photoshop, right click on the long exposure photograph layer and select Blending Options... at the top of the list. Try out the different options until you find the one that works best. I typically use Screen or Lighter Color.

And now you have a finished image showing the strength of a Bluetooth signal around your Bluetooth device! Keep experimenting with different techniques and scenes to see what kind of images you can create.
Step 9: Image Gallery


I created a website to show a gallery of images created using the Blue Paint application for inspiration.

Runner Up in the
Bluetooth Challenge


