

Introduction: Voice Controlled WiFi Car


In this project, I'll show you how make voice controlled car with esp motorshield and MIT app Inventor.
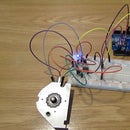
Step 1: ESP Motorshield

There's not so much information on the Internet about this board. First of all this shield for ESP-12E Dev Kit and NodeMcu boards and not for all, because width between pins is 25mm and that's not enough for some boards like LoLin. In my project, I used NodeMcu Amica.
This shield board is driven by the special excent large power full-bridge chip L293DD from the famous Stmicroelectronics company, which can directly drive 2-channels DC motors or one-channel stepper motor. The driven current can be arrived at 1.2A.
Motor power: can be up to 36V.
ESP power: can be up to 9V. Because it goes straight to the esp without any voltage regulators.
Also, these pins have common ground, you can connect voltage supply to one pin and use shortcut for other(if voltage less than 9V).
Board uses 4 pins to control motors. PWMA, PWMB- speed of motors. DA, DB-direction of motors(0-straight;1-reverse).
Here pinout for NodeMcu Amica.
- PWMA-GPIO5.
- PWMB-GPIO4.
- DA-GPIO0.
- DB-GPIO2.
Step 2: Circuit

That's how I connected all this stuff. For power supply I use 2 Samsung INR18650-30Q connected in series. About motors, I connect 2 motors in parallel to each motor outputs- PWMA(Left side), PWMB(Right side).Make sure that motors will rotate in one direction when you connect it.
Step 3: MIT App Inventor

I used MIT app Inventor, because it is a simple way to create an Android app and it has voice recognition.
This app contains text field- you can enter IP address of esp server, button- after you press the button, you can command your car by voice.
OK, let's look how this works.
Step 4: Button Block

When you press button it calls voice recognition and you can say some command.
Step 5: Handling Block

After voice recognizer got the command we should handle it.
Program sends web requests in depend on what command was. If voice recognition fails or you said some other command that not in our list, we do nothing.
Step 6: Response Block

Here we getting response from esp. If response code 200, all is fine.
Step 7: ESP Code
This code deploys web server on esp.
#include <ESP8266WiFi.h>
#include <WiFiClient.h>
#include <ESP8266WebServer.h>
#include <ESP8266mDNS.h>
MDNSResponder mdns; // Replace with your network credentials const char* ssid = "ssid"; const char* password = "password"; ESP8266WebServer server(80); String webPage = "OK"; int right = 4; int left = 5; int dirR=2; int dirL=0; void setup(void){ // preparing GPIOs pinMode(right, OUTPUT); pinMode(left, OUTPUT); pinMode(dirL, OUTPUT); pinMode(dirR, OUTPUT); digitalWrite(right, LOW); digitalWrite(left, LOW); digitalWrite(dirR, LOW); digitalWrite(dirL, LOW); delay(1000); Serial.begin(115200); WiFi.begin(ssid, password); Serial.println(""); // Wait for connection while (WiFi.status() != WL_CONNECTED) { delay(500); Serial.print("."); } Serial.println(""); Serial.print("Connected to "); Serial.println(ssid); Serial.print("IP address: "); Serial.println(WiFi.localIP()); if (mdns.begin("esp8266", WiFi.localIP())) { Serial.println("MDNS responder started"); } server.on("/", [](){ server.send(200, "text/html", webPage); }); // handling commands server.on("/go", [](){ server.send(200, "text/html", webPage); digitalWrite(dirL, LOW); digitalWrite(dirR, LOW); digitalWrite(right, HIGH); digitalWrite(left, HIGH); delay(300); digitalWrite(right, LOW); digitalWrite(left, LOW); }); server.on("/around", [](){ server.send(200, "text/html", webPage); digitalWrite(dirL, LOW); digitalWrite(dirR, HIGH); digitalWrite(right, HIGH); digitalWrite(left, HIGH); delay(530); digitalWrite(right, LOW); digitalWrite(left, LOW); }); server.on("/gogogo", [](){ server.send(200, "text/html", webPage); digitalWrite(dirL, LOW); digitalWrite(dirR, LOW); digitalWrite(right, HIGH); digitalWrite(left, HIGH); delay(1000); digitalWrite(right, LOW); digitalWrite(left, LOW); }); server.on("/back", [](){ server.send(200, "text/html", webPage); digitalWrite(dirL, HIGH); digitalWrite(dirR, HIGH); digitalWrite(right, HIGH); digitalWrite(left, HIGH); delay(300); digitalWrite(right, LOW); digitalWrite(left, LOW); }); server.on("/left", [](){ server.send(200, "text/html", webPage); digitalWrite(dirR, LOW); digitalWrite(dirL, HIGH); digitalWrite(right, HIGH); digitalWrite(left, HIGH); delay(130); digitalWrite(right, LOW); digitalWrite(left, LOW); }); server.on("/right", [](){ server.send(200, "text/html", webPage); digitalWrite(dirR, HIGH); digitalWrite(dirL, LOW); digitalWrite(right, HIGH); digitalWrite(left, HIGH); delay(130); digitalWrite(right, LOW); digitalWrite(left, LOW); }); server.begin(); Serial.println("HTTP server started"); } void loop(void){ server.handleClient(); }
When you uploaded code to esp you should open COM port to see what address of esp server and type it in text field in MIT app Inventor.
Step 8: Demonstration Video
I'm currently freelancer. For hiring, you can contact me at about.prototype@gmail.com

Runner Up in the
Voice Activated Challenge


