

Introduction: WHEELIE CHEAT DEVICE


In this project we will make arduino device, that helps you learn wheelie. It will press your rear brake which will balance you. It will also have 2 buttons to increase or decrease angle in which it will be pressing your brake so it will be much more easier to adjust it on the go. I personally got better at wheelies after i started using this device. So let's get into building this device.
Step 1: What You Will Need

- Arduino (I am using Nano because of its size)
- mpu6050 accelerometer sensor (you can find it everywhere)
- 100uF capacitor (for smoothing voltage on servo motor)
- servo motor (try to use one with metal gears and at least 2kg of force)
- 2x 10kOhm resistors
- 2x buttons
- hose clamp (for attaching servo motor to handlebars)
- 3 mini breadboards or 1 big
- wires
- metal wire for attaching brake to servo motor arm
- USB cable for arduino
- Power bank for powering your device
Step 2: Connecting Everything Together

This is very easy to connect. Adding 100uF capacitor is optional but it will be much smoother and servo will have more torque. So if you want, connect 100uF capacitor between + and - on servo. Try using breadboard connectors, so it will be much more compact.
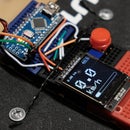
Step 3: Making It Compact

Put everything in breadboard and try to do it as smallest as possible.
Step 4: Mounting Main Computer on Bike


Mount it on main tube of bicycle frame and secure it with velcro strap. Make sure you leave the usb port free and dont bend anything.
Step 5: Mounting Battery


Secure your battery to the bottle holder with some clear tape. Try, if there is enough lenght of usb wire to connect battery and main computer.
Step 6: Mounting Servo and Connecting It to the Brake Lever


Here comes the main part. It will be much easier for servo to pull hydraulic brakes than wire brakes so make sure that if you dont have hydraulic brakes, use a stronger motor. Secure your servo motor on the handlebars with hose clamp. If you are scared that you will damage your plastic on he servo, use some foam to protect it. Also check if youhave enough space to put your hand on. Next, take a wire and put it closest to the center of rotating on servo motor and as far as possible from center of rotating on brakes. This way it will be easiest to pull brake for servo.
Step 7: Code
Attachments

Step 8: Understanding the Code and Using It


This code basically get values from mpu6050 and according to that value (I use x direction but there is also y so if you want than try it) it triggers servo motor to pull the brake. I also added 2 buttons som everythime you press it, it will increase or decrease angle by 1 degree. For that reason you should hold button so you dont have to press it 90 times if you want 90 degrees. And after 90 degrees it will come back to 0 degrees .
Step 9: Check If It Is Working
Step 10: Final Product

If you have it done and it is working, it is probably time to test it. But dont forget your helmet and good luck.

Participated in the
Arduino Contest 2020


