

Introduction: Walnut Side Table Lamps


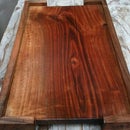

I wanted to create side lamps using left over walnut scrap wood and was inspired but this design. The final product had a distinct departure from the original which was too pyramidal for my liking. I drafted a plan, old school style: paper and pen.
Step 1: Scrap Stock: Cut, Glued and Ready


I gathered all of my walnut scrap stock. Mind you I planed these boards myself. In the future I would used store bought stock so I don't run into gaps when glued up.
Stock is 4" wide, cut them to about 6" in height. Final dimensions vary. Glued them, clamped them and let them dry for 10 hours. As you can see because I don't have many clamps, I used 2 and just lined all the stock. Lazy? Yes.
Step 2: Cut to Rough Size


I decided to not go with a pyramid look at all. So I set my chop saw to 10 degrees and cut 2 sides down.
I noticed that because my planing was rushed when I made these boards from scratch, there were some gaps between them. I had an inspiration in the middle of the night: I would use leather trim I had left over to embed flush into the wood.
So I used the height of the leather to set my table saw, set the fence to about 1/2" for the border and started carving away. Don't rush this step. I had to free hand it, and let's just say I took too much off and the 1/2" border had to be adjusted on ALL due to this one mistake.
I used a chisel to even the surface then coarse sanding to prep it for the leather glue up.
NOTE: the table saw scarfing cuts looked really nice on their own and I would use that as the final look as an alternative. It makes the stock look like a motorcycle engine block with the heat ventilation thingies. Not sure what they are called.
Step 3: Leather Trim


I used the carved out section as a template, cut out leather trim, labels them for each side with an arrow indicating which side is up, did a dry fit then used cement glue on both ends and trimmed the excess. Sanded the sides of wood and tops with 300 sandpaper.
Step 4: Electrical Components


Socket and Edison bulbs were from local hardware store, cloth cord and components were from my fave Etsy merchant. The cord color adds a great pop to the end product. Walnut has rich brown/blonde warm tones, so you might want to go with a cool color like Teal, Blue or Green for balance, OR you can go warm all the way and choose Red or Gold cord. Anything but black or white chords. In this case I chose Green cord in homage to the green leaves that once flourished on the walnut tree that would eventually give birth to these lamps.
I drilled a hole 2" deep to fit in the socket, then drilled through to take the hollow screw thru which the cable will connect to the socket. Cut the cord 2' out installed switch. Then threaded everything.
Step 5: Final Touches and Product


The cable needs space from the bottom, so I nailed felt thingies. Then came my fave part: oiling the wood. I used an orange bees waxy product. Even the leather gets the oil treatment. About 3 coats and the walnut comes to life. I also chose Edison bulbs that flared up to bring balance to the pyramid bottom shape. Test the build and we are set. Total time: 6 hours work time spread over days. Hope you enjoyed this instructable and it inspires you to create something out of scraps. As usual: be safe, goggles, fumes , work outside ... Yada Yada.
Questions comments? Let me know. I priced these at $90 each or $170 together to raise money for our child's school. What price would pay for these if you saw them?


