

Introduction: Whiteboard Costume


Credit for sparking this costume idea goes to push_reset, who wore a dress she had made to work which was coated in chalkboard paint. I immediately thought it would be fun to use the same concept but as a whiteboard, and here it is! Also a big thank you to audreyobscura for the awesome photos.
My design goals were to make something somewhat dress-like that still provided a rigid surface for ease of writing, and could fold flat for storage. I had some stretch latex fabric at home that needed to be used, and found that while it is not a perfect substitute for a true whiteboard (you can see a halo of what was erased), it's pretty close. Whiteboard paint would likely be the most effective option, but I was concerned that the paint would chip along the seams upon folding it flat. What I also liked about the latex is that everything in this outfit can act as a dry erase board, including the pants and top.
I look forward to seeing what variations other people create! Make sure to post an "I Made It!" comment if you make your own whiteboard costume!
Step 1: What You Need

Depending on what type of outfit you are going for, you will need either latex, white board paint, or both. If using latex for anything stretchy, you need 4 way stretch pvc fabric. White board paint is available at most hardware stores.
I used one 2'x4' sheet of coroplast for the base, as it is lightweight and strong. Draft your pattern first so you know exactly how many square feet to buy. Available at TAP Plastics and some hardware stores.
The rest of the supplies I used are pretty basic: cardboard, packing tape, hot glue, velcro, a good knife, sewing machine, eyelets, zip ties.
Step 2: Make the Pattern


First, a few notes about fit. I wanted the dress to fit well enough at the waist to stay up on its own, and have an hourglass shape. This meant the skirt had to be very full to compensate for the boxy top half, yet still small enough that it would be possible to walk in a crowded environment. I started with a longer skirt (shown above), but it was impossible to sit down. The final result is barely a skirt, but I think going this short is the most practical option for sitting (still difficult, but possible) and walking purposes.
On to pattern making! Compared to a normal dress pattern, this is easy. I recommend using cardboard or another readily available, rigid material to draft your pattern.
I started with the front piece of the top bodice by holding the bottom of a piece of cardboard to my waist, marking where I guessed the princess seams would lie, then drawing where I wanted to top corners to be. The result should be a trapezoid for the most flattering shape. From there I connected the dots and cut out my first piece, and continued this process around my body. As it was difficult to reach my back, I primarily used measurements to draft what I guessed the pieces should be, and adjusted from there. It took a few iterations to make a six sided box best fit my body, but the trial and error process with cardboard is fast.
It is fine if your six bodice pieces vary in length at the waist (your front and back pieces will likely be longer), but they should not be too dramatically different. If they are, bring the longer pieces in just at the waist, and move that distance to the side panels. Once you are content with the fit, take a moment to make sure all the vertical connecting edges align properly (see last photo). Make sure it is big enough to breath and move easily, yet fitted enough to stay up and move your arms comfortably.
Once the top bodice is done, the skirt is easy. I simply drew trapezoids that are around a foot wide along the bottom and 13" tall, with the top measurement matching the waist of each of the six pieces from the bodice. I only drafted three panels for pattern making purposes (just enough to test the spread and length of the skirt), and I drew them precisely in the next step. I'd recommend testing out three panels in cardboard before cutting in coroplast, as these measurements will vary by person and desired effect.
Step 3: Cut Coroplast


Take your drafted pattern, and trace the pieces precisely on the coroplast. I cut everything out with a sharp rock knife and straight edge. As you will be fitting the pieces together at an angle, I made a second angled cut at every vertical seam to allow the outside edges to meet flush.
Once everything is cut out, tape it together around the outside with packing tape, and see your dress start to take shape! Make sure to leave the opening of the top and bottom in the same place (in my case on the side). I decided to keep the top and bottom as separate sections to enable flat storage after use, however if you don't care about that you could tape the whole thing together for a more seamless surface.
Step 4: Attach Vinyl, or Paint


Now it's time to coat your surface. Regardless of if you choose to use vinyl or dry erase paint, it's a good idea to sand the surface first so there is some texture. Clean it off thoroughly.
If using vinyl, lay your pieces down and cut vinyl to shape, with a margin around the outside of about 1". Use spray adhesive to attach the vinyl, working quickly in sections of about a foot at a time so it doesn't dry. Take care to avoid bubbles as you slowly wipe the fabric down.
If using paint, I imagine you would want to wrap the top and bottom edges with tape first, then apply the paint to the entire dress in its 3D form to avoid cracking. I'm very curious about this method, so if anyone tries it be sure to add your findings in the comments!
Step 5: Create Closure


After some trial and error I found that most tapes and glues will not stick to the shiny side of vinyl. They will stick to the fabric side and the coroplast however. To hold down the edges I used hot glue, which worked as it was fabric side to plastic, and glued down the entire perimeter.
I kept things low tech and used velcro for the opening. I glued one side down along the inside of the bodice (make sure you have some coroplast here to glue to, as otherwise it won't stick), and sewed the other side to a strip of vinyl, which I glued down along the inside of the other panel. The only problem is that the strip does not stick where the outside vinyl had already been glued down along the inside, which means the closure is not as tight as I'd like. I could have sewn the strip to the outside piece of vinyl before glueing it down to make the closure more precise, but in the interest of time I decided it was good enough and moved on to the rest of the costume.
Step 6: Dress Complete!


With that, the dress portion of your costume is complete! On to everything else!
Step 7: Pens


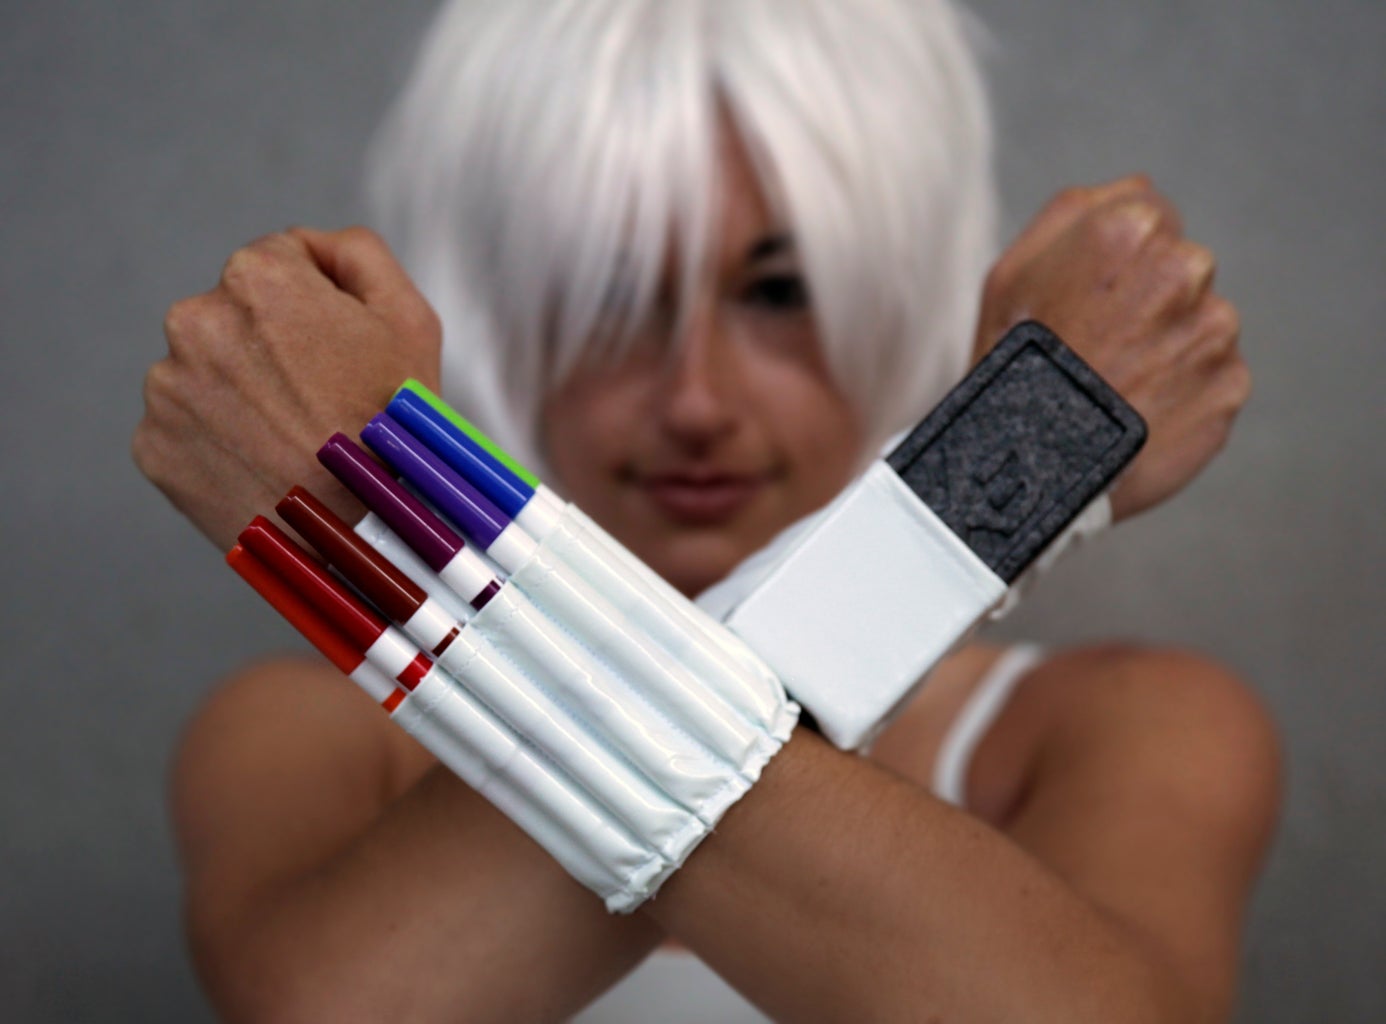
To have pens and eraser at the ready, I decided to make wrist compartments for them. This gives the outfit a nice super-hero like appeal. The images pretty much tell the story of how I made the marker holder, just be mindful that after image 3 you will need to run a seam along the bottom openings so the pens stay put.
As a side note about pens, if you do choose to use vinyl, remember that it is not a 100% erasable surface. What I found interesting is that erasability also varies greatly by color - some stained and some erased in full. I bought a 16 pack and tested them all by drawing and erasing the next day, and chose to use the colors which erased the best.
Step 8: Eraser


Next I used a similar method to make an eraser holder. I considered integrated cleaning fluid as well, but felt it would be too bulky.
Keep in mind that adding a tiny bit of water to the eraser is necessary if the drawings have been there for a while, otherwise you will have a hell of a time trying to remove them. However if you erase within a few minutes the eraser alone should work just fine.
Step 9: Pants


This was the biggest and most unanticipated pattern making nightmare, so be warned. I figured that since the vinyl is 4 way stretch that it would be like making any other pair of stretch leggings, but oh no, I was so wrong. For vinyl to look good it has to be a perfect skin tight fit. Initially I simply copied a pair of leggings that fit well with some generous seam allowances as latex isn't as stretchy as spandex, but upon sewing them together and seeing the awful wrinkled mess, I took the whole thing apart and literally pinned the pieces together on my body until the fit was perfect.
If you aren't ready to take this on, I would recommend buying a pair (I haven't ordered these before, but I think their fit is likely pretty good), or going for a shiny spandex. Obviously any drawings on spandex will not be erasable, but it is also much more comfortable.
Step 10: Top


As the bodice moves around a lot, I needed a top to wear underneath as well. I draped a basic crop top using a dress form and chose to have a lace up back, which removed a lot of the pattern fine-tuning that was required with the pants.
Construction was simple - I sewed the three pieces together with a half inch seam allowance, then folded the seam allowance outwards and sewed a channel to the outside of the seam wide enough to insert some boning. I was out of boning, so I used zip ties. Once they were in, I folded down the top and bottom, and finished the edges with a zig zag stitch (necessary for stretch).
To finish the back, I folded the back over with an inset piece of non-stretch fabric to support the eyelets, as well as some boning (best to use on either side of the eyelets, but I just put it on one side). Even with the non-stretch fabric inset my eyelets are starting to wander because of how stretchy the latex is, so I'd recommend using the nicer two sided eyelets if you have them.
Once the back is complete, add some straps, and you're done!
Step 11: Put It All Together!


Because I made the top and bottom of the dress separately for ease of storage, the pieces need to be taped together along the waist to stay put as a single item. You'll want to tightly duct taped the two halves together before putting it on for a seamless look.
For the rest of the outfit I wore some platform boots I already owned, and bought a white wig to really complete the look. Don't forget to have fun with makeup too!
Enjoy your interactive costume this halloween!

Participated in the
Halloween Costume Contest


