

Introduction: Wine Bottle Stoppers


Bottle stoppers are simple yet rewarding projects for the wood lathe. A quick trip to the wine aisle of your favorite wine supplier will show that the choices of wine stoppers are limited to uninspired plastic to way overpriced chrome items. By creating your own you can add a unique flair that can be a conversation piece for years to come. One can use just about any wood species and design options are limited only by the imagination of the turner. Bottle stoppers require inserts made of cork, stainless steel, or chrome plated metal. Stoppers make great gifts and can provide some quick cash for those in the craft sales business. For this project, I will make a simple bottle stopper made of Sycamore with a stainless insert. The project typically takes about 30 minutes for an experienced turner and about an hour for those just starting out. On a scale of difficulty from 1 to 10 where 10 is an advanced artistic hollow form, I would estimate this project to be a 2.
Step 1: Project Materials:


Wood:
As I mentioned in the intro, most any species of wood can be used for a bottle stopper. For this demonstration, I will use Sycamore as it is readily available and turns well. The stopper project requires a piece of stock that is 2”W x 2”D x 2 ½”L.
Accessories:
The stopper will require an insert for sealing the bottle. The inserts are sold at a number of online and local woodworking shops. See above for stainless steel insert.
Tools:
Wood Lathe (Powermatic 4424 at TechShop)
Drill (preferably a drill press)
3/8" Drill bit
Skew
Small Spindle Gouge
Spindle Roughing Gouge
Parting Tool
Small mallet
Stopper Mandrel (See above)
Sanding paper (100, 240, 320, 400)
Finish of choice
Step 2: Project Setup:

Setup the lathe for spindle turning. Remove the drive center from the headstock and set aside.
Remove any drive chucks, if installed.
Inspect the tool
rest for deep nicks or other problems that would cause the tools to hang during
use.
Inspect live center
(tail stock end) to ensure it spins freely.
Cut blank as noted
above with the grain running along the 2 1/4 length.
Mark the center on
one end of the blank on the end designated as the bottom.
Drill a 3/8"
hole that is 1" deep into the blank at the center mark.
Use the bottle stopper mandrel to create threads in the drilled hole by tightening the mandrel
in the stopper blank until it is flush with the bottom.
Install the blank
and mandrel on the lathe.
Bring the tail stock
up until the live center is 1/2" from the blank and lock the tail stock in
place. Extend the live center until it makes very firm contact with the blank.
Bring the center the
banjo/tool rest on the work piece. Bring the tool rest to within 1/8" of
the work piece. Position the tool rest 1/4" below center for the first
operation.
Spin the work piece
to ensure it turns freely and does not contact anything.
We are now ready to
begin turning the stopper.
Step 3: Safety:
Before launching into the project, I want to remind everyone of a few quick safety considerations: Always wear safety glasses/goggles and a face shield. Make sure that no clothing, jewelry, or hair is dangling in or around the turning parts. A lathe will pull things into it a speed faster than human reaction time. Make sure all lathe switches and locking devices are serviceable. Make sure that the tool rest stays close to the work surface when turning. Be sure to make and maintain contact with the tool rest before making contact with the work piece. Never turn your back or walk away from a turning lathe!
Step 4: Turning the Project:


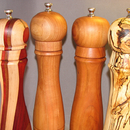
We will begin by roughing or removing the rough edges from the piece. Using the Spindle roughing gouge, slowly begin introducing the tool at a slight upward angle to the wood. The tool will cut away the wood and remove the square edges. Continue roughing until the wood is in the form of a cylinder. Ideally, you should have a 2" cylinder remaining. Once done with, the roughing, we have to decide on a design. Stoppers can range from ornamental to very functional. For ornamental designs one can study classical spindle designs and find any number of options. To retain a purely functional element, the final design should have a rounded or flat top for pounding the stopper in and a grip for pulling the stopper free. I have included a few examples of both functional and ornamental for consideration.
We will turn an "acorn" style for this example. This stopper features an ornamental design that makes for a great conversation piece. It has a narrow bottom to allow a firm grip when inserting and removing from bottle. Using the gouge, begin removing the wood at the base and taper the cut toward the top. This step creates a cone of wood that is slightly larger than the mandrel at the bottom. The top will extend to a point that is 2" from the edge of the mandrel. Using the parting tool, cut a deep channel beginning at the 2" mark from the mandrel. This cut can be all the way to the end of the blank from this mark.
Step 5: Shaping the Stopper:

Continue shaping the stopper to your liking. Making coves and beads at appropriate points add a bit of style to the project. Once you are confident that the design is close to finished, we will remove stock until the bottom of the wood matches the top of the mandrel or is larger depending on your design. This ensures that the stopper insert will match the bottom of the stopper in diameter. If you are satisfied with final design, it is time to part of the top. Using the parting tool remove the remaining wood until only a 1/8 nib remains. Using the skew turned on edge with the long tip down, we cut a "V” groove until the nib is cut free.
Stop the lathe and
back the tailstock away from the work. Slide the tool rest and banjo around to access the free end of the stopper. Make sure the work piece turns freely and then start the lathe. Using the skew as a scraper, gently remove any remaining nib from the end of the piece. Now we are ready to sand and finish...
Step 6: Finishing the Project:

Sanding can be accomplished by removing the tool rest and turning lathe to the lowest speed.
Applying the abrasive to the work piece in this manner is an efficient way of
sanding, but does have a drawback. The sanding for spindle work is usually
against the grain and thus creates sanding marks that are not natural and
distract from the beauty of the wood. To counter this, we will do some final
sanding by hand in the direction of the grain while the lathe is off. We will
do this hand sanding in between each grit to ensure clean grain direction
sanding before progressing to the next grit.
Continue with your sanding
until you have reached a desired level of smoothness. At this point, you can
apply finish. Some finishes are best applied while the piece is on the lathe.
DO NOT USE cloth applicators while the lathe is turning as this can pull your
hands into the turning lathe.
After completing the
finishing step. You are ready to assemble the stopper. Remove the stopper from
the mandrel and install the stopper insert. Viola! You have a beautiful new
bottle stopper to share and enjoy.
Sources:
The sources named here are available in any internet search for woodturning
supplies and are not provided as recommendations.
Craft Supplies: http://www.woodturnerscatalog.com/t/4/-/12/52/Bot...
SS Niles: http://nilesbottlestoppers.com/
Penn State: http://www.pennstateind.com/store/bottle-stopper-k...
Arizona Silhouette: http://www.arizonasilhouette.com/category/bottle-s...
I made it at
TechShop on the Powermatic 4424 Lathe: http://www.techshop.ws


