

Introduction: Wire Helicopter


I had a few odds and ends laying about, so, of course, I had to build something! Below is my completed wire helicopter project. Took about an hour. Very pleased with the result! The main rotor spins really well when I pick up the helicopter. My three year old son will love it!
Supplies:
Metal rods (Aluminum I believe)
Random assortment of gears (I didn't use all of them)
Paper clips
Rubber bands (x3)
Step 1: Creating the Main Rotor


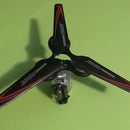
Here we go! To start, I bent the first metal rod into a flat S curve. To help reinforce the shape and give a nice look, I then wound one rubber band on each propeller. To get the propeller to stay on the rod, I pushed on the smallest gear and interweaved a rubber band to get the rotor to stay on.
Step 2: Main Frame


Using three separate metal rods, I bent out the basic shape of a helicopter. I bent one rod to be a larger helicopter shape than the other two as this served as the middle of the helicopter. The next part was a little tricky, but I bent paperclips to hold the three metal rods in the exact shape I wanted. Once the paper clips were in place, the frame held well.
Step 3: Incorporating the Main Rotor and Rear Rotor


I used paper clips to hold the propeller metal rod against the middle body rod. Using the paper clips in this way allows the rotor to spin freely when I twist the bottom handle. Speaking of, once the propeller rod was held firmly in place, I bent the bottom to serve as a handle to twist, as well as to become a stand for the helicopter to rest on. It took some tweaking to get the balance just right, but I'm very happy with the resulting stability.
For the rear rotor, I simply added a gear to look like a spinning back propeller. To hold it in place, I used the my remaining paper clip.
And, voila! A fun, working helicopter out of office supply leftovers. Can't want to show my son!

Participated in the
Homemade Gifts Contest 2017

Participated in the
Metal Contest 2017


