

Introduction: Wood Floating Shelves


Time: 20 hours
Cost: ~$100 for all three
Tools: Table and/or circular saw, hammer, drill, driver, level, clamps, extra long drill bit for floating shelf hangers, miter saw or bow saw with miter box, sanding tools, dremel (not absolutely required), pin nailer (optional), measuring tape (calipers help), wood glue, stain, polyurethane
Background: My wife asked for some floating shelves in the kitchen so here are some floating shelves I built for our kitchen. They were pretty simple to build, but installing was a nightmare. Basically, you need to ensure that your floating shelf hanger rods are dead straight or else you are in for a lot of headaches later on. These particular shelves are 30" wide and 8" deep each. The load capacity will depend heavily on the Brackets used, but you should be able to get 50 - 60lb per shelf if you are drilling into studs.
Supplies
Wood Buy List:
- 1x 72" long 1x3 S2S Pine
- 1x 96" long 1x3 S2S Pine
- 1x 2'x4'x1/4" plywood (I used the Sande Dimensions brand from HD)
- 1x 2'x4'x1/2" plywood (same brand, type, and grain as above)
- 3x 96" long 1x2 common board or pine
You will also need to buy Floating Shelf Hanger Brackets (I bought two COLSEN Floating Shelf Bracket Black Heavy Duty 6 Inch 4 Packs from Amazon and they were fine once I figured out some were slightly off on angle). An extra long drill bit will be needed to drill the holes for the brackets once built up.
Step 1: Cut the Wood


First, I ripped the 1x3 Pine down to 2" thick and the 1x2s were then ripped down to 1" on a table saw. For the 2"thk pieces, you will need 3x 30-1/2" long pieces with both ends mitered at 45 degrees. Then cut 6x 8-1/4" long pieces with a 45 degree miter at one end only. The extra 1/4" is to allow you to trim flush after assembly.
The 1" thick pieces were all cut to 29" long. I would recommend cutting one and then using this as your go by to cut cut all the others at the same time (or in two batches) on the miter saw as shown in the photo.
The plywood was cut into 3x each 29" x 7-1/4" rectangles. I used a table saw to rip to width and then a miter saw to finish off the length.
Step 2: Stain the Wood


Everything was stained using Minwax Dark Walnut. I would highly recommend staining prior to build in case you get glue squeeze out.
Step 3: Assemble the Shelves


To assemble the shelves, lay down a piece of the 1/2" plywood, stain side down. Add the front and side pieces with the mitered edges using wood glue and clamp everything together. Flush cut the extra length of the side rails when done so that they are in line with the plywood. I put some finish nails near the miters to hold those in place. If there is a slight gap between the miters, lightly hit the corners with a hammer until the gaps are closed. When you are finished, people won't be able to notice the difference.
After the glue has set, you can start adding in the 1" thk support pieces. I inset the first piece about 1/2" from the edge to match the thickness of my Floating Shelf Brackets. Then the remaining two supports were spaced off the first by using two 3/4" thick pieces of scrap wood. Everything was glued down in place and I added some finish nails to the sides going into the supports. This probably isn't needed but it adds some sturdiness.
Once those are in place, liberally add glue to the top of each support as well as three edges of the 1/4" thk plywood piece. Installed the 1/4" plywood into the opening with stain side facing out and clamp everything until the glue sets. Make sure your clamps are in line with the supports or else you risk bowing or breaking the plywood.
Step 4: Provide Clearance for the Hangers

My Brackets were slightly larger than the openings in the back so I used a dremel to make clearance. The lateral location of the brackets should be determined by the location of your wall studs where the shelves are to be hung.
Step 5: Install the Brackets

Since I had three shelves I tried three different install methods: drilling and installing brackets into shelves first then marking locations on walls, installing brackets on wall first and then drilling holes in shelves, and a hybrid of the two that worked so poorly I won't even go into details.
Overall, I recommend attaching the brackets to the wall first to ensure everything is level and true. Then you can mark the location of each post on the back of the shelf and drill the holes.
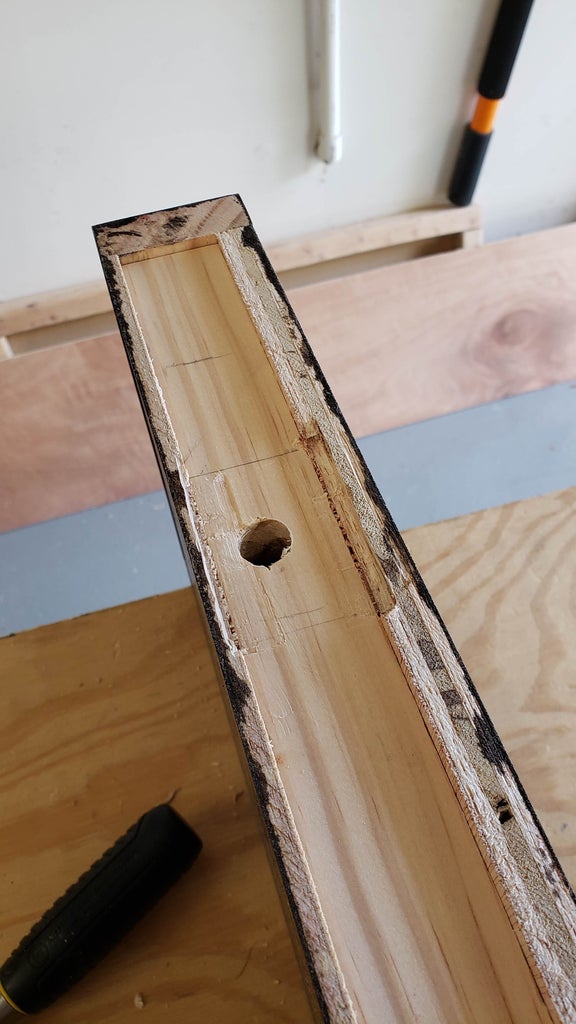
When drilling the holes, use a drill press or drill guide with a small bit diameter to get a perfectly perpendicular hole on the first support piece only. Then enlarge the hole in steps out to your final diameter. Once you reach final diameter, drill through the other two supports to get everything in line.
NOTE: because these shelves are enclosed, some wood shavings will get stuck inside during drilling. If that bothers you, you can always hold them upsidedown and shake the shavings out through the holes.
Step 6: Install the Shelves

Put the shelves on the wall and enjoy your handiwork! Don't be alarmed if they don't go on right away. If the Brackets are off by even a degree, it will make things tough. I had to loosen the Bracket bolts ever so slightly to allow them to move a bit against the drywall.

Participated in the
Shelving Contest


