

Introduction: Worlds Smallest Drone!


Welcome to my instructable!
Today I will be building the worlds smallest homemade quadcopter!
I was inspired to build a micro quadcopter after reading punkkills amazing instructable on a micro 105 fpv quadcopter. After reading the instructable and a couple weeks of research, I really wanted to build one! Flying around with a mini quad seemed like so much fun.
So I ordered all my parts and waited to build a micro 105 quadcopter!
... Unfortunately, as you may know, no project goes as planned. After the parts arrived I realized I had ordered the wrong motors...
Instead of buying the beefy 8.5mm motors like I had planned, I had ordered 6mm motors!
No worries I thought, lets build the worlds smallest quadcopter!
Step 1: Parts


Main Parts
1. Flight Controller: Micro Scisky
2. Motors: JJRC H8 Replacement 6mm Motors
3. Battery and Charger: I had originally bought a pack of 750 mah batteries that came with a charger, however it was too heavy for the quad to take off. On Ebay, I found a JJRC 150mah battery for about $10 and I use the charger from the old batteries
Link to ChargerLink to New BatteryHigh Quality Charger
4. Micro Props. I bought two packs, but it turned out to be WAY too much, I would just buy 1 if I were you.
5. JST Connector. Using a Male and Female connector to connect battery to charger and quadcopter
6. TX. Heres where it might get complicated. The Micro Scisky is a DSM2 RX. In order to communicate, I bought a whole new Mkron T TX and it was a nightmare to set up. If you already have a trusty TX I would by a OrangeRX DSMX/DSM2 Module
Tools
3d Printer
Scissors
Lighter
3d Filament Link to my favorite filament
Hot Glue
Rubber Band
Soldering Iron/Solder
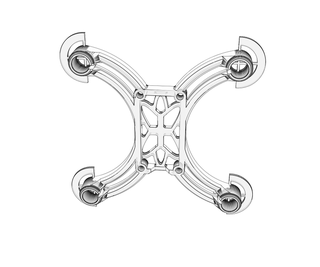
Step 2: 3d Printing


To start, I went on thingiverse and found a 105 quadcopter frame I thought looked pretty cool.
However...I dont have 8.5mm motors!
So I shrunk the frame down in Cura and pressed print on the 3d printer I built!
And... messed up again... The frame was a little bit too tight for the motors, so using a lighter, I warmed up the pla and squeezed the motors into place. But more on that later...
No 3d Printer? Just print using 3d hubs for a cheap and easy way to get the frame without printing it yourself!
(Special thanks to Paintballmagic for creating Beefy Remix Micro 105 FPV Quadcopter)
All I really did, was shrink Paintballmagic's frame from 8.5mm motor mounts to 4mm.
Settings I used:
Height: 0.2 mm
Thickness: 1.0 mm
Fill: 10%
Speed: 50 mm/s
Temp: 210
Printed using 1.75 PLA filament.
Below is the File I used
Attachments
Step 3: Wiring


First I decided on which way my quad would face, then using the picture guide on cleanflight,
I set my quad into a quad x, which means the motors are oriented:
4 2
3 1
Motor 4: Clockwise
Motor 3: Counter Clockwise
Motor 2: Counter Clockwise
Motor 1: Clockwise
But how do I know if a motor is Clockwise or Counter Clockwise?
It may be different for you depending on where you buy your motors, but my motors followed a typical
Blue/Red: Clockwise
Black/White: Counter Clockwise
Format. If your unsure, I would check with you dealer or read the items description
Wiring the FC
Wiring the Flight Controller was much simpler then I anticipated.
The board is clearly marked with a 3.7 + and a - in the dead center for the battery. So using the female JST connecter, I soldered the wires to the respective terminals
The Motor terminals were also clearly marked, with make wiring a breeze.
So a simply soldering motor 1 to the motor 1 mount, motor 2 to the motor 2 mount and so on...
And that was it!
Creating the Battery
to power the drone, I bought a pack of 3.7v batteries that came with a charger, however they were to heavy and I bought a much smaller 150mah battery later.
To connect the FC with the Battery, I cut the leads of the lipo (Making sure not to short it out) and soldered on a female JST connector, while the FC got a male JST connector.
Thats it!
Next was time to program the FC which... I wish I could say was as easy as soldering...
Step 4: Programming


Get ready for the most frustrating moment of your life.
I have never worked with such a..."annoying" flight controller as the micro scisky, However im not the greatest at programming.
I used many guides and how to's that I found on the web, All the sites I used will be listed below.
Well first of all I had to setup the Tx to be able to communicate with the Rx of the fc
luckily they both operated in dsm2, however the TX was a piece of junk.
To be able to fly the quad you must follow this video (Not mine)
Once I completed that, I plugged the fc into CleanFlight and began the programming/Nightmare part of the build
Be sure not to plug in the battery at the same time as the usb plug as it can fry your board
Flashing
Once I plugged in the board, I flashed the fc with the lastest software
Binding
After plugged in, the red led is flashing fast meaning it can bind with the TX. Bind it by holding Bind and Powering on the TX
Configuration tab.
Choose Quad X and motor stop.
Receiver mode should be RX_Serial, serial receiver provider should be SPEKTRUM1024
Set minimum throttle 1000, mid throttle 1500, Maximum throttle 2000, Minimum command 1000.
Set failsafe to anything below min throttle value so the drone doesnt flyway when there is no signal
Reciever Tab
Check TAER 1234.
Check to see that the sticks move in the respective catagories. You may have to reverse them!
*If your values dont seem right, edit using the CLI by typing "rxrange <Channel Number> <Min> <Max>" *
Keep in mind that the min value MUST be below the arming value or your quad wont move.
Modes Tab
Click add range and then using the channels on your TX add modes
Keep in mind you must add an Arming Switch for the micro scisky and TX pair that I used
I have not tried all Flight modes, and I normally stick to Acro. However this is your quad! Choose any mode you like to fly in.
Heres a cool guide that lists all the flight modes
CLI
Type: set motor_pwm_rate=23200 (others use 32000); press enter
type: set deadband=6; press enter
Then: set yaw_deadband=6; press enter
Then: save (don't forget); press enter
Then Tune PID to your likings and save
DONT FORGET TO CLICK SAVE ON EVERY PAGE!!!
Step 5: Final Touches


At this point you're pretty much done!
Just add the mini props to the motors, matching the Clockwise Props to the Clockwise Motors and Counter Clockwise Props to Counter Clockwise Motor.
And your quad is ready for flight!
Plug in the 3.7v battery using the jst connectors and take off!
Have Fun Flying!
Thats about it! I hoped you enjoyed my instructable and I hope you build this quad as well! If theres any questions or suggestions you may have, simply ask in the comments below!
Also dont forget to follow me on Instrucatbles and Youtube to be notified of my new projects or inventions that I may make.
Thanks for reading!

Participated in the
Drones Contest 2016

Participated in the
Maker Olympics Contest 2016


